Honda CR-V: Radiator Replacement
For Japan-produced Model
1. Drain the engine coolant.
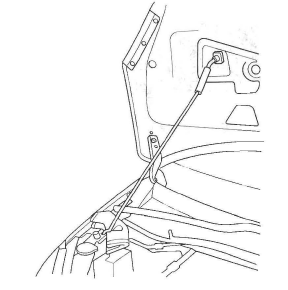
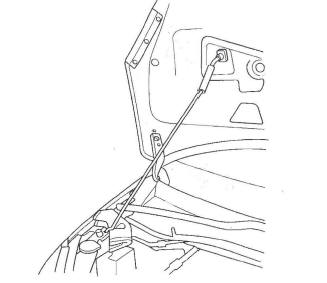
2. Remove the hood support rod, then use it as shown to prop the hood in the wide-open position.
3. Remove the bulkhead cover.
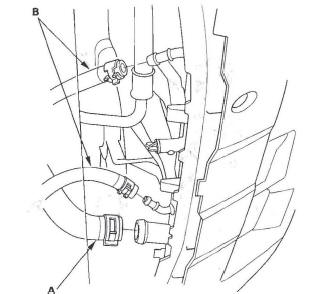
4. Remove the coolant reservoir hose (A) and upper radiator hose (B).
5. Raise the vehicle on the lift to full height.
6. Remove the splash shield.
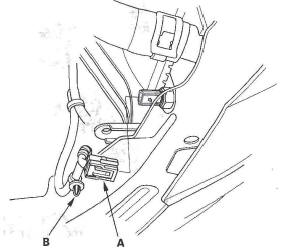
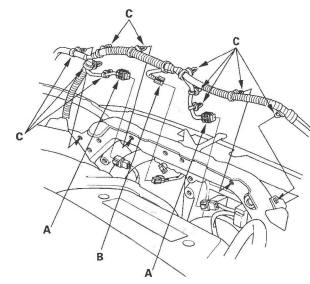
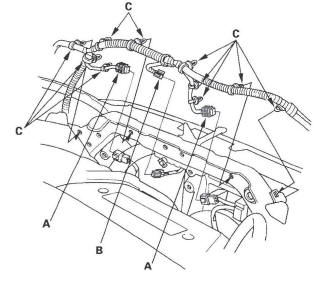
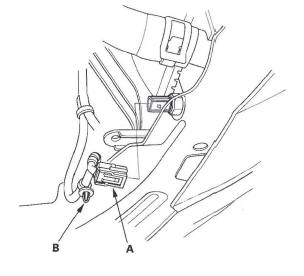
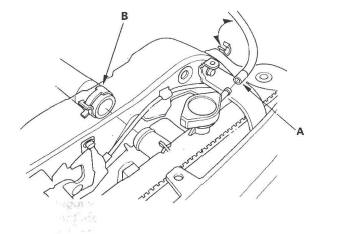
7. Disconnect the engine coolant temperature (ECT) sensor 2 connector (A), and remove the harness clip (B).
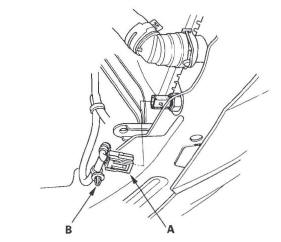
8. Remove the lower radiator hose (A).
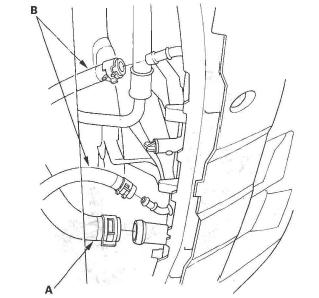
9. Remove the automatic transmission fluid (ATF) cooler hoses (B), then plug the hose and line.
10. Lower the vehicle on the lift.
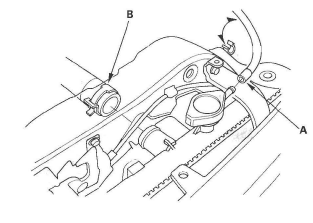
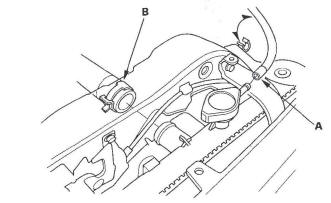
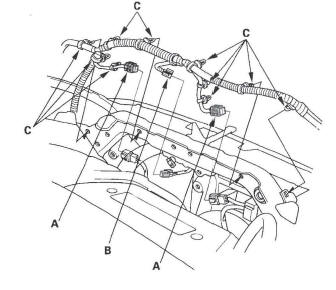
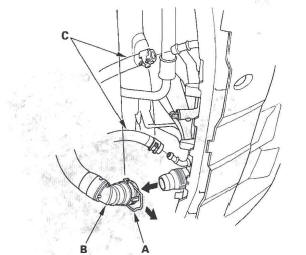
11. Disconnect the fan motor connectors (A) and hood switch connector (B), then remove the harness clips (C).
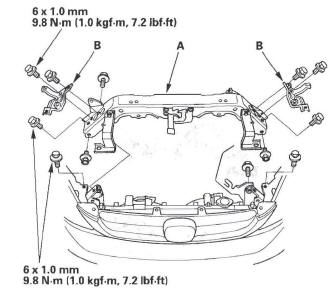
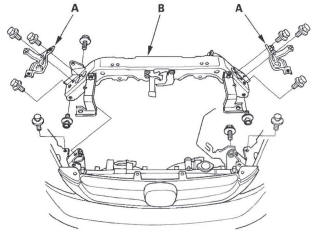
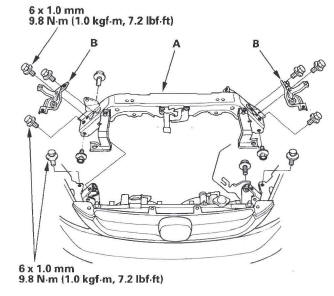
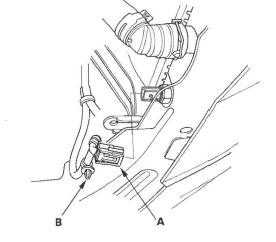
12. Remove the radiator upper brackets (A), then remove the front bulkhead (B).

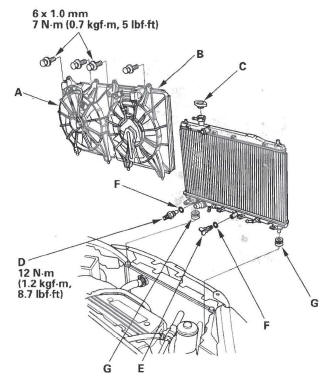
13. Pull up the radiator, then remove the radiator fan shroud assembly (A), A/C condenser fan shroud assembly (B), radiator cap (C), ETC sensor 2 (D), and drain plug (E).
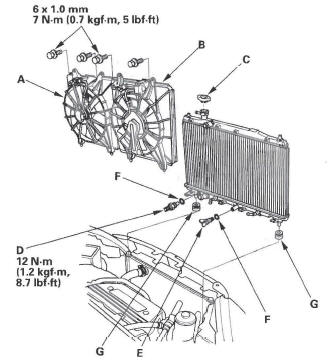
14. Reassemble the radiator with new O-rings (F).
15. Install the radiator. Make sure the lower cushions (G) are set securely.
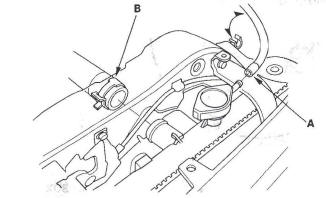
16. Install the front bulkhead (A), then install the radiator upper brackets (B).
17. Apply body paint to the bulkhead mounting bolts.
18. Connect the fan motor connectors (A) and hood switch connector (B), then install the harness clips (C).
19. Raise the vehicle on the lift to full height.
20. Install the lower radiator hose (A) and ATF cooler hoses (B).
21. Connect the engine coolant temperature (ECT) sensor 2 connector (A), and install the harness clip (B).
22. Install the splash shield.
23. Lower the vehicle on the lift.
24. Install the coolant reservoir hose (A) and upper radiator hose (B).
25. Install the bulkhead cover.
26. Refill the radiator with engine coolant, and bleed the air from the cooling system with the heater valve open (see step 6).
For U.S.A.-produced Model
1. Drain the engine coolant.
2. Remove the hood support rod, then use it as shown to prop the hood in the wide-open position.
3. Remove the bulkhead cover.
4. Remove the coolant reservoir hose (A) and upper radiator hose (B).
5. Raise the vehicle on the lift to full height.
6. Remove the splash shield.
7. Disconnect the engine coolant temperature (ECT) sensor 2 connector (A), and remove the harness clamp (B).
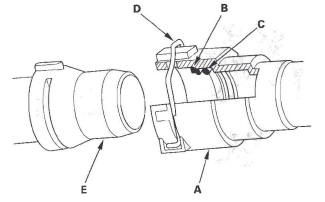
8. Clean any dirt off the quick connector (A), radiator, and lower radiator hose.
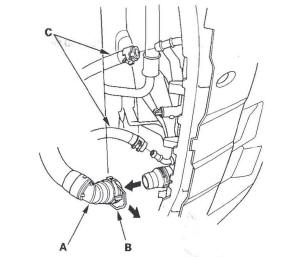
9. Pull out the lock (B) by hand, then wiggle the quick connector loose, and remove it from the radiator.
Do not use any tools to remove the quick connector.
10. Remove the automatic transmission fluid (ATF) cooler hoses (C), then plug the hoses and lines.
11. Lower the vehicle on the lift.
12. Disconnect the fan motor connectors (A) and hood switch connector (B), then remove the harness clips (C).
13. Remove the radiator upper brackets (A), then remove the front bulkhead (B).
14. Pull up the radiator, then remove the radiator fan shroud assembly (A), A/C condenser fan shroud assembly (B), radiator cap (C), ETC sensor 2 (D), and drain plug (E).
15. Reassemble the radiator with new O-rings (F).
16. Install the radiator. Make sure the lower cushions (G) are set securely.
17. Install the front bulkhead (A), then install the radiator upper brackets (B).
18. Apply body paint to the bulkhead mounting bolts.
19. Connect the fan motor connectors (A) and hood switch connector (B), then install the harness clips (C).
20. Raise the vehicle on the lift to full height.
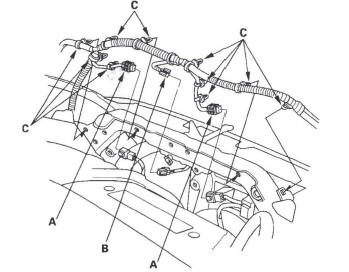
21. Check the quick connector (A) and set ring (B) for cracks or damage. If the connector and/or set ring are cracked or damaged, replace the connector.
22. Make sure the set ring is in place inside the quick connector. If the set ring is displaced or not properly seated in the connector, replace the quick connector.
23. Replace the O-ring (C) in the quick connector.
24. Check the lock (D). If the lock is damaged or deformed, replace it. When installing the new lock to the connector, slide it straight down along the groove.
25. Install a new lower radiator hose on the quick connector, and install the clamp.
26. Clean the connecting surface of the radiator (E), then apply clean engine coolant around the connecting surface.
27. Push down the lock (A), then push the quick connector (B) onto the radiator until you hear it click.
28. Install ATF cooler hoses (C).
29. Connect the engine coolant temperature (ECT) sensor 2 connector (A), and install the harness clip (B).
30. Install the splash shield.
31. Lower the vehicle on the lift.
32. Install the coolant reservoir hose (A) and upper radiator hose (B).
33. Install the bulkhead cover.
34. Refill the radiator with engine coolant, and bleed the air from the cooling system with the heater valve open (see step 6).
READ NEXT:
 Fan Controls
Component Location Index
RADIATOR FAN RELAY
A/C CONDENSER FAN RELAY
FAN CONTROL RELAY
A/C CONDENSER FAN ASSEMBLY
RADIATOR FAN ASSEMBLY
ENGINE COOLANT TEMPERATURE
(ECT) SENSOR 1
E
Fuel and Emissions Systems
Special Tools
Fuel Sender Wrench
Fuel Pressure Gauge Attachment Set
Vacuum/Pressure Gauge, 0-4 in.Hg
Pressure Gauge Adapter
Oil Pressure Hose
A/T Pressure Hose
A/T Low Pressure
SEE MORE:
General Troubleshooting Information
How to Check for DTCs with the Honda
Diagnostic System (HDS)
When the powertrain control module (PCM) senses an
abnormality in the input or output system, the D
indicator (A) in the gauge control module (tach) (B) will
usually blink.
When the Honda Diagnostic System (HDS) is connected
to the data l
All Children Should Sit in a Back Seat
According to statistics, children of all
ages and sizes are safer when they
are restrained in a back seat.
The National Highway Traffic Safety
Administration and Transport
Canada recommend that all children
aged 12 and under be properly
restrained in a back seat. Some
states have laws
