Honda CR-V: Maintenance
Lubricants and Fluids
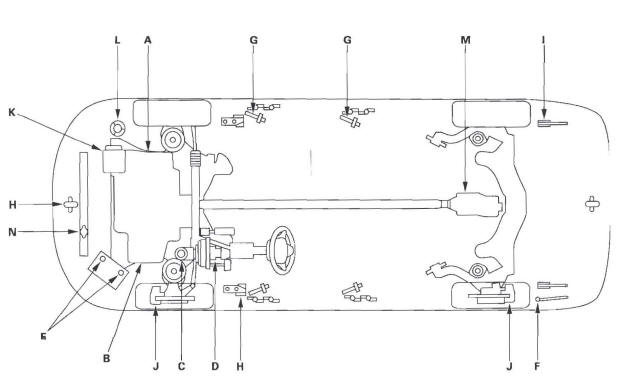
For details of lubrication points and type of lubricants to be applied, refer to the illustrated index and various work procedures (such as Assembly/Reassembly, Replacement, Overhaul, Installation, etc.) contained in each section.
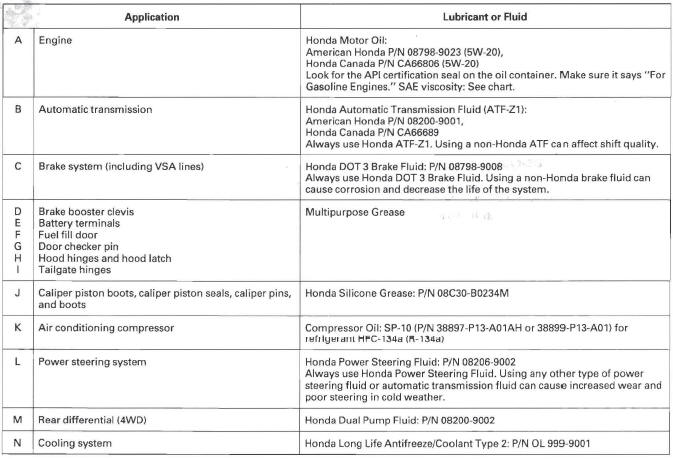
API CERTIFICATION SEAL

Recommended Engine Oil
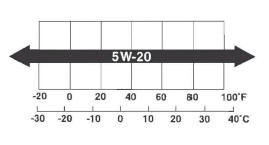
Engine oil viscosity for ambient temperature ranges
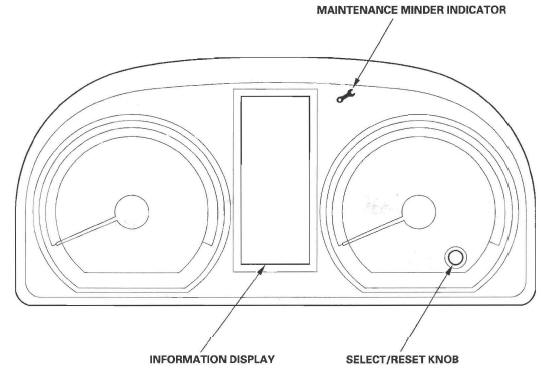
Maintenance Minder
General Information
Maintenance Display
The Maintenance Minder is an important feature of the information display. The CR-V's onboard computer (PCM) calculates the remaining engine oil life and automatic transmission fluid life. The system also displays the code for other scheduled maintenance items needing service.
Service Information
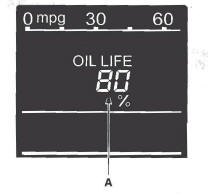
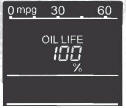
1. The remaining engine oil life (A) is shown as a percentage on the information display. To see the current engine oil life, turn the ignition switch to the ON (II) position, then push and release the SELECT/ RESET knob repeatedly until the engine oil life displays.
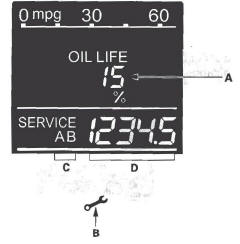
2. When the ignition switch is in the ON (II) position, and the remaining engine oil life (A) is 6 % to 15 %, the remaining engine oil life and other scheduled maintenance item(s) needing service are displayed.
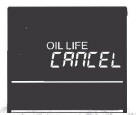
The maintenance minder indicator (B) also comes on when the engine oil life is 15 % or less. To cancel the display and the indicator, press the SELECT/RESET knob.
- Complete list of maintenance main items (C)
- Complete list of maintenance sub items (D)
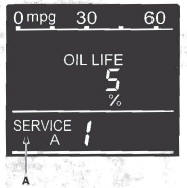
3. When the ignition switch is in the ON (II) position, and the remaining engine oil life is 1 % to 5 %, the message "SERVICE" (A) is displayed along with engine oil life and the same maintenance item code(s).
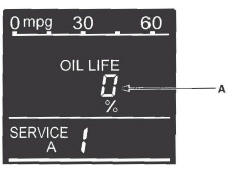
4. When the ignition switch is in the ON (II) position, and the remaining engine oil life is 0 %, the engine oil life indicator (A) blinks.
Pressing the SELECT/RESET knob cancels the display, but the maintenance minder indicator stays on.
5. If the indicated maintenance is not done, the engine oil life indicator shows a negative mileage, for example "-10": on the display. If the negative mileage is between 0 and -9, the indicator is displayed for only a few seconds when the ignition switch is turned to the ON (II) position.
The negative mileage remains displayed after the vehicle is driven more than 10 miles (for USA models) or 10 km (for Canada models) after 0 % oil life is reached. This means the indicated maintenance item(s) should have been done more than 10 miles (or 10 km) ago.
Resetting the Maintenance Information Display
NOTE:
- The vehicle must be stopped to reset the display. If a
required service is done and the display is not reset.
or if the maintenance display is reset without doing the service, the system will not show the proper maintenance timing. This can lead to serious mechanical problems because there will be no accurate record of when the required maintenance is needed.
- The engine oil life, and the maintenance items can be reset independently only with the HDS.
1. Turn the ignition switch to the ON (II) position.
2. Push and release the SELECT/RESET knob repeatedly until the engine oil life indicator is displayed.
3. Press and hold the SELECT/RESET knob for about 10 seconds. The information display shows the reset mode display.
NOTE: If you are resetting the display when the engine oil life is more than 15 %, make sure any maintenance item(s) requiring service are done before resetting the display.
4. Press and hold the SELECT/RESET knob for another 5 seconds. The maintenance item code(s) will disappear, and the engine oil life will reset to "100".
Maintenance Main Items
If the message "SERVICE" does not appear more than 12 months after the display is reset, change the engine oil every year.
NOTE:
- Replace the brake fluid every 3 years (independent of the maintenance messages in the information display).
- Inspect idle speed every 160,000 miles (256,000 km).
- Adjust the valves during services A, B, 1,2, or 3, only if they are noisy.
- Replace engine oil
- Engine oil capacity without engine oil filter: 4.0 L (4.2 US qt).
- Replace engine oil and oil filter
- Engine oil capacity with engine oil filter: 4.2 L (4.4 US qt).
Inspect front and rear brakes
- Check pads and discs for wear (thickness), damage, and cracks.
- Check calipers for damage, leaks, and tightness of mounting bolts.
Check parking brake adjustment
- Check the number of clicks (6 to 7) when the parking brake pedal is pressed with 294 N (30 kgf, 66 lbf) of force.
Inspect tie-rod ends, steering gearbox, and gearbox boots
- Check rack grease and steering linkage.
- Check boots for damage and leaking grease.
Inspect suspension components
- Check bolts for tightness.
- Check condition of ball joint boots for deterioration and damage.
Inspect driveshaft boots
- Check boots for cracks and boot bands for tightness.
Inspect brake hoses and lines including VSA
- Check the master cylinder and VSA modulator-control unit for damage or leakage.
Inspect all fluid levels, condition of fluids, and for leaks.
- Engine coolant
- Automatic transmission fluid (ATF)
- Rear differential fluid
- Power steering fluid
- Brake fluid
- Windshield washer fluid
Inspect exhaust system*
- Check catalytic converter heat shields, exhaust pipes, and muffler for damage, leaks, and tightness.
Inspect fuel lines and connections*
- Check for loose connections, cracks, and deterioration; retighten loose connections and replace damaged parts.
NOTE: According to state and federal regulations, failure to do the maintenance Items marked with an asterisk (*) will not void the customer's emissions warranties. However, Honda recommends that all maintenance services be done at the recommended interval, to ensure long-term reliability.
Maintenance Sub Items
- Rotate tires, and check tire inflation and condition.
- Follow the pattern shown in the Owner's Manual.
- Replace air cleaner element
- Replace every 15,000 miles (24,000 km), if the vehicle is primarily driven in dusty conditions.
Replace dust and pollen filter
- Replace the filter at 15,000 miles (24,000 km) intervals if the vehicle is primarily driven in urban areas that have high concentrations of soot in the air from industry and diesel-powered vehicles.
- Replace the filter whenever airflow from the heating and cooling system is less than normal.
Inspect drive belt
- Look for cracks and damage, then check the position of the drive belt auto-tensioner indicator.
- Replace automatic transmission fluid
- Capacity 2WD: 2.6 L (2.7 US qt), 4WD: 2.5 L (2.6 US qt), use Honda Automatic transmission fluid(ATF-Z1)
- Replace spark plugs
- Use IZFR6K11 (NGK) or SKJ20DR-M11 (DENSO).
Inspect the valve clearance (cold)
- Intake: 0.21-0.25 mm (0.008-0.010 in.),
Exhaust: 0.28-0.32 mm (0.011-0.013 in.).
- Replace engine coolant
- Capacity (including reservoir): 5.0 L (1.32 US qt); use Honda Long Life Antifreeze/Coolant Type 2.
- Replace rear differential fluid
- Capacity: 1.2 L (1.3 US qt); use Honda Dual Pump Fluid.
READ NEXT:
 Starting System
Component Location Index
STARTER CUT RELAY
UNDER-DASH
FUSE/RELAY BOX
STARTER
Starter Circuit Troubleshooting
Performance Test
Removal and Installation
Overhaul
Ignition System
Component Location Index
SPARK PLUG
Inspection
IGNITION COIL
Ignition Timing Inspection
Removal/Installation
Circuit Diagram
Ignition Timing Inspection
1. Conne
SEE MORE:
Lock-up System
The lock-up mechanism of the torque converter clutch operates in D position
(2nd, 3rd, 4th, and 5th), and in D position
D3 driving mode (2nd and 3rd). The pressurized fluid is drained from the back of
the torque converter through a fluid
passage, causing the torque converter clutch piston to be he
Troubleshooting
Troubleshooting - B-CAN System
Diagnosis Test Mode A
Check the PCM for DTCs, and troubleshoot PCM or F-CAN loss of communication errors
first, then do this diagnosis if the symptom is related to
the B-CAN system.
NOTE: Always cycle the ignition switch within
3 seconds when prompted in the DTC troub
