Honda CR-V: Damper/Spring
Damper/Spring Removal and Installation
Removal
1. Turn the ignition switch ON (II), then turn on the windshield wipers. Turn the ignition switch off when the wipers are near the A-pillars.
2. Raise the front of the vehicle, and support it with safety stands in the proper locations.
3. Remove the front wheel.
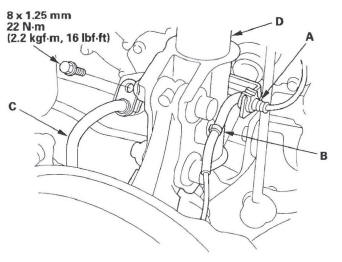
4. Remove the wheel sensor harness guide (A), the harness clip (B), and the brake hose (C) from the damper (D). Do not disconnect the wheel sensor connector.
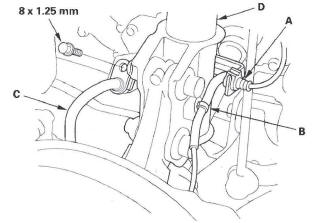
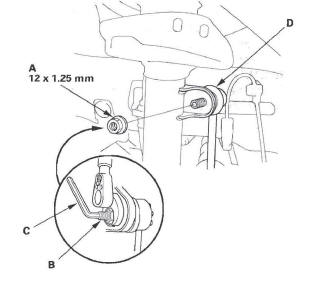
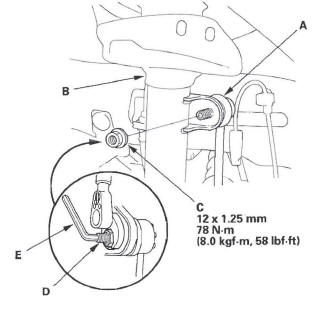
5. Remove the flange nut (A), while holding the joint pin (B) with a hex wrench (C), and disconnect the stabilizer link (D) from the damper.
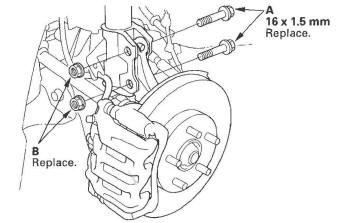
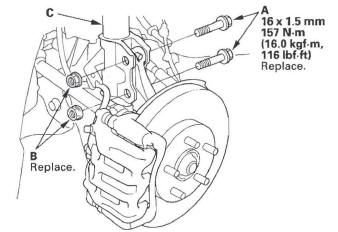
6. Remove the damper pinch bolts (A) and self-locking nuts (B) from the damper.
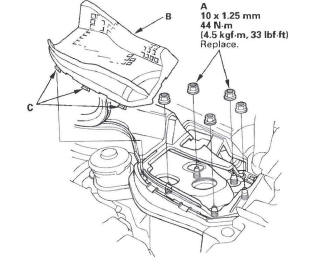
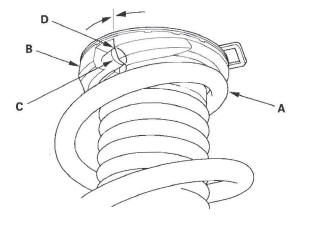
7. Remove the lid (A) by releasing the hooks (B).
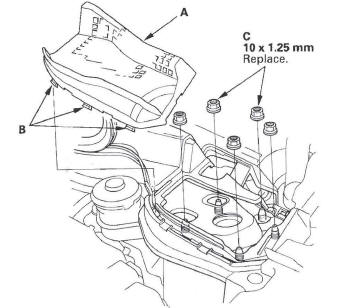
8. Remove the flange nuts (C) from the top of the damper.
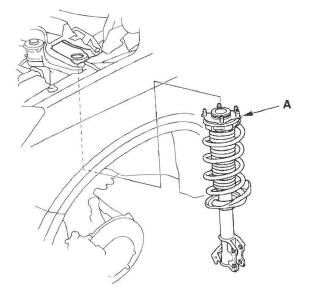
9. Remove the damper assembly (A).
NOTE:
- The damper springs are different, left and right.
Mark the springs L and R before you continue.
- Be careful not to damage the body.
Installation
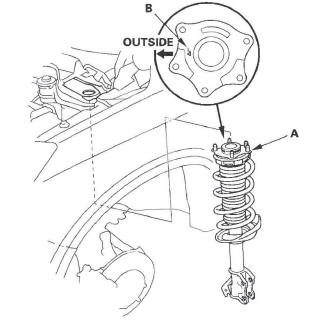
1. Install the damper assembly (A) on to the frame.
Note the direction of the damper mounting base so that the stamp (B) on it is toward the outside of the vehicle.
NOTE: Be careful not to damage the body.
2. Loosely install new flange nuts (A) to the top of the damper.
NOTE: Install the lid (B) by pushing the hooks (C) into place securely after tightening the flange nuts to the specified torque value.
3. Loosely install new damper pinch bolts (A) and new self-locking nuts (B) to the damper (C).
4. Connect the stabilizer link (A) to the damper (B), and loosely install the flange nut (C), while holding the joint pin (D) with the hex wrench (E).
5. Install the wheel sensor harness guide (A), the harness clip (B), and the brake hose (C) to the damper (D).
6. Raise the front suspension with a floor jack to load the suspension with the vehicle's weight.
7. Tighten the damper pinch bolts and the self-locking nuts to the specified torque value.
8. Tighten the flange nuts on top of the damper to the specified torque value.
9. Install the lid.
10. Clean the mating surface of the brake disc and the inside of the wheel, then install the rear wheel.
11. Check the wheel alignment. and adjust it if necessary.
Damper/Spring Disassembly, Inspection, and Reassembly
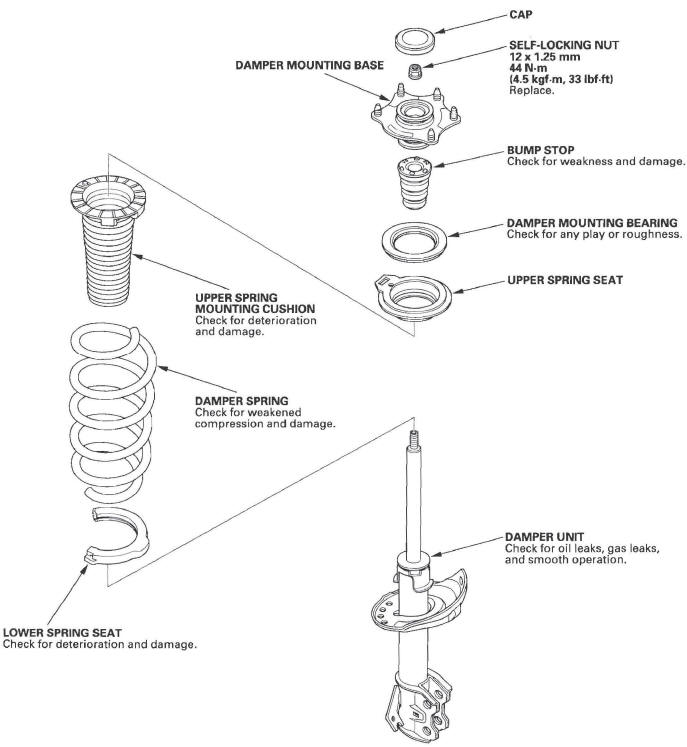
Exploded View
Special Tools Required
Strut nut adapter 07 AAA-SVAA100 NOTE: When compressing the damper spring, use a commercially available strut spring compressor (Branick MST-580A or Model 7200, or equivalent) according to the manufacturer's instructions.
Disassembly
1. Remove the cap (A) from the top of the damper.

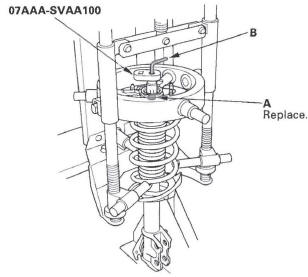
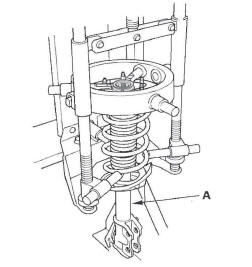
2. Compress the damper spring, then remove the self-locking nut (A) using the strut nut adapter, a ratchet or breaker bar while holding the damper shaft with a hex wrench (B). Do not compress the spring more than necessary to remove the nut.
3. Release the pressure from the strut spring compressor, then disassemble the damper as shown in the Exploded View.
Inspection
1. Reassemble all the parts, except for the upper spring mounting cushion, the bump stop, and the damper spring.
2. Compress the damper assembly by hand, and check for smooth operation through a full stroke, both compression and extension. The damper should extend smoothly and constantly when compression is released. If it does not, the gas is leaking and the damper should be replaced.

3. Check for oil leaks, abnormal noises, or binding during these tests.
Reassembly
NOTE: Assemble each of the disassembled parts by referring to the Exploded View.
1. Install the upper spring mounting cushion (A) on the upper spring seat (B) by aligning the ledge portion (C).
2. Install the damper spring (A) on the upper spring mounting cushion (B), then align the upper end (C) of the damper spring with the cushion stop (D).
3. Compress the damper spring.
4. Install all the parts except the damper mounting washer and self-locking nut onto the damper unit (A) by referring to the Exploded View.
5. Align the bottom of the damper spring (A) with the stepped part (B) of the lower spring seat.
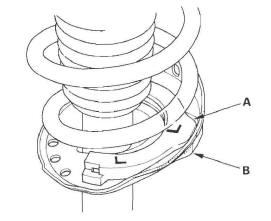
6. Align the center of raised portion (A) on the upper spring seat and the damper unit.
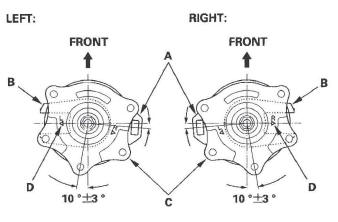
7. Align the damper bracket (B) and the damper
mounting base (C) so that " " stamp (D) on it is
toward the outside of the vehicle.
" stamp (D) on it is
toward the outside of the vehicle.
8. Install a new self-locking nut (A).
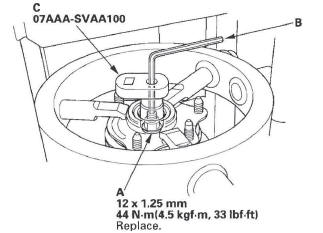
9. Hold the damper shaft using a hex wrench (B), and tighten the new self-locking nut using the strut nut adapter (C) and, a torque wrench to the specified torque value.
READ NEXT:
 Knuckle/Hub Bearing Unit Replacement
Exploded View
Hub Bearing Unit Replacement
1. Raise the rear of the vehicle, and support it with safety stands in the
proper locations.
2. Remove the wheel nuts (A) and the rear wheel.
3. Remove t
Upper Arm Replacement
1. Raise the rear of the vehicle, and support it with safety stands in the
proper locations.
2. Remove the rear wheel.
3. Place a floor jack under the trailing arm, and
support the suspension.
4.
SEE MORE:
Accelerating and Braking
For better traction on all surfaces,
accelerate slowly and gradually build
up speed. If you try to start too fast
on wet soil, mud, snow, or ice, you
might not have enough traction to
get underway, and you may dig
yourself a hole. Starting with the
shift lever in second (2) gear will
DTC 91: VSA System
1. Check the brake system for leaks or mechanical
problems.
Is the brake system OK? (No brake fluid leakage,
no air trapped in the brake system, no brake pads
worn out.)
YES-Go to step 2.
NO-Repair the brake system, then recheck.
2. Turn the ignition switch ON (II).
3. Clear the DTC with the HDS
