Honda CR-V: Cooling System
Honda CR-V (2006–2011) Service Manual / Engine Cooling / Cooling System
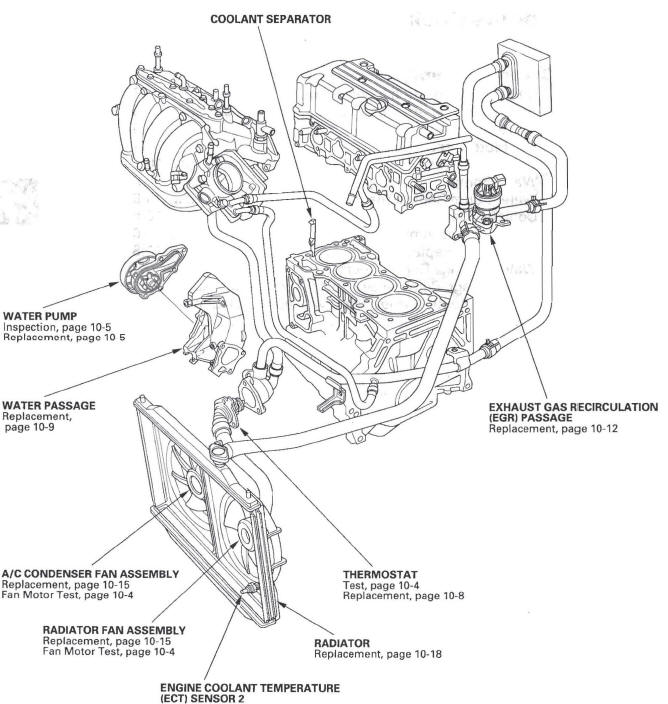
Component Location Index
-
COOLANT SEPARATOR
-
EXHAUST GAS RECIRCULATION (EGR) PASSAGE
-
THERMOSTAT
-
RADIATOR
-
ENGINE COOLANT TEMPERATURE (ECT) SENSOR 2
-
RADIATOR FAN ASSEMBLY
-
A/C CONDENSER FAN ASSEMBLY
-
WATER PUMP
-
WATER PASSAGE
- Radiator Cap Test
- Water Passage Replacement
- EGR Passage Removal and Installation
- Fan, Fan Motor, Shroud Removal and Installation
- Radiator Replacement
READ NEXT:
 Radiator Cap Test
1. Remove the radiator cap (A), wet the seal with
engine coolant, then install it on the pressure tester
(B) (commercially available).
2. Apply a pressure of 93-123 kPa
(0.95-1.25 kgf/cm2, 14-18 psi)
Water Passage Replacement
1. Drain the engine coolant.
2. Remove the alternator.
3. Remove the condenser fan shroud assembly.
4. Remove the A/C compressor without disconnecting
the A/C hoses (see step 34).
5. Remove the in
EGR Passage Removal and Installation
Removal
1. Drain the engine coolant.
2. Remove the air cleaner housing.
3. Remove the harness holder (A) from the bracket,
then remove the harness holder bracket (B).
4. Remove the upper radiator h
SEE MORE:
DTC P0128: Cooling System Malfunction
NOTE: Before you troubleshoot, record all freeze data
and any on-board snapshot, and review the general
troubleshooting information.
1. Turn the ignition switch ON (II).
2. Clear the DTC with the HDS.
3. Turn the blower switch OFF.
4. Check the FAN CTRL in the DATA LIST with the
HDS.
Is it OFF?
Blower Unit
Removal/Installation
1. Remove the glove box.
2. Disconnect the connector (A), then remove the
connector clip (B), the wire harness clips (C), the
bolts, and the glove box frame (D).
3. Cut the plastic cross brace (A) in the glove box
opening with diagonal cutters in the area shown.
Retain plastic cross brace to be r
© 2016-2026 Copyright www.hcrv.net
