Honda CR-V: Water Passage Replacement
1. Drain the engine coolant.
2. Remove the alternator.
3. Remove the condenser fan shroud assembly.
4. Remove the A/C compressor without disconnecting the A/C hoses (see step 34).
5. Remove the intake manifold.
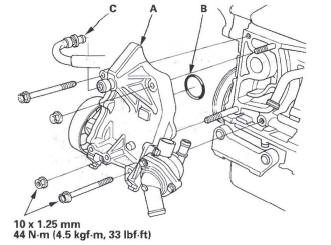
6. Remove the bolt (A) securing the connecting pipe.
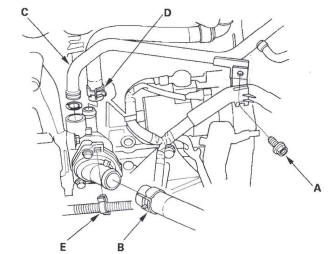
7. Remove the lower radiator hose (B), connecting pipe (C), water bypass hose (D), and harness clamp (E).
8. Remove the positive crankcase ventilation (PCV) hose (A). then remove the water passage (B).
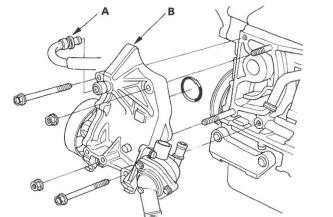
9. Remove the thermostat housing.
10. Remove the water pump.
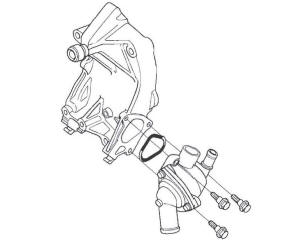
11. Install the water pump.
12. Install the thermostat housing (A) with a new O-ring (B).
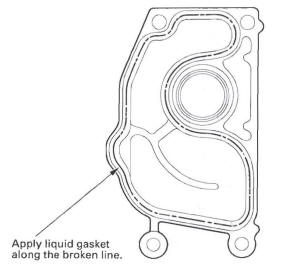
13. Clean and dry the water passage mating surfaces.
14. Apply liquid gasket, P/N 08717-0004,08718-0001, 08718-0003, or 08718-0009, evenly to the engine block mating surface of the water passage. Install the component within 5 minutes of applying the liquid gasket.
NOTE:
- If you apply liquid gasket P/N 08718-0012, the component must be installed within 4 minutes.
- If too much time has passed after applying the liquid gasket, remove the old liquid gasket and residue, then reapply new liquid gasket.
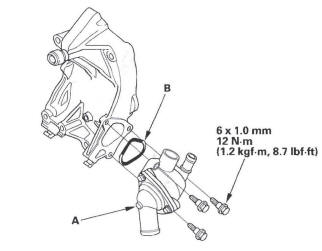
15. Install the water passage (A) with a new O-ring (B).
NOTE:
- Wait at least 30 minutes before filling the engine with oil.
- Do not run the engine for at least 3 hours after installing the water passage.
16. Install the PCV hose (C).
17. Install the connecting pipe (A) with a new O-ring (B).
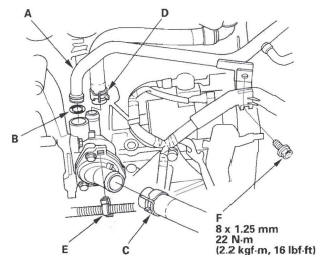
18. Install the lower radiator hose (C), water bypass hose (D), and harness clamp (E).
19. Tighten the bolt (F) securing the connecting pipe.
20. Install the intake manifold.
21. Install the A/C compressor (see step 23).
22. Install the condenser fan shroud assembly.
23. Install the alternator.
24. Refill the radiator with engine coolant, and bleed the air from the cooling system with the heater valve open (see step 6).
READ NEXT:
 EGR Passage Removal and Installation
Removal
1. Drain the engine coolant.
2. Remove the air cleaner housing.
3. Remove the harness holder (A) from the bracket,
then remove the harness holder bracket (B).
4. Remove the upper radiator h
Fan, Fan Motor, Shroud Removal and Installation
Removal
1. Remove the hood support rod, then use it as shown
to prop the hood in the wide-open position.
2. Remove the bulkhead cover.
3. Disconnect the fan motor connectors (A) and hood
switch conn
Radiator Replacement
For Japan-produced Model
1. Drain the engine coolant.
2. Remove the hood support rod, then use it as shown
to prop the hood in the wide-open position.
3. Remove the bulkhead cover.
4. Remove the co
SEE MORE:
DTC P0101: MAF Sensor Range/Performance Problem
NOTE:
Before you troubleshoot, record all freeze data and
any on-board snapshot, and review the general
troubleshooting information.
If DTC P1128, P1129, P2228, and/or P2229 are stored
at the same time as DTC P0101, troubleshoot those
DTCs first, then recheck for DTC P0101.
1. Check for poor
Selecting a Child Seat
When buying a child seat, you need
to choose either a conventional child
seat, or one designed for use with
the Lower Anchors and Tethers for
CHildren (LATCH) system.
Conventional child seats must be
secured to a vehicle with a seat belt,
whereas LATCH-compatible seats
are secured by
