Honda CR-V: DTC P0716: Problem in Input Shaft (Mainshaft) Speed Sensor Circuit
DTC P0716: Problem in Input Shaft
(Mainshaft) Speed Sensor Circuit
DTC P0717: Problem in Input Shaft
(Mainshaft) Speed Sensor Circuit (No Signal
Input)
NOTE:
- Before you troubleshoot, record all freeze data and any on-board snapshot, and review General Troubleshooting Information.
- This code is caused by an electrical circuit problem and cannot be caused by a mechanical problem in the transmission.
1. Clear the DTC with the HDS.
2. 4WD model: Raise the vehicle on a lift, make sure it is securely supported, and allow all four wheels to rotate freely.
2WD model: Raise the front of the vehicle, make sure it is securely supported, and allow the front wheels to rotate freely. Or raise the vehicle.
3. Check for proper input shaft (mainshaft) speed sensor installation. If the sensor is installed incorrectly, reinstall the sensor correctly, then go to step 36.
4. Start the engine, and turn the VSA off (the light on the VSA OFF switch comes on). Run the engine in the D position, and hold the vehicle at speeds over 35 mph (56 km/h) for more than 10 seconds. Slow down and stop the wheel.
5. Monitor the OBD STATUS for P0716 or P0717 in the DTCs/Freeze Data in A/T Mode Menu for a pass/fail.
Does the HDS indicate FA/LED? YES-Go to step 6.
NO-Intermittent failure, the system is OK at this time. Check for poor connections or loose terminals at the input shaft (mainshaft) speed sensor and the PCM. If the HDS indicates NOT COMPLETED, return to step 4 and recheck.
6. Turn the ignition switch OFF.
7. Jump the SCS line with the HDS.
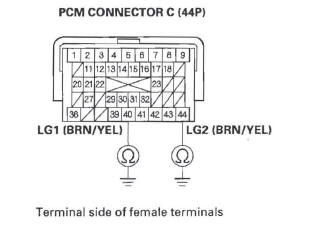
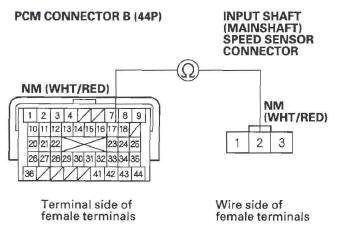
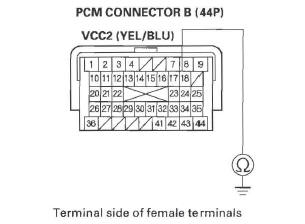
8. Disconnect PCM connector C (44P).
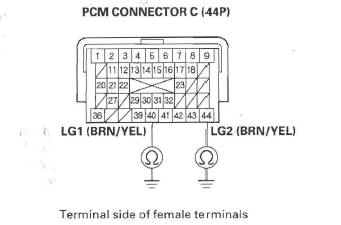
9. Check for continuity between PCM connector terminals C40 and body ground, and between C44 and body ground.
Is there continuity? YES-Go to step 10.
NO-Repair open in the wires between PCM connector terminals C40, C44 and ground (Gl0l), or repair poor ground (G 101), then go to step 36.
10. Connect PCM connector C (44P).
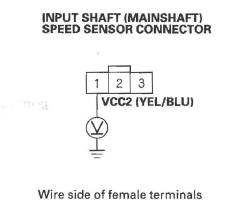
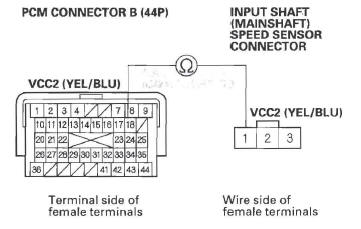
11. Disconnect the input shaft (mainshaft) speed sensor connector.
12. Turn the ignition switch ON (II).
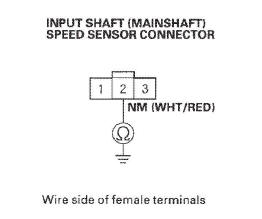
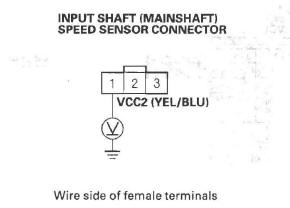
13. Measure the voltage between input shaft (mainshaft) speed sensor connector terminal No.1 and body ground.
Is there about 5 V? YES-Go to step 18.
NO-Go to step 14.
14. Turn the ignition switch OFF.
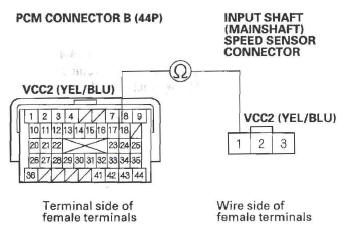
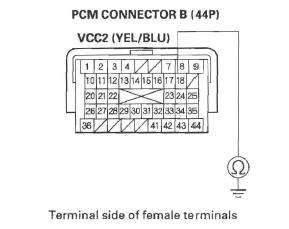
15. Disconnect PCM connector B (44P).
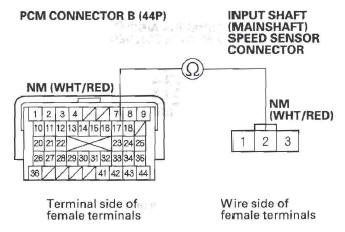
16. Check for continuity between PCM connector terminal B18 and input shaft (mainshaft) speed sensor connector terminal No.1.
Is there continuity? YES-Go to step 17.
NO-Repair open in the wire between PCM connector terminal B18 and the input shaft (mainshaft) speed sensor, then go to step 36.
17. Check for continuity between PCM connector terminal B18 and body ground.
Is there continuity? YES-Repair short in the wire between PCM connector terminal B18 and the input shaft (mainshaft) speed sensor, then go to step 36.
NO-Go to step 32.
18. Turn the ignition switch OFF.
19. Disconnect PCM connector B (44P).
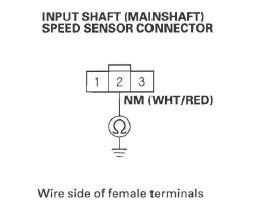
20. Check for continuity between input shaft (mainshaft) speed sensor connector terminal No.2 and body ground.
Is there continuity? YES-Repair short in the wire between PCM connector terminal B17 and the input shaft (mainshaft) speed sensor connector, then go to step 36.
NO-Go to step 21.
21. Check for continuity between PCM connector terminal B33 and input shaft (mainshaft) speed sensor connector terminal No.3.

Is there continuity? YES-Go to step 22.
NO-Repair open in the wire between the input shaft (mainshaft) speed sensor connector and PCM connector terminal B33, then go to step 36.
22. Connect PCM connector B (44P).
23. Turn the ignition switch ON (II).
24. Measure the voltage between input shaft (mainshaft) speed sensor connector terminals No.2 and No.3.
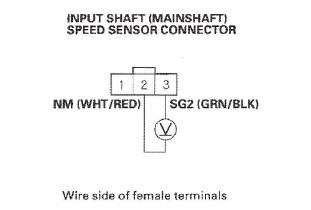
Is there about 5 V? YES-Go to step 25.
NO- Go to step 29.
25. Connect the input shaft (mainshaft) speed sensor connector.
26. Clear the DTC with the HDS.
27. Start the engine, and turn the VSA off (the light on the VSA OFF switch comes on). Run the engine in the D position, and hold the vehicle at speeds over 35 mph (56 km/h) for more than 10 seconds. Slow down and stop the wheel.
28. Monitor the OBD STATUS for P0716 or P0717 in the DTCs/Freeze Data in A/T Mode Menu for a pass/fail.
Does the HDS indicate FAILED? YES-Replace the input shaft (mainshaft) speed sensor, then go to step 36.
NO-Go to step 32.
29. Turn the ignition switch OFF.
30. Disconnect PCM connector B (44P).
31. Check for continuity between PCM connector terminal B17 and input shaft (mainshaft) speed sensor connector terminal No.2.
Is there continuity? YES-Go to step 32.
NO-Repair open in the wire between PCM connector terminal B17 and the input shaft (mainshaft) speed sensor, then go to step 36.
32. Update the A/T software in the PCM if it does not have the latest software, or substitute a known-good PCM.
33. Start the engine, and turn the VSA off (the light on the VSA OFF switch comes on). Run the engine in the D position, and hold the vehicle at speeds over 35 mph (56 km/h) for more than 10 seconds. Slow down and stop the wheel.
34. Check for DTC(s) in the DTCs/Freeze Data in A/T Mode Menu with the HDS.
Is DTC P0716 or P0717 indicated? YES-If the PCM was updated, substitute a known-good PCM (see page 14-10), then recheck. If the PCM was substituted, go to step 1.
NO-Go to step 35.
35. Monitor the OBD STATUS for P07l6 or P0717 in the DTCs/Freeze Data in A/T Mode Menu for a pass/fail.
Does the HDS indicate PASSED? YES-If the PCM was updated, troubleshooting is complete. If the PCM was substituted, replace the original PCM. If any other DTCs were indicated on step 34, go to the indicated DTC's troubleshooting.
NO-If the HDS indicates FAILED, check for poor connections and loose terminals at the input shaft (mainshaft) speed sensor and the PCM. If the PCM was updated, substitute a known-good PCM, then recheck. If the PCM was substituted, go to step 1. If the HDS indicates NOT COMPLETED, return to step 33 and recheck.
36. Clear the DTC with the HDS.
37. Start the engine, and turn the VSA off (the light on the VSA OFF switch comes on). Run the engine in the D position, and hold the vehicle at speeds over 35 mph (56 km/h) for more than 10 seconds. Slow down and stop the wheel.
38. Check for DTC(s) in the DTCs/Freeze Data in A/T Mode Menu with the HDS.
Is DTC P0716 or P0717 indicated? YES-Check for poor connections and loose terminals at the input shaft (mainshaft) speed sensor and the PCM, then go to step 1.
NO-Go to step 39.
39. Monitor the OBD STATUS for P0716 or P0717 in the DTCs/Freeze Data in A/T Mode Menu for a pass/fail.
Does the HDS indicate PASSED? YES-Troubleshooting is complete. If any other DTCs were indicated on step 38, go to the indicated DTC's troubleshooting.
NO-If the HDS indicates FAILED, check for poor connections and loose terminals at the input shaft (mainshaft) speed sensor and the PCM, then go to step 1. If the HDS indicates NOT COMPLETED, return to step 37 and recheck.
DTC P0718: Input Shaft (Mainshaft) Speed Sensor Intermittent Failure
NOTE:
- Before you troubleshoot, record all freeze data and any on-board snapshot, and review General Troubleshooting Information.
- This code is caused by an electrical circuit problem and cannot be caused by a mechanical problem in the transmission.
1. Clear the DTC with the HDS. 2. Test-drive the vehicle for several minutes in the D position through all five gears.
3. Monitor the OBD STATUS for P0718 in the DTCs/ Freeze Data in A/T Mode Menu for a pass/fail.
Does the HDS indicate FAILED? YES-Go to step 4.
NO-Intermittent failure, the system is OK at this time. Check for poor connections or loose terminals at the input shaft (mainshaft) speed sensor and the PCM. If the HDS indicates NOT COMPLETED, return to step 2 and recheck.
4. Turn the ignition switch OFF.
5. Disconnect the input shaft (mainshaft) speed sensor connector, and inspect the connector and connector terminals to be sure they are making good contact.
Are the connector terminals OK? YES-Go to step 6.
NO-Repair the connector terminals, then go to step 6.
6. Connect the input shaft (mainshaft) speed sensor connector.
7. Test-drive the vehicle for several minutes in the D position through all five gears.
8. Monitor the OBD STATUS for P0718in the DTCs/ Freeze Data in A/T Mode Menu for a pass/fail.
Does the HDS indicate FAILED? YES-Go to step 9.
NO-Troubleshooting is complete. If the HDS indicates NOT COMPLETED, return to step 7 and recheck.
9. Turn the ignition switch OFF.
10. Jump the SCS line with the HDS.
11. Disconnect PCM connector C (44P).
12. Check for continuity between PCM connector terminals C40 and body ground, and between C44 and body ground.
Is there continuity? YES-Go to step 13.
NO-Repair open in the wires between PCM connector terminals C40, C44 and ground (Gl0l), or repair poor ground (Gl0l), then go to step 34.
13. Connect PCM connector C (44P).
14. Disconnect the input shaft (mainshaft) speed sensor connector.
15. Turn the ignition switch ON (II).
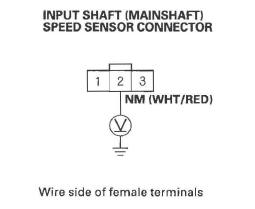
16. Measure the voltage between input shaft (mainshaft) speed sensor connector terminal No.1 and body ground.
Is there about 5 V? YES-Go to step 17.
NO-Go to step 26.
17. Turn the ignition switch OFF. , 18. Disconnect PCM connector B (44P).
19. Check for continuity between input shaft (mainshaft) speed sensor connector terminal No.2 and body ground.
Is there continuity? YES-Repair short in the wire between PCM connector terminal B17 and the input shaft (mainshaft) speed sensor connector, then go to step 34.
NO-Go to step 20.
20. Connect PCM connector B (44P).
21. Turn the ignition switch ON (II).
22. Measure the voltage between input shaft (mainshaft) speed sensor connector terminal No. 2 and body ground.
Is there about 5 V? YES-Replace the input shaft (mainshaft) speed sensor, then go to step 34.
NO-Go to step 23.
23. Turn the ignition switch OFF.
24. Disconnect PCM connector B (44P).
25. Check for continuity between PCM connector terminal B17 and input shaft (mainshaft) speed sensor connector terminal No.2.
Is there continuity? YES-Go to step 30.
NO-Repair open in the wire between PCM connector terminal B17 and the input shaft (mainshaft) speed sensor, then go to step 34.
26. Turn the ignition switch OFF.
27. Disconnect PCM connector B (44P).
28. Check for continuity between PCM connector terminal B18 and input shaft (mainshaft) speed sensor connector terminal No.1.
Is there continuity? YES-Go to step 29.
NO-Repair open in the wire between PCM connector terminal B18 and the input shaft (mainshaft) speed sensor, then go to step 34.
29. Check for continuity between PCM connector terminal B18 and body ground.
Is there continuity? YES-Repair short in the wire between PCM connector terminal B18 and the input shaft (mainshaft) speed sensor, then go to step 34.
NO-Go to step 30.
30. Update the A/T software in the PCM if it does not have the latest software, or substitute a known-good PCM.
31. Test-drive the vehicle for several minutes in the D position through all five gears.
32. Check for DTC(s) in the DTCs/Freeze Data in A/T Mode Menu with the HDS.
Is DTC P07l8 indicated? YES-If the RCM was updated, substitute a known-good PCM, then recheck. If the PCM was substituted, go to step 1.
NO-Go to step 33.
33. Monitor the OBD STATUS for P0718 in the DTCs/ Freeze Data in A/T Mode Menu for a pass/fail.
Does the HDS indicate PASSED? YES-If the PCM was updated, troubleshooting is complete. If the PCM was substituted, replace the original PCM. If any other DTCs were indicated on step 32, go to the indicated DTC's troubleshooting.
NO-If the HDS indicates FAILED, check for poor connections and loose terminals at the input shaft (mains haft) speed sensor and the PCM. If the PCM was updated, substitute a known-good PCM, then recheck. If the PCM was substituted, go to step 1. If the HDS indicates NOT COMPLETED, return to step 31 and recheck.
34. Clear the DTC with the HDS.
35. Test-drive the vehicle for several minutes in the D position through all five gears.
36. Check for DTC(s) in the DTCs/Freeze Data in A/T Mode Menu with the HDS.
Is DTC P07l8 indicated? YES-Check for poor connections and loose terminals at the input shaft (mainshaft) speed sensor and the PCM, then go to step 1.
NO-Go to step 37.
37. Monitor the OBD STATUS for P0718 in the DTCs/ Freeze Data in A/T Mode Menu for a pass/fail.
Does the HDS indicate PASSED? YES-Troubleshooting is complete. If any other DTCs were indicated on step 36, go to the indicated DTC's troubleshooting.
NO-If the HDS indicates FAILED, check for poor connections and loose terminals at the input shaft (mainshaft) speed sensor and the PCM, then go to step 1. If the HDS indicates NOT COMPLETED, return to step 35 and recheck.
READ NEXT:
 DTC P0721: Problem in Output Shaft
(Countershaft) Speed Sensor Circuit
DTC P0721: Problem in Output Shaft
(Countershaft) Speed Sensor Circuit
DTC P0721: Problem in Output Shaft
(Countershaft) Speed Sensor Circuit
DTC P0722: Problem in Output Shaft
(Countershaft) Speed Sensor Circuit (No
Signal Input)
NOTE:
Before you troubleshoot, record
DTC P0731: Problem in 1st Clutch and 1st
Clutch Hydraulic Circuit
NOTE: Before you troubleshoot, record all freeze data and any on-board
snapshot, and review General Troubleshooting Information.
1. Warm up the engine to normal operating
temperature (the radiator fa
DTC P0752: Shift Solenoid Valve A Stuck ON
NOTE: Before you troubleshoot, record all freeze data and any on-board
snapshot, and review General Troubleshooting Information.
1. Warm up the engine to normal operating
temperature (the radiator f
SEE MORE:
Important Safety Precautions
To eliminate potential hazards, read
the instructions before you begin,
and make sure you have the tools
and skills required.
Make sure your vehicle is parked
on level ground, the parking brake
is set, and the engine is off.
To clean parts, use a commercially
available degreaser or par
How the SRS Indicator Works
The SRS indicator alerts you to a
potential problem with your airbags
or seat belt tensioners.
When you turn the ignition switch to
the ON (II) position, this indicator
comes on briefly then goes off. This
tells you the system is working
properly.
If the indicator comes on at any
