Honda CR-V: ATF Temperature Sensor
ATF Temperature Sensor Test/Replacement
1. Raise the vehicle on a lift, or apply the parking brake, block the rear wheels, and raise the front of the vehicle. Make sure it is securely supported.
2. Remove the splash shield.
3. Disconnect the shift solenoid harness connector.
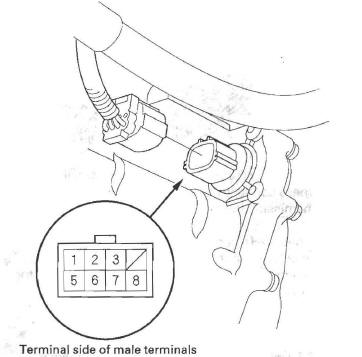
4. Measure the ATF temperature sensor resistance between shift solenoid harness connector terminals No.6 and No.7.
Standard: 50 Ω -25 k Ω
5. If the resistance is out of standard, replace the ATF temperature sensor and solenoid harness, then go to step 6. The ATF temperature sensor is not available separately from the solenoid harness.
If the measurement is within the standard, connect the connector securely, and install the splash shield.
6. Remove the drain plug (A), and drain the transmission fluid (ATF).
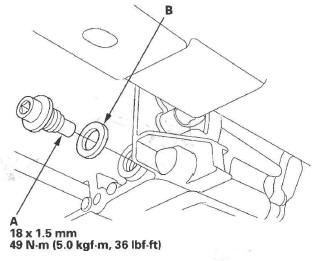
7. Reinstall the drain plug with the new sealing washer (B).
8. Make sure you have the audio system or the navigation system (if equipped) anti-theft code, and write down the audio presets.
9. Disconnect the negative terminal from the battery, then disconnect the positive terminal.
10. Remove the battery hold-down bracket, and remove the battery cover, battery, and battery tray.
11. Remove the battery base.
12. Remove the air cleaner housing and intake air duct.
13. Remove the ATF dipstick, and remove the bolts securing the ATF cooler line (A).
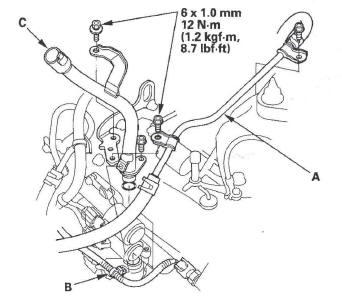
14. Remove the harness clamp (B), and remove the ATF dipstick guide tube (C).
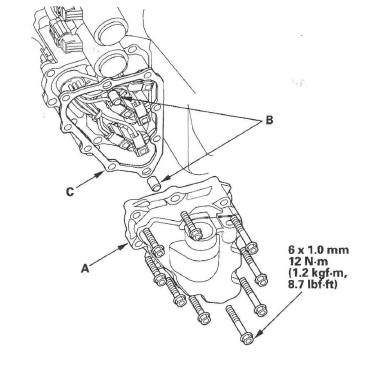
15. Remove the shift solenoid valve cover (A), dowel pins (B), and gasket (C).
16. Remove the shift solenoid harness connector (A), and replace it.
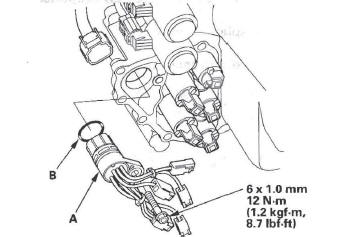
17. Install a new O-ring (B) on the shift solenoid harness connector, and install the connector in the transmission housing.
18. Connect WHT harnesses and ORN harness connector to shift solenoid valve D. The ATF temperature sensor is assembled in the connector with WHT harnesses.
19. Connect the harness terminals to the solenoids:
- RED wire connector to shift solenoid valve E.
- GRN wire connector to shift solenoid valve C.
- ORN wire connector to shift solenoid valve B.
- BLU wire connector to shift solenoid valve A.
20. Install the shift solenoid valve cover, dowel pins, and a new gasket.
21. Install the new O-ring on the ATF dipstick guide tube, and install the guide tube then secure it with the bolts.
22. Check the connector for rust, dirt, or oil, then connect the connector securely. Install the harness clamp in its clamp bracket on the ATF dipstick guide tube.
23. Secure the ATF cooler line with the bolts.
24. Refill the transmission with ATF (see step 5).
25. Install the intake air duct and air cleaner housing.
26. Install the battery base.
27. Install the battery tray, battery, battery Gover, and battery hold-down bracket, then connect battery terminals.
28. Install the splash shield.
29. Enter the audio system or the navigation system (if equipped) anti-theft code, then enter the audio presets, and set the clock.
READ NEXT:
 ATF Level Check
NOTE: Keep all foreign particles out of the transmission.
1. Park the vehicle on the level ground.
2. Warm up the engine to normal operating
temperature (the radiator fan comes on), and turn
the engi
ATF Replacement
NOTE: Keep all foreign particles out of the transmission.
1. Park the vehicle on the level ground.
2. Warm up the engine to normal operating
temperature (the radiator fan comes on), and turn
the eng
Transfer Assembly Inspection/Removal/Installation
Transfer Assembly Inspection
1. Shift the transmission into the N position.
2. Raise the vehicle on a lift, and make sure it is
supported securely.
3. Make a reference mark (A) across the propeller
SEE MORE:
Replacing Tires andWheels
Replace your tires with radial tires of
the same size, load range, speed
rating, and maximum cold tire
pressure rating (as shown on the
tire’s sidewall).
Mixing radial and bias-ply tires on
your vehicle can reduce braking
ability, traction, and steering
accuracy. Using tires of a di
DTC P2101: Electronic Throttle Control
System (ETCS) Malfunction
CAUTION
Do not insert your fingers into the installed throttle
body when you turn the ignition switch ON (II) or
while the ignition switch is ON (II). If you do, you
will seriously injure your fingers if the throttle valve
is activated.
NOTE: Before you troubleshoot, record all freeze data and any o
