Honda CR-V: PCV System
Honda CR-V (2006–2011) Service Manual / Fuel and Emissions / PCV System
Component Location Index
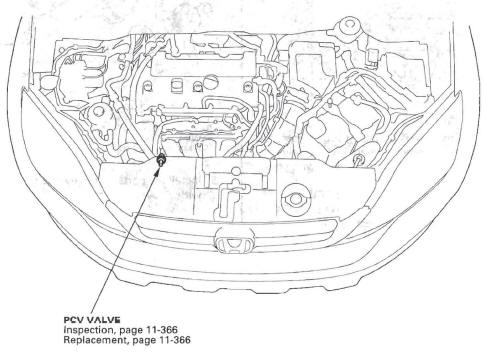
- PCV VALVE
PCV Valve Inspection
1. Check the PCV valve (A), hoses (B), and connections for leaks or restrictions.
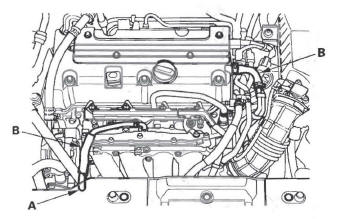
2. At idle, make sure there is a clicking sound from the PCV valve when the hose between the PCV valve and intake manifold is lightly pinched (A) with your fingers or pliers.
If there is no clicking sound, check the PCV valve washer for cracks or damage. If the washer is OK, replace the PCV valve and recheck.

PCV Valve Replacement
1. Disconnect the PCV hose.
2. Remove the PCV valve (A).
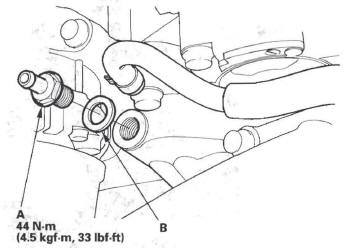
3. Install the parts in the reverse order of removal with a new washer (B).
READ NEXT:
 EVAP System
Component Location Index
EVAPORATIVE EMISSION (EVAP)
CANISTER PURGE VALVE
Replacement
POWERTRAIN CONTROL MODULE (PCM)
General Troubleshooting Information
Replacement
DTC P0443: EVAP Canister Purge Valve
Circuit Malfunction
Special Tools Required
Vacuum pump/gauge, 0-30 in.Hg, Snap-on YA4000A
or equivalent, commercially available.
NOTE: Before you troubleshoot, record all freeze data
and any on-board snapshot, and revie
SEE MORE:
Pressure Test
Special Tools Required
A/T clutch pressure gauge set
07406-0020400 or 07406-0020401
A/T pressure hose, 2,210 mm 07MAJ-PY4011A
A/T pressure hose adapter 07MAJ-PY40120
1. Make sure the transmission fluid is filled to the proper level.
2. 4WD model: Raise the vehicle on a lift, make sure it
is s
Radiator and A/C Condenser Fan Low Speed Circuit Troubleshooting
NOTE:
Do not use this troubleshooting procedure if the A/C
compressor is inoperative. Refer to the symptom
troubleshooting index.
Before doing symptom troubleshooting, check for
powertrain DTCs.
1. Check the No.7 (20 A) fuse in the under-hood
fuse/relay box, and the No. 36 (10 A) fuse in the
© 2016-2026 Copyright www.hcrv.net
