Honda CR-V: Wiper/Washer Switch Test/Replacement
1. Remove the steering column covers.
2. Disconnect the dashboard wire harness 8P connector (A) from the wiper/washer switch (B).
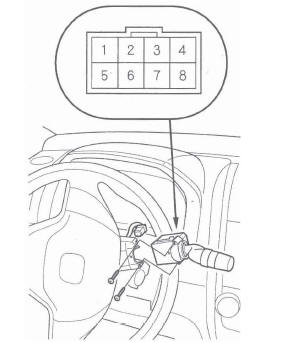
3. Remove the two screws, then slide out the wiper/ washer switch.
4. Inspect the connector terminals to be sure they are all making good contact.
- If the terminals are bent, loose or corroded, repair them as necessary, and recheck the system.
- If the terminals look OK, go to step 5.
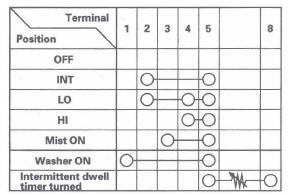
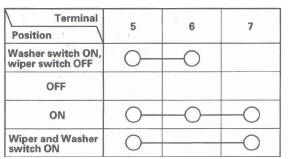
5. Check for continuity between the terminals in each switch position according to the table.
Windshield
Rear Window
6. If the continuity is not as specified, replace the switch.
7. Install the switch in the reverse order of removal.
Wiper Motor Test
Windshield
1. Open the hood. Remove the caps, nuts, and the windshield wiper arms.
NOTE: Carefully remove the wiper arms so that they do not touch the hood.
2. Remove the hood seal and cowl covers.
3. Disconnect engine compartment wire harness 5P connector C302 (A) from the windshield wiper subharness C302 (B).

4. Test the motor by connecting battery power to the No.3 terminal and ground to the No.2 terminal of the windshield wiper motor subharness 5P connector C302 (B). The motor should run at low speed.
5. Test the motor by connecting battery power to the No.5 terminal and ground to the No.2 terminal of the windshield wiper motor subharness 5P connector C302 (B). The motor should run at high speed.
6. Connect an analog ohmmeter to the No.4 and No.2 terminals, and run the motor at low or high speed. The needle of the ohmmeter should pulse.
7. If there is no pulse, or the motor does not run, or fails to run smoothly, check for continuity of the windshield wiper motor subharness, if the wire harness is OK, replace the motor.
Rear Window
1. Open the tailgate, and remove the tailgate lower panel.
2. Disconnect the 4P connector (A) from the wiper motor (B).
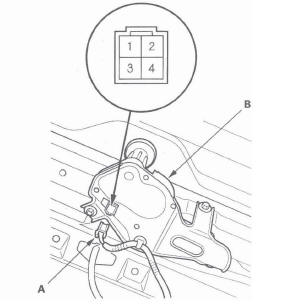
3. Test the motor by connecting battery power to the No.1 terminal and ground the No.3 terminal of the wiper motor. The motor should run. If the motor does not run or fails to run smoothly, replace the motor.
4. Connect an analog ohmmeter to the No.2 and No.3 terminals, and run the motor. The needle of the ohmmeter should pulse. If it does not, replace the motor.
Washer Motor Test
1. Remove the right inner fender.
2. Disconnect the 2P connector (A) from the washer motor (B).
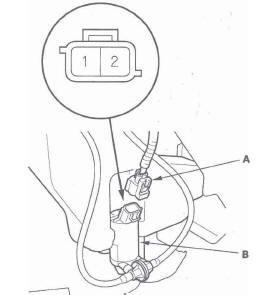
3. Test the motor by connecting battery power to the No.2 [No.1] terminal and ground the No.1 [No.2] terminal of the washer motor. The motor should run.
[ ] : Rear window washer direction.
- If the motor does not run or fails to run smoothly, replace it.
- If the motor runs smoothly, but little or no washer fluid is pumped, check for a disconnected or blocked washer hose, or a clogged washer motor outlet.
Washer Fluid Level Switch Test
Canada models
1. Remove the right inner fender.
2. Disconnect the 2P connector (A) from the washer fluid level switch (B).
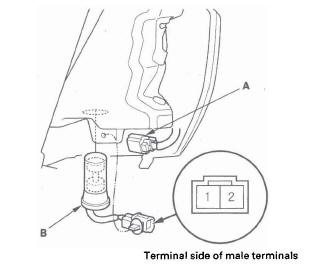
3. Remove the washer fluid level switch from the washer reservoir.
NOTE: Fluid may flow out of the opening.
4. Check for continuity between the No.1 and No.2 terminals in each float position.
- There should be continuity when the float is down.
- There should be no continuity when the float is up.
5. If the continuity is not as specified, replace the switch.
Wiper Motor Replacement
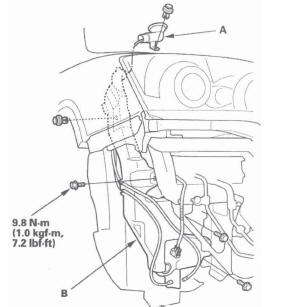
Windshield (Removal)
1. Open the hood. Remove the caps, nuts (A), and the windshield wiper arms (B).
NOTE: Carefully remove the wiper arms so that they do not touch the hood.
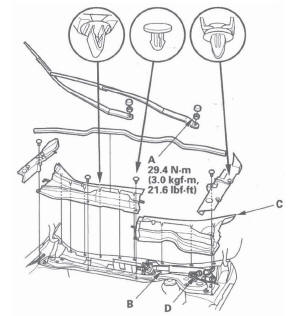
2. Remove the hood seal and cowl covers (C).
3. Disconnect the 5P connector (D) from the wiper motor.
4. Remove the bolts and the under-cowl panel (A).
5. Remove the four bolts and wiper linkage assembly (B).
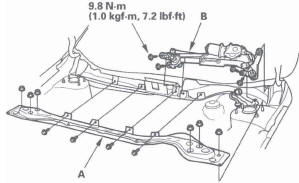
6. Remove the nut (A), and separate the link (B) from windshield wiper motor (C).
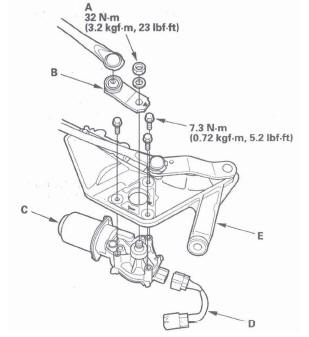
7. Disconnect the windshield wiper motor subharness (D), then remove the three bolts, and separate the windshield wiper linkage (E) from the wiper motor.
Windshield (Installation)
1. Plug in motor alone, turn the wiper/washer switch to (LO) or (HI) ON, then OFF to return the motor shaft to the park position.
NOTE:
- Do not use the wiper/washer switch (INT)
position in this step.
If necessary, replace any damaged clips.
Apply multipurpose grease to the moving parts.
2. Install the wiper motor to the wiper linkage assembly.
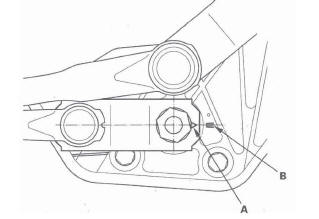
3. Install the link to the wiper motor shaft, then align the mark (A) of the link and the mark (B) of the wiper linkage assembly.
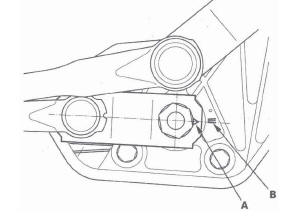
4. Before installing the wiper linkage assembly to the vehicle, mark sure the mark (A) of the link and the mark (B) of the linkage assembly are stiff aligned.
5. After installation, adjust the wiper arms.
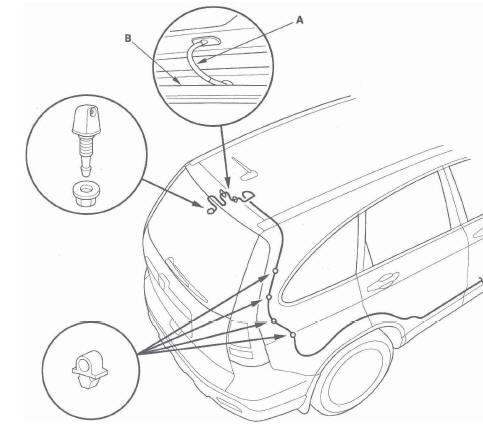
Rear Window
1. Open the tailgate, and remove the tailgate lower panel.
2. Remove the cap (A), mounting nut (B), wiper arm (C), and special nut (D).
3. Disconnect the 4P connector (A), from the rear window wiper motor (B).
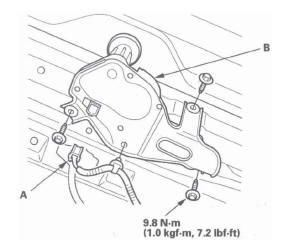
4. Remove the three bolts and wiper motor.
5. Install the wiper motor in the reverse order of removal.
Washer Reservoir Replacement
1. Remove the right inner fender.
2. Disconnect the 2P connector(s) (A) from the washer motor (B) and the washer fluid level switch (Canada models).
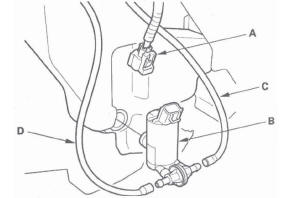
3. Disconnect the windshield washer tube (C) and the rear window washer tubes (D).
4. Remove the clip from the filler neck (A), then disconnect the filler neck.
5. Remove the clip and bolts, then remove the washer reservoir (B).
6. Install the washer reservoir in the reverse order of removal.
Wiper Blade Replacement
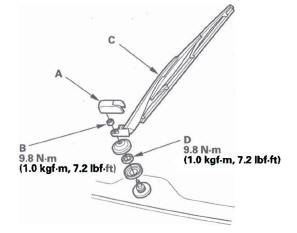
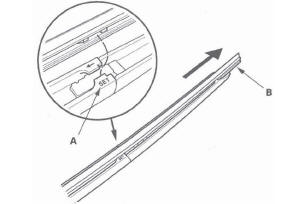
1. Lift the wiper arms off the windshield.
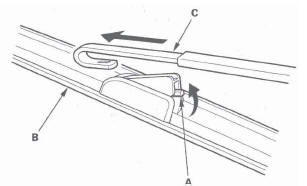
2. Pull up and hold the tab (A), and slide the wiper blade (B) toward the tabs until it releases from the wiper arm (C).
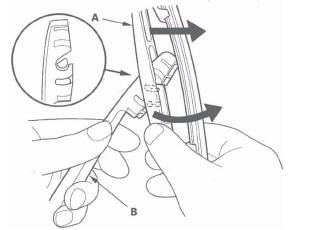
3. Find the blade labeled "SET" (A), then release the blade from it.
4. Pull back the end of the blade and slide out the old rubber (B).
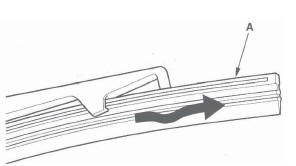
5. Install a new rubber in the reverse order of removal.
6. Install the wiper blades onto the windshield wiper arms in the reverse order of removal.
7. Test by turning on the wipers. If the blades slip, turnoff the wipers and seat the attachments more firmly.
Rear Window
1. Lift the wiper arm off the window.
2. Turn the blade (A) to release it from the wiper arm (B).
3. Pull back the end of the blade, and slide out the old rubber (A).
4. Install a new rubber in the reverse order of removal.
5. Install the wiper blade onto the rear window wiper arm in the reverse order of removal.
6. Test by turning on the wiper. If the blade slips, turn off the wiper and reinstall the wiper blade securely.
Wiper Arm/Nozzle Adjustment
1. Turn the windshield wipers ON then OFF, make sure when the wiper arms stop at the park position.
Windshield wiper arms stop position
a: Position at about 1.7 in. (43 mm) from the top of cowl cover (A).
b: Position at about 1.4 in. (35 mm) from the top of cowl cover (A).
Rear window wiper arms stop position
c: Align the wiper arms on the lowest wire of the rear window defogger (E).
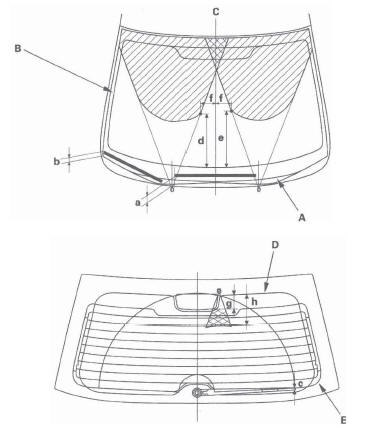
2. When you turn on the washer(s), confirm 50 % or more of the washer fluid lands within the spray area. If the spray area is not within the standard positions, adjust the nozzle(s).
Windshield washer nozzle position
d: Position at about 12.9 in. (327 mm) from the top of the black ceramic area
(B) at the lower windshield.
e: Position at about 13.7 in. (347 mm) from the top of the black ceramic area
(B) at the lower windshield.
f: Position at about 4.8 in. (123 mm) from the windshield center line (C).
Rear window washer nozzle position
g: Position at about 1.5 in. (57 mm) from the rear window center line (D) at
the upper rear window.
h: Position at about 4.2 in. (132 mm) from top of the black ceramic area (D)
at the upper rear window.
Washer Tube Replacement
Windshield
1. Remove the right inner fender.
2. Remove the washer nozzles and clips, then remove the tubes.
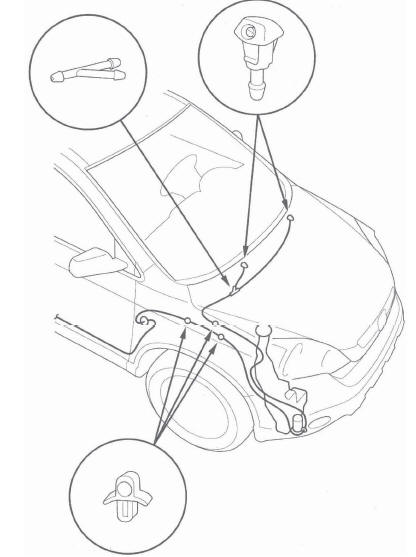
3. Install in the reverse order of removal. Take care not to pinch the washer tubes. Check the washer operation.
Rear Window
1. Open the tailgate, and lower the rear of the headliner.
2. Remove the washer nozzle and clips, then remove the tube.
3. Install the parts in the reverse order of removal. Take care not to pinch the washer tube. Check the washer operation.
NOTE: Even if the washer tube is pinched between the weatherstrip and the tailgate, the washer may operate, but it may allow water to leak at the weaterstrip. Make sure the tube is aligned, and adjust the tube by twisting if as needed.
READ NEXT:
 Gauges
Component Location Index
GAUGE CONTROL MODULE
Self-diagnostic Function
Input Test
Rewriting the ODO Data and Transferring Smart
Maintenance on a New Gauge Control Module
Replacement
Out
Reminder Systems
Component Location Index
GAUGE CONTROL MODULE
MICU
Circuit Diagram
Control Unit Input Test
NOTE: Before testing, troubleshoot the B-CAN System Diagnosis Test Mode A.
MICU
1. Turn the ignition s
Moonroof
Component Location Index
MOON ROOF SWITCH
MOON ROOF CONTROL UNIT/MOTOR
Resetting the Moonroof Control Unit
Resetting the moon roof is required when any of the following have occurred:
The moonr
SEE MORE:
Nothing Happens or the Starter Motor Operates Very Slowly
When you turn the ignition switch to
the START (III) position, you do not
hear the normal noise of the engine
trying to start. You may hear a
clicking sound, a series of clicks, or
nothing at all.
Check these things:
Check the transmission interlock.
The transmission must be in Park
o
Inflation Guidelines
Keeping the tires properly inflated
provides the best combination of
handling, tread life, and riding
comfort.
Underinflated tires wear unevenly,
adversely affect handling and fuel
economy, and are more likely to
fail from being overheated.
Overinflated tires can make your
vehicle ri
