Honda CR-V: Moonroof
Component Location Index
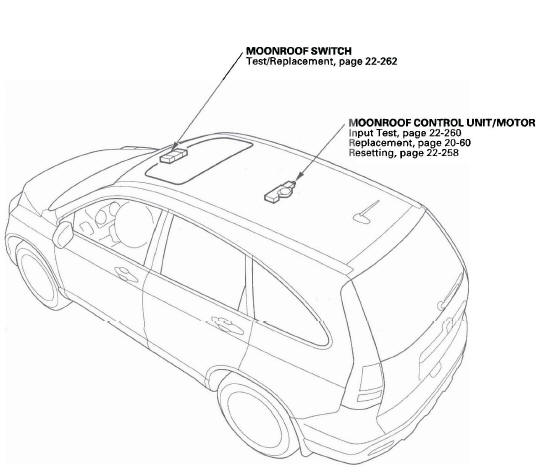
- MOON ROOF SWITCH
- MOON ROOF CONTROL UNIT/MOTOR
Resetting the Moonroof Control Unit
Resetting the moon roof is required when any of the following have occurred:
- The moonroof was moved manually while the battery was dead or disconnected.
- The moon roof motor was replaced with a new one.
- Any of components related to the moonroof were replaced.
- Wind deflector
- Moonroof glass
- Moonroof seal
- Moonroof glass bracket
- Moonroof cables, etc.
To reset the moonroof control unit, do these steps:
1. Close the driver's door.
2. Turn the ignition switch OFF.
3. Press and hold the tilt switch,. and turn the ignition switch ON (II).
4. Release the tilt switch, and turn the ignition switch OFF.
5. Repeat steps 2 and 3 four times.
6. Check if the AUTO OPEN and AUTO CLOSE functions still work. If they still work, the AUTO functions have not been cleared, go back to step 1. If the AUTO functions have been cleared, go to step 7.
7. Press and hold the moonroof open switch for 3 additional seconds after the moonroof is fully opened.
8. Press and hold the moonroof close switch for 3 additional seconds after the moonroof is fully closed (tilted).
9. Confirm that the moon roof control unit is reset by using the moonroof AUTO OPEN and AUTO CLOSE function.
Circuit Diagram
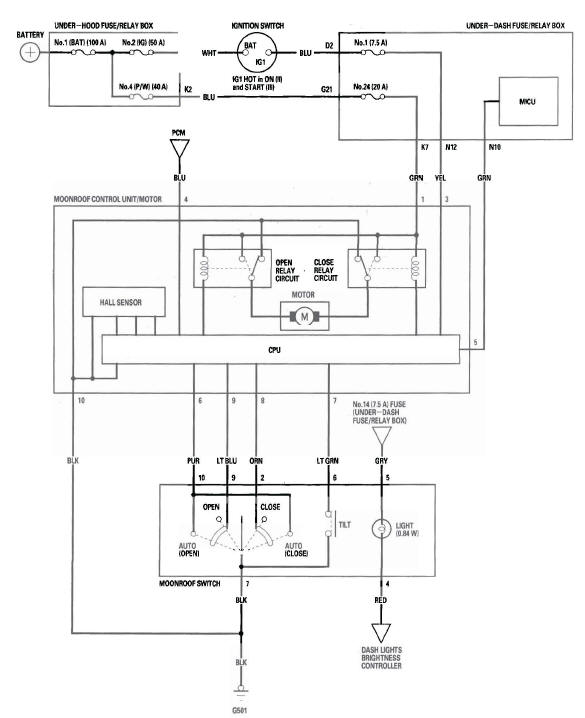
Moonroof Control Unit Input Test
NOTE: If the moonroof works OK manually, but will not work in AUTO, or reverses frequently (obstacle detection), do the moonroof calibration before proceeding with the input test.
1. Turn the ignition switch OFF.
2. Remove the headliner.
3. Disconnect the 10P connector (A) from the moonroof control unit (B).
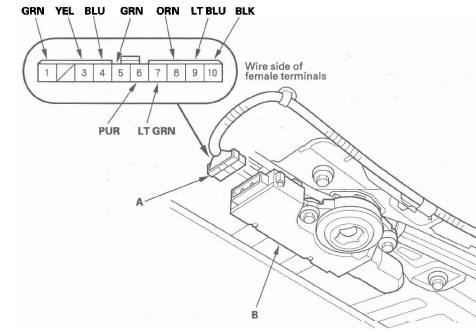
4. Inspect the connector and socket terminals to be sure they are all making good contact.
- If the terminals are bent, loose or corroded, repair them as necessary, and recheck the system.
- If the terminals look OK, go to step 5.
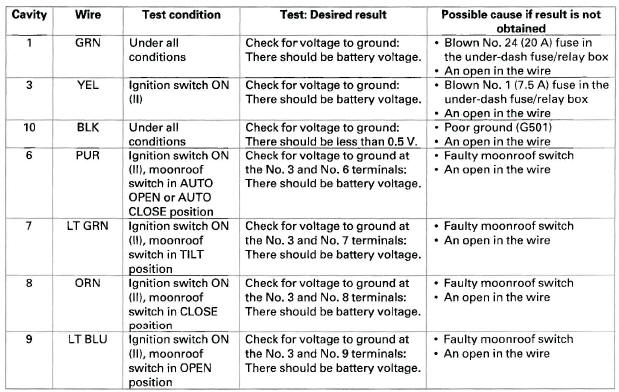
5. Reconnect the connector to the control unit, and make these input tests at the connector
- If any test indicates a problem, find and correct the cause, then recheck the system.
- If all the input tests prove OK, go to step 6.
6. Check the PCM DTCs. If there is no DTC, jump the SCS line with the HDS, then disconnect PCM connector A (44P) and the moon roof control unit/motor 10P connector.
7. Make these input tests at the connector.
- If any test indicates a problem, find and correct the cause, then recheck the system.
- If all the input tests prove OK, the control unit must be faulty; replace the moon roof control unit/motor.

Moonroof Switch Test/Replacement
1. Remove the front individual map lights.
2. Disconnect the moonroof switch 10P connector (A) and map light switch 3P connector (B).
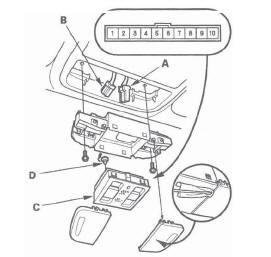
3. Remove the moonroof switch (C).
4. Check for continuity between the terminals in each switch position according to the table.
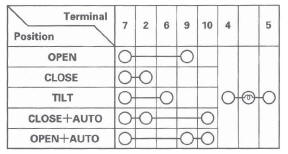
5. If the continuity is not as specified, replace the illumination bulb (D) or the switch.
6. Install the switch and light in the reverse order of removal.
READ NEXT:
 Accessory Power Sockets
Component Location Index
CONSOLE ACCESSORY
POWER SOCKET RELAY
CONSOLE ACCESSORY POWER SOCKET
FRONT ACCESSORY POWER SOCKET
UNDER-DASH
FUSE/RELAY BOX
FRONT ACCESSORY
POWER SOCKET RELAY
CARGO
Power Mirrors
Component Location Index
POWER MIRRORS/POWER MIRROR DEFOGGERS
AUXILIARY
UNDER-HOOD
RELAY BOX
POWER MIRROR
DEFOGGER RELAY
REAR WINDOW DEFOGGER SWITCH/
MIRROR DEFOGGER SWITCH
POWER MIRROR
Seat Heaters
Component Location Index
DRIVER'S SEAT
HEATER RELAY (HIGH)
DRIVER'S SEAT
HEATER RELAY (LOW)
DRIVER'S SEAT CUSHION HEATER
DRIVER'S SEAT-BACK HEATER
FRONT PASSENGER'S
SEAT-BACK HEATER
FRONT
SEE MORE:
MICU Input Test
NOTE: Before testing, troubleshoot the B-CAN System Diagnosis Test Mode A.
1. Turn the ignition switch OFF.
2. Disconnect the under-dash fuse/relay box connectors E, F, G, K, R, and T.
NOTE: All connector views are wire side of female terminals.
UNDER-DASH FUSE/RELAY BOX CONNECTOR E (42P)
UNDER-D
How the Side Airbag Off Indicator Works
This indicator alerts you that the
passenger’s side airbag has been
automatically shut off. It does
mean there is a problem with your
side airbags.
not
When you turn the ignition switch to
the ON (II) position, the indicator
should come on briefly and then go
off. If it doesnâ€
