Honda CR-V: DTC P0453: FTP Sensor Circuit High Voltage
NOTE: Before you troubleshoot, record all freeze data and any on-board snapshot, and review the general troubleshooting information.
1. Turn the ignition switch ON (II).
2. Clear the DTC with the HDS.
3. Turn the ignition switch OFF.
4. Remove the fuel fill cap.
5. Turn the ignition switch ON (II).
6. Check the FTP SENSOR in the DATA LIST with the HDS.
Is about 7.3 kPa (2.16 in.Hg, 55 mmHg), or 4.7 V or more indicated? YES-Go to step 10.
NO-Go to step 7.
7. Install the fuel fill cap.
8. Start the engine.
9. Monitor the OBD STATUS for DTC P0453 in the DTCs MENU with the HDS.
Does the screen indicate FAILED? YES-Go to step 10.
NO-If the screen indicates PASSED, intermittent failure, the system is OK at this time. Check for poor connections or loose terminals at the FTP sensor and the PCM. lf the screen indicates NOT COMPLETED, go to step 6 and recheck.
10. Turn the ignition switch OFF.
11. Disconnect the FTP sensor 3P connector.
12. Connect FTP sensor 3P connector terminals No.2 and No.3 with a jumper wire.
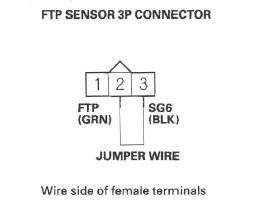
13. Turn the ignition switch ON (II).
14. Check the FTP SENSOR in the DATA LIST with the HDS.
Is about 7.3 kPa (2.16 in.Hg, 55 mmHg), or 4.7 V or more indicated? YES-Go to step 15.
NO-Go to step 26.
15. Measure voltage between FTP sensor 3P connector terminals No.1 and No.3.
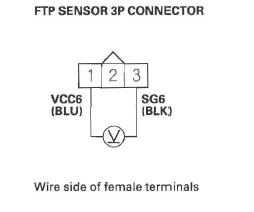
Is there about 5 V? YES-Go to step 21.
NO-Go to step 16.
16. Turn the ignition switch OFF.
17. Jump the SCS line with the HDS.
18. Disconnect PCM connector A (44P).
19. Connect FTP sensor 3P connector terminal No.3 to body ground with a jumper wire.
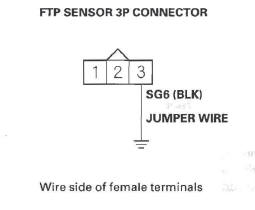
20. Check for continuity between PCM connector terminal A9 and body ground.
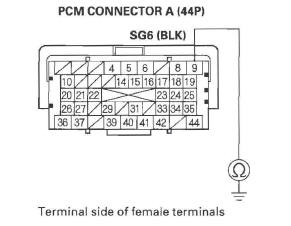
Is there continuity? YES-Go to step 34.
NO-Repair open in the wire between the PCM (A9) and the FTP sensor, then go to step 28.
21. Turn the ignition switch OFF.
22. Jump the SCS line with the HDS.
23. Disconnect PCM connector A (44P).
24. Connect FTP sensor 3P connector terminal No.2 to body ground with a jumper wire.
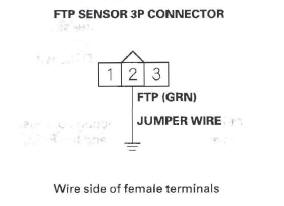
25. Check for continuity between PCM connector terminal A26 and body ground.
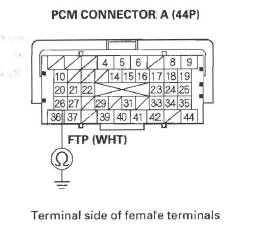
Is there continuity? YES-Go to step 34.
NO-Repair open in the wire between the PCM (A26) and the FTP sensor, then go to step 28.
26. Turn the ignition switch OFF.
27. Replace the FTP sensor.
28. Reconnect all connectors.
29. Turn the ignition switch ON (II).
30. Reset the PCM with the HDS.
31. Do the PCM idle learn procedure.
32. Check for Temporary DTCs or DTCs with the HDS.
Is DTC P0453 indicated? YES-Check for poor connections or loose terminals at the FTP sensor and the PCM, then go to step 1.
NO-Go to step 33.
33. Monitor the OBD STATUS for DTC P0453 in the DTCs MENU with the HDS.
Does the screen indicate PASSER? YES-Troubleshooting is complete. If any other Temporary DTCs or DTCs were indicated in step 32, go to the indicated DTC's troubleshooting.
NO-If the screen indicates FAILED, check for poor connections or loose terminals at the FTP sensor and the PCM, then go to step 1. If the screen indicates NOT COMPLETED, go to step 31.
34. Reconnect all connectors.
35. Update the PCM if it does not have the latest software, or substitute a known-good PCM.
36. Start the engine.
37. Check for Temporary DTCs or DTCs with the HDS.
Is DTC P0453 indicated? YES-Check for poor connections or loose terminals at the FTP sensor and the PCM. If the PCM was updated, substitute a known-good PCM, then go to step 35. If the PCM was substituted, go to step 1.
NO-Go to step 38.
38. Monitor the OBD STATUS for DTC P0453 in the DTCs MENU with the HDS.
Does the screen indicate PASSED? YES-If the PCM was updated, troubleshooting is complete. If the PCM was substituted, replace the original PCM. If any other Temporary DTCs or DTCs were indicated in step 37, go to the indicated DTC's troubleshooting.
NO-If the screen indicates FAILED, check for poor connections or loose terminals at the FTP sensor and the PCM. If the PCM was updated, substitute a known-good PCM, then go to step 36. If the PCM was substituted, go to step 1. If the screen indicates NOT COMPLETED, let the engine idle until a result comes on.

