Honda CR-V: DTC P0455/P0456: EVAP System Large Leak Detected/Very Small Leak Detected
DTC P0455: EVAP System Large Leak Detected
DTC P0456: EVAP System Very Small Leak Detected
NOTICE
The fuel system is designed to allow specified maximum vacuum and pressure conditions. Do not deviate from the vacuum and pressure tests as indicated in these procedures. Excessive pressure/ vacuum would damage the EVAP components or cause eventual fuel tank failure.
Special Tools Required
Vacuum pump/gauge, 0-30 in.Hg, Snap-on YA4000A or equivalent, commercially available
NOTE:
- Before you troubleshoot, record all freeze data 'and any on-board snapshot, and review the general troubleshooting information.
- Fresh fuel has a higher volatility that will create greater pressure/vacuum. The optimum condition for testing is less than a full tank of fresh fuel. If possible, to assist in leak detection, add 1 gallon of fresh fuel to the tank (as long as it will not fill the tank), just before starting these procedures.
1. Check the fuel fill cap (the cap must say "Tighten to click"). It should turn 1/4 turn after it's tight, then it clicks.
Is the correct fuel fill cap installed and properly tightened? YES-Go to step 2.
NO-Replace or tighten the cap, then go to step 22.
2. Check the fuel fill cap seal (A) and the fuel fill pipe mating surface (B). Verify that the fuel fill cap tether cord (C) is not caught under the cap.
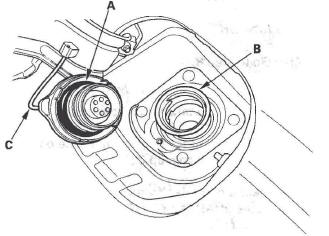
Is the fuel fill cap seal missing or damaged, is the fuel fill pipe damaged, or is the tether cord caught under the cap? YES-Replace the fuel fill cap or the fuel fill pipe, then go to step 22.
NO-Go to step 3.
3. Turn the ignition switch ON (II).
4. Clear the DTC with the HDS.
5. Do the EVAP FUNCTION TEST in the INSPECTION MENU with the HDS.
Is the result OK? YES-Intermittent failure, the system is OK at this time. Check for poor connections or loose terminals at the FTP sensor, the EVAP canister purge valve, or the EVAP canister vent shut valve, and the PCM.
NO-Go to step 6.
6. Turn the ignition switch OFF.
7. Check for a poor connection or damage at the fuel tank vapor recirculation tube.
Is the tube OK? YES-Go to step 8.
NO-
- Replace the fuel tank vapor recirculation tube, then go to step 22.
- If necessary, replace the fuel tank, then go to step 22.
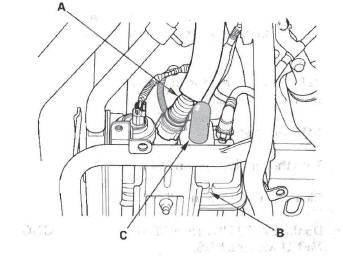
8. Disconnect the fuel tank vapor recirculation tube (A) from the EVAP canister (B), and plug the EVAP canister port (C).
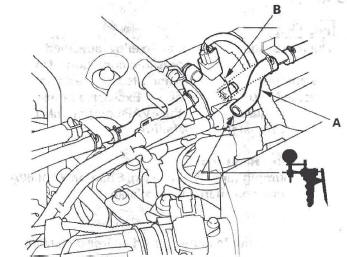
9. Disconnect the vacuum hose (purge line) (A) from the EVAP canister purge valve (B) in the engine compartment, and connect a vacuum pump/gauge, 0-30 in.Hg, to the vacuum hose as shown"
10. Turn the ignition switch ON (II).
11. Select EVAP CVS ON in the INSPECTION MENU with the HDS.
12. Apply vacuum to the hose until the FTP reads 1.90 V (- 0.59 in.Hg, -15.1 mmHg).
NOTE: Be careful not to exceed the pressure. If you exceed the pressure, the FTP sensor can be damaged.
13. Monitor the FTP SENSOR in the DATA LIST for 1 minute with the HDS.
Does the voltage increase more than 0.2 V (0.1 in.Hg, 2.5 mmHg).
YES-Go to step 14.
NO-Go to step 19.
14. Select EVAP CVS OFF in the INSPECTION MENU with the HDS.
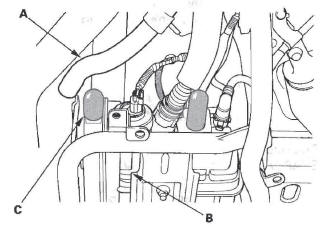
15. Disconnect the fresh air hose (A) from the EVAP canister (B), and plug the EVAP canister port (C).
16. Apply vacuum to the EVAP system until the FTP reads 1.90 V (-0.59 in.Hg, -15.1 mmHg).
NOTE: Be careful not to exceed the pressure. If you exceed the pressure, the FTP sensor can be damaged.
17. Monitor the FTP SENSOR in the DATA LIST for 1 minute with the HDS.
Does the voltage increase more than 0.2 V (0.1 in.Hg, 2.5 mmHg)? YES-Go to step 18.
NO-Replace the EVAP canister vent shut valve then go to step 21.
18. Check for a loose or damaged EVAP canister purge line between the EVAP canister and the EVAP canister purge valve.
Is the line OK? YES-Replace these parts, then go to step 21:
- FTP sensor O-ring
- EVAP canister vent shut valve case and O-ring
- EVAP canister
NO-Reconnect or repair the EVAP canister purge hose, then go to step 21.
19. Select EVAP CVS OFF in the INSPECTION MENU with the HDS.
20. Check these parts for looseness or damage:
- Fuel fill pipe
- Fuel vapor return pipe
Are the parts OK? YES-Check the fuel tank unit base gasket, and check the fuel tank, then go to step 21.
NO-Repair or replace the damaged parts, then go to step 21.
21. Reconnect all hoses and connectors.
22. Turn the ignition switch ON (II).
23. Reset the PCM with the HDS.
24. Do the PCM idle learn procedure.
25. Do the EVAP FUNCTION TEST in the INSPECTION MENU with the HDS.
Is the result OK? YES-Troubleshooting is complete.
NO-Check for poor connections or loose terminals at the FTP sensor, the EVAP canister purge valve, the EVAP canister vent shut valve, and the PCM, then go to step 1.
READ NEXT:
 DTC P0457: EVAP System Leak Detected/Fuel
Fill Cap Loose or Missing
DTC P0457: EVAP System Leak Detected/Fuel
Fill Cap Loose or Missing
NOTE: Before you troubleshoot, record all freeze data and any on-board
snapshot, and review the general troubleshooting information.
1. Check the fuel fill cap (the cap must say "Tighten to
click").
EVAP Canister Replacement
1. Lift the vehicle, and support it with jackstands.
2. Remove the cover (A).
3. Remove the EVAP canister baffle cover (A).
4. Disconnect the hoses (A) and the fuel subharness
6P connector (B).
5.
SEE MORE:
Fuel Pressure Relieving
Before disconnecting fuel lines or hoses, relieve
pressure from the system by disabling the fuel pump
and then disconnecting the fuel tube/quick connect
fitting in the engine compartment.
With the HDS
1. Make sure you have the anti-theft code for the
audio system.
2. Remove the fuel fill cap, to re
PCM Replacement
NOTE:
Make sure the HDS is loaded with the latest software
version.
If you are replacing the PCM after substituting a
known-good PCM, reinstall the original PCM, then do
this procedure.
During the procedure, is any READ DATA, WRITE
DATA, or other data checks fail, note the failure, then
con
