Honda CR-V: DTC P0457: EVAP System Leak Detected/Fuel Fill Cap Loose or Missing
NOTE: Before you troubleshoot, record all freeze data and any on-board snapshot, and review the general troubleshooting information.
1. Check the fuel fill cap (the cap must say "Tighten to click"). It should turn 1/4 turn after it's tight, then it clicks.
Is the correct fuel fill cap installed and properly tightened? YES-Go to step 2.
NO-Replace or tighten the cap, then go to step 19.
2. Check the fuel fill cap seal (A) and the fuel fill pipe mating surface (B). Verify that the fuel fill cap tether cord (C) is not caught under the cap.
Is the fuel fill cap seal missing or damaged, is the fuel fill pipe damaged, or is the tether cord caught under the cap? YES-Replace the fuel fill cap or the fuel f ill pipe, then go to step 19.
NO-Go to step 3.
3. Turn the ignition switch ON (II).
4. Clear the DTC with the HDS.
5. Do the EVAP FUNCTION TEST in the INSPECTION MENU with the HDS.
Is the result OK? YES-Intermittent failure, the system is OK at this time. Check for poor connections or loose terminals at the FTP sensor, or the EVAP canister vent shut valve, and the PCM.
NO-Go to step 6.
6. Turn the ignition switch OFF.
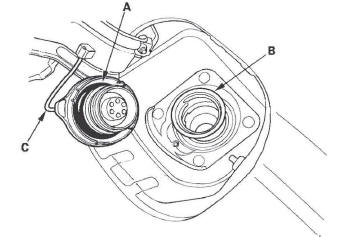
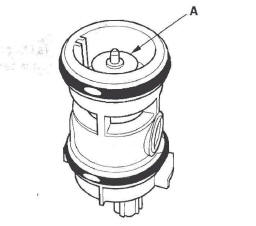
7. Remove the EVAP canister vent shut valve from the EVAP canister.
8. Connect the 2P connector to the EVAP canister vent shut valve.
9. Turn the ignition switch ON (II).
10. Select EVAP CVS ON in the INSPECTION MENU with the HDS.
11. Check the EVAP canister vent shut valve (A) operation.

Does the valve operate? YES-Check the routing of the EVAP canister vent tube, then go to step 18.
NO-Go to step 12.
12. Turn the ignition switch OFF.
13. Replace the EVAP canister vent shut valve.
14. Turn the ignition switch ON (II).
15. Reset the PCM with the HDS.
16. Do the PCM idle learn procedure.
17. Do the EVAP FUNCTION TEST in the INSPECTION MENU with the HDS.
Is the result OK? YES-Troubleshooting is complete.
NO-Check for poor connections or loose terminals at the FTP sensor, the EVAP canister vent shut valve, and the PCM, and check all EVAP line connections, then go to step 1.
18. Reinstall the EVAP canister vent shut valve.
19. Turn the ignition switch ON (II).
20. Reset the PCM with the HDS.
21. Do the PCM idle learn procedure.
22. Do the EVAP FUNCTION TEST in the INSPECTION MENU with the HDS.
Is the result OK? YES-Troubleshooting is complete.
NO-Check for poor connections or loose terminals at the FTP sensor, the EVAP canister vent shut valve, and the PCM, and check all EVAP line connections, then go to step 1.
DTC P0496: EVAP System High Purge Flow
NOTE: Before you troubleshoot, record all freeze data and any on-board snapshot, and review the general troubleshooting information.
1. Turn the ignition switch ON (II).
2. Clear the DTC with the HDS.
3. Do the EVAP FUNCTION TEST in the INSPECTION MENU with the HDS.
Is the result OK? YES-Intermittent failure, the system is OK at this time. Check for poor connections or loose terminals at the FTP sensor, the EVAP canister purge valve, the EVAP canister vent shut valve, and the PCM.
NO-Go to step 4.
4. Turn the ignition switch OFF.
5. Replace the EVAP canister purge valve.
6. Turn the ignition switch ON (II).
7. Reset the PCM with the HDS.
8. Do the PCM idle learn procedure.
9. Do the EVAP FUNCTION TEST in the INSPECTION MENU with the HDS.
Is the result OK? YES-Troubleshooting is complete.
NO-Check for poor connections or loose terminals at the FTP sensor, the EVAP canister purge valve, the EVAP canister vent shut valve, and the PCM, then go to step 1.
DTC P0497: EVAP System Low Purge Flow
Special Tools Required
- Vacuum/pressure gauge, 0-4 in.Hg, 07JAZ-001000B
- Vacuum pump/gauge, 0-30 in.Hg, Snap-on YA4000A or equivalent, commercially available
NOTE: Before you troubleshoot, record all freeze data and any on-board snapshot, and review the general troubleshooting information.
1. Check the fuel fill cap installation (The cap label must say "Tighten to click.". The cap should tighten 1/4 turn after it is tight.).
Is the fuel fill cap installed and properly tightened? YES-Go to step 2.
NO-Properly install the fuel fill cap, then go to step 23.
2. Turn the ignition switch ON (II).
3. Clear the DTC with the HDS.
4. Do the EVAP FUNCTION TEST in the INSPECTION MENU with the HDS.
Is the result OK? YES-Intermittent failure, the system is OK at this time. Check for poor connections or loose terminals at the FTP sensor, the EVAP canister purge valve, or the EVAP canister vent shut valve, and the PCM.
NO-Go to step 5.
5. Check for a loose or damaged EVAP canister purge line between the intake manifold and the EVAP canister purge valve.
Is the line OK? YES-Go to step 6.
NO-Reconnect or repair the EVAP canister purge line, then go to step 23.
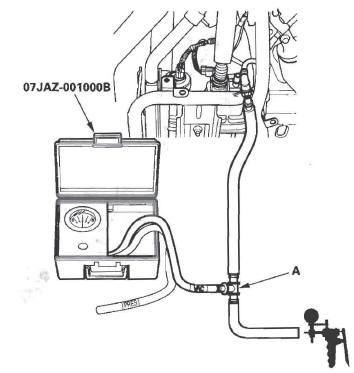
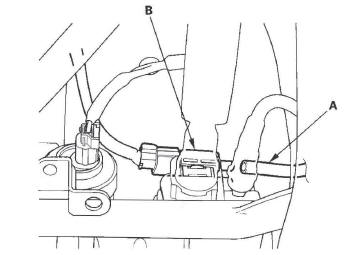
6. Disconnect the vacuum hose (A) from the EVAP canister purge valve (B) in the engine compartment, and connect a T-fitting (C) from the vacuum gauge and the vacuum pump/gauge, 0-30 in.Hg, to the vacuum hose as shown.

7. Select EVAP PCS ON in the INSPECTION MENU with the HDS.
8. Slowly apply about 0.6 in.Hg (15 mmHg) of vacuum to the hose.
Does it hold vacuum? YES-Replace the EVAP canister purge valve, then go to step 22.
NO-Go to step 9.
9. Reconnect the vacuum hose to the EVAP canister purge valve.
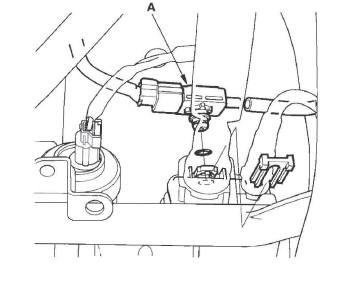
10. Disconnect the vacuum hose from the purge line (at the EVAP canister side), and connect a T-fitting (A) from the vacuum gauge and the vacuum pump/ gauge, 0-30 in.Hg, to the hose as shown.
11. Select EVAP PCS ON in the INSPECTION MENU with the HDS.
12. Slowly apply about 2 kPa (0.6 in.Hg, 15 mmHg) of vacuum to the hose.
Does it hold vacuum? YES-Check for a restrictied EVAP canister purge line between the EVAP canister purge valve and the EVAP canister, then go to step 22.
NO-Go to step 13.
13. Remove the FTP sensor with its connector connected.
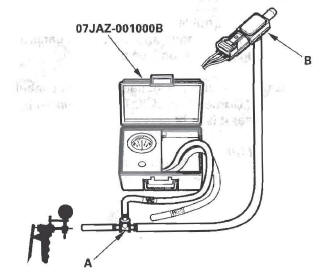
14. Connect a T-fitting (A) from the vacuum pump/gauge, 0-30 in.Hg, and the vacuum pump to the FTP sensor (B) as shown.
15. Check and record the FTP SENSOR reading in the DATA LIST with the HDS.
16. Slowly apply about 1.3 kPa (0.4 in.Hg, 10 mmHg) of vacuum to the hose.
17. Check the FTP SENSOR in the DATA LIST with the HDS.
Is the difference more than 1.1 kPa (0.31 in.Hg, 8 mmHg) before and after applying vacuum? YES-Go to step 18.
NO-Replace the FTP sensor, then go to step 22.
18. Reconnect the vacuum hoses to the EVAP canister purge line (EVAP canister side), and reinstall the FTP sensor.
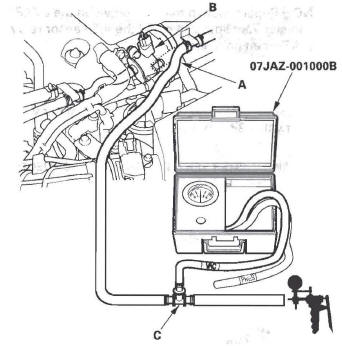
19. Disconnect the vacuum hose (purge line) (A) from the EVAP canister purge valve (B), and connect a T-fitting (C) from the vacuum gauge and the vacuum pump/gauge, 0-30 in.Hg, to the hose as shown.
20. Select EVAP CVS ON in the INSPECTION MENU with the HDS.
21. Slowly apply about 2 kPa (0.6 in.Hg, 15 mmHg) of vacuum to the hose.
Does the hose hold vacuum? YES-Check for blockage at the EVAP canister port, then go to step 22.
NO-Replace the EVAP canister vent shut valve, then go to step 22.
22. Reconnect all hoses.
23. Turn the ignition switch ON (II).
24. Reset the PCM with the HDS.
25. Do the PCM idle learn procedure.
26. Do the EVAP FUNCTION TEST in the INSPECTION MENU with the HDS.
Is the result OK? YES-Troubleshooting is complete.
NO-Check for poor connections or loose terminals at the FTP sensor, the EVAP canister purge valve, the EVAP canister vent shut valve, and the PCM, then go to step 1.
DTC P0498: EVAP Canister Vent Shut Valve Control Circuit Low Voltage
NOTE: Before you troubleshoot, record all freeze data and any on-board snapshot, and review the general troubleshooting information.
1. Turn the ignition switch ON (II).
2. Clear the DTC with the HDS.
3. Check for Temporary DTCs or DTCs with the HDS.
Is DTC P0498 indicated? YES-Go to step 6.
NO-Go to step 4.
4. Select EVAP CVS ON in the INSPECTION MENU with the HDS.
5. Check for Temporary DTCs or DTCs with the HDS.
Is DTC P0498 indicated? YES-Go to step 6.
NO-Intermittent failure, the system is OK at this time. Check for poor connections or loose terminals at the EVAP canister vent shut valve and the PCM.
6. Turn the ignition switch OFF.
7. Disconnect the EVAP canister vent shut valve 2P connector.
8. Turn the ignition switch ON (II).
9. Measure voltage between EVAP canister vent shut valve 2P connector terminal No.2 and body ground.
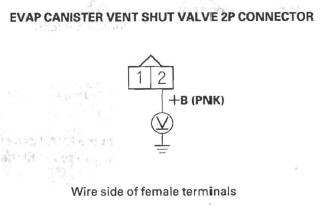
Is there battery voltage? YES-Go to step 10.
NO-Repair open in the wire between the EVAP canister vent shut valve and the A/F sensor relay (LAF), then go to step 18.
10. Turn the ignition switch OFF.
11. Measure resistance between EVAP canister vent shut valve 2P connector terminals No. 1 and No.2.
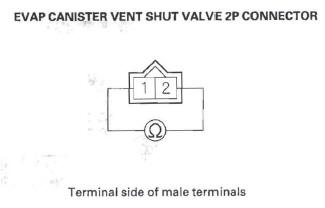
Is there about 25- 30 Ω at room temperature? YES-Go to step 12.
NO-Go to step 17.
12. Jump the SCS line with the HDS.
13. Disconnect PCM connector A (44P).
14. Check for continuity between PCM connector terminal A10 and body ground.
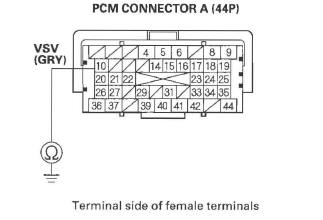
Is there continuity? YES-Repair short in the wire between the EVAP canister vent shut valve and the PCM (A10), then go to step 18.
NO-Go to step 15.
15. Connect EVAP canister vent shut valve 2P connector terminal No. 1 to body ground with a jumper wire.
16. Check for continuity between PCM connector terminal Al0 and body ground.
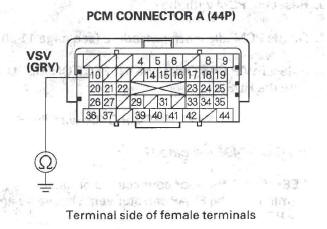
Is there continuity? YES-Go to step 24.
NO-Repair open in the wire between the EVAP canister vent shut valve and the PCM (A 10), then go to step 18.
17. Replace the EVAP canister vent shut valve.
18. Reconnect all connectors.
19. Turn the ignition switch ON (II).
20. Reset the PCM with the HDS.
21. Do the PCM idle learn procedure.
22. Select EVAP CVS ON in the INSPECTION MENU with the HDS.
23. Check for Temporary DTCs or DTCs with the HDS.
Is DTC P0498 indicated? YES-Check for poor connections or loose terminals at the EVAP canister vent shut valve and the PCM, then go to step 1.
NO-Troubleshooting is complete. If any other Temporary DTCs or DTCs are indicated, go to the indicated DTC's troubleshooting.
24. Reconnect all connectors.
25. Update the PCM if it does not have the latest software, or substitute a known-good PCM.
26. Select EVAP CVS ON in the INSPECTION MENU with the HDS.
27. Check for Temporary DTCs or DTCs with the HDS.
Is DTC P0498 indicated? YES-Check for poor connections or loose terminals at the EVAP canister vent shut valve and the PCM. If the PCM was updated, substitute a known-good PCM, then go to step 26. If the PCM was substituted, go to step 1.
NO-If the PCM was updated, troubleshooting is complete. If the PCM was substituted, replace the original PCM. If any other Temporary DTCs or DTCs are indicated, go to the indicated DTC's troubleshooting.
DTC P0499: EVAP Canister Vent Shut Valve Control Circuit High Voltage
NOTE: Before you troubleshoot, record all freeze data and any on-board snapshot, and review the general troubleshooting information.
1. Turn the ignition switch ON (II).
2. Clear the DTC with the HDS.
3. Select EVAP CVS ON in the INSPECTION MENU with the HDS.
4. Check for Temporary DTCs or DTCs with the HDS.
Is DTC P0499 indicated? YES-Go to step 5.
NO-Intermittent failure, the system is OK at this time. Check for poor connections or loose terminals at the EVAP canister vent shut valve and the PCM.
5. Update the PCM if it does not have the latest software, or substitute a known-good PCM.
6. Select EVAP CVS ON in the INSPECTION MENU with the HDS.
7. Check for Temporary DTCs or DTCs with the HDS.
Is DTC P0499 indicated? YES-Check for poor connections or loose terminals at the EVAP canister vent shut valve and the PCM. If the PCM was updated, substitute a known-good PCM, then go to step 6. If the PCM was substituted, go to step 1.
NO-If the PCM was updated, troubleshooting is complete. If the PCM was substituted, replace the original PCM. If any other Temporary DTCs or DTCs are indicated, go to the indicated DTC's troubleshooting.
DTC P1454: FTP Sensor Range/Performance Problem
DTC P2422: EVAP Canister Vent Shut Valve
Stuck Closed Malfunction
NOTE: Before you troubleshoot, record all freeze data and any on-board snapshot, and review the general troubleshooting information.
1. Turn the ignition switch ON (II).
2. Clear the DTC with the HDS.
3. Turn the ignition switch OFF.
4. Remove the fuel fill cap, and wait for 1 minute.
5. Check the FTP SENSOR in the DATA LIST with the HDS.
Is it between - 0.67 and 0.67 kPa (- 0.2 and 0.2 in.Hg, - 5 and 5 mmHg), or 2.4 and 2.6 V? YES-Go to step 6.
NO-Go to step 17.
6. Install the fuel fill cap.
7. Clear the DTC with the HDS.
8. Start the engine. Hold the engine speed at 3,000 rpm without load (in Park or neutral) until the radiator fan comes on, then let it idle.
9. Monitor the OBD STATUS for DTC P1454 in the DTCs MENU with the HDS.
Does the screen indicate FAILED? YES-Go to step 10.
NO-If the screen indicates PASSED, intermittent failure, the system is OK at this time. Check for poor connections or loose terminals at the FTP sensor, the EVAP canister vent shut valve, and the PCM. Also check for a blockage in the vent hoses and the drain joint. If the screen indicates NOT COMPLETED, go to step 8 and recheck.
10. Clear the DTC with the HDS.
11. Turn the ignition switch OFF.
12. Remove the EVAP canister vent shut valve from the EVAP canister.
13. Connect the 2P connector to the EVAP canister vent shut valve.
14. Turn the ignition switch ON (II).
15. Select EVAP CVS ON in the INSPECTION MENU with the HDS.
16. Check the EVAP canister vent shut valve (A) operation.
Does the valve operate? YES-Check for a blockage in the EVAP canister, vent hoses, and drain joint, then install the EVAP canister vent shut valve, and go to step 23.
NO-Replace the EVAP canister vent shut valve, then go to step 23.
17. Disconnect the air tube (A) from the FTP sensor (B).
18. Check the FTP SENSOR in the DATA LIST with the HDS.
Is it between - 0.67 and 0.67 kPa (- 0.2 and 0.2 in.Hg, - 5 and 5 mmHg), or 2.4 and 2.6 V? YES-Check for a blockage in the FTP sensor air tube or vent, then go to step 23.
NO-Go to step 19.
19. Turn the ignition switch OFF.
20. Remove the FTP sensor (A) from the EVAP canister with its connector connected.
21. Turn the ignition switch ON (II).
22. Check the FTP SENSOR in the DATA LIST with the HDS.
Is it between - 0.67 kPa and 0.67 kPa ( - 0.2 and 0.2 in.Hg, - 5 and 5 mmHg), or 2.4 and 2.6 V? YES-Check for debris or clogging at the EVAP canister and the FTP sensor port, then go to step 23.
NO-Replace the FTP sensor, then go to step 23.
23. Turn the ignition switch ON (II).
24. Reset the PCM with the HDS.
25. Do the PCM idle learn procedure.
26. Start the engine. Hold the engine speed at 3,000 rpm without load (in Park or neutral) until the radiator fan comes on, then let it idle.
27. Check for Temporary DTCs or DTCs with the HDS.
Is DTC P1454 and/ or P2422 indicated? YES-Check for poor connections or loose terminals at the FTP sensor, the EVAP canister vent shut valve, and the PCM, then go to step 1.
NO-Go to step 28.
28. Monitor the OBD STATUS for DTC P1454 in the DTCs MENU with the HDS.
Does the screen indicate PASSED? YES-Troubleshooting is complete. If any other Temporary DTCs or DTCs were indicated in step 27, go to the indicated DTC's troubleshooting.
NO-If the screen indicates FAILED, check for poor connections or loose terminals at the FTP sensor, the EVAP canister vent shut valve, and the PCM, then go to step 1. If the screen indicates NOT COMPLETED, go to step 26.
DTC P145C: EVAP System Purge Flow (Vacuum Line)
NOTE:
- Before you troubleshoot, record all freeze data and any on-board snapshot, and review the general troubleshooting information.
- This DTC is representative of an EVAP system purge flow problem. If DTC P145C is indicated alone, troubleshoot P0496 and P0497 using the freeze data for P145C.
- If any of the DTCs listed below are indicated at the
same time as DTC P145C, troubleshoot those DTC
first, then recheck for P145C:
P0496, P0497: EVAP system purge flow
READ NEXT:
 EVAP Canister Replacement
1. Lift the vehicle, and support it with jackstands.
2. Remove the cover (A).
3. Remove the EVAP canister baffle cover (A).
4. Disconnect the hoses (A) and the fuel subharness
6P connector (B).
5.
Automatic Transmission
Special Tools
07HAE-PL50101 may also be used to substitute one of 07LAE-PX40100.
Mainshaft Holder
Attachment, 78 x 90 mm
Clutch Spring Compressor Bolt Assembly
Holder Handle
Oil Seal Driver At
SEE MORE:
If the Engine Overheats
The reading of the vehicle’s
temperature gauge should stay in
the midrange. If it climbs to the red
mark, you should determine the
reason (hot day, driving up a steep
hill, etc.).
If the vehicle overheats, you should
take immediate action. The only
indication may be the temperature
Accessories
Your dealer has Honda accessories
that allow you to personalize your
vehicle. These accessories have
been designed and approved for your
vehicle, and are covered by warranty.
Although non-Honda accessories
may fit on your vehicle, they may not
meet factory specifications, and
could ad
