Honda CR-V: DTC P0111: IAT Sensor Circuit Range/Performance Problem
NOTE: Before you troubleshoot, record all freeze data and any on-board snapshot, and review the general troubleshooting information.
1. Check for poor connections or loose terminals at ECT sensor 1/2 and the IAT sensor.
Are the connections and terminals OK? YES-Go to step 2.
NO-Repair the connectors or terminals, then go to step 15.
2. Remove the MAF sensor/IAT sensor.
3. Allow the IAT sensor to cool to the ambient temperature.
4. Note the ambient temperature.
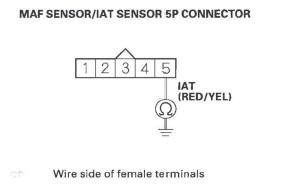
5. Connect the MAF sensor/IAT sensor to the 5P connector, but do not install the sensor onto the air cleaner.
6. Turn the ignition switch ON (II).
7. Note the value of the IAT SENSOR quickly in the DATA LIST with the HDS.
8. Compare the value of the IAT SENSOR and the ambient temperature.
Does the value of the IAT SENSOR differ 5.4 ºF (3 ºC) or more? YES-Go to step 13.
NO-Go to step 9.
9. Disconnect the MAF sensor/IAT sensor from the 5P connector.
10. Using a heat gun, blow hot air on the MAF sensor/ IAT sensor for a few seconds. Do not apply the heat longer than a few seconds or you will damage the sensor.
11. Connect the MAF sensor/IAT sensor to the 5P connector, but do not install the sensor onto the air cleaner.
12. Check the IAT SENSOR in the DATA LIST with the HDS.
Does the IAT SENSOR change 58 ºF (32ºC) or more? YES-Intermittent failure, the system is OK at this time. Check for poor connections or loose terminals at the MAF sensor/IAT sensor and the PCM.
NO-Go to step 13.
13. Turn the ignition switch OFF.
14. Replace the MAF sensor/IAT sensor.
15. Turn the ignition switch ON (II).
16. Reset the PCM with the HDS.
17. Do the PCM idle learn procedure.
18. Check for Temporary DTCs or DTCs with the HDS.
Is DTC P0111 indicated? YES-Check for poor connections or loose terminals at the MAF sensor/IAT sensor and the PCM, then go to step 1.
NO-Troubleshooting is complete. If any other Temporary DTCs or DTCs are indicated, go to the indicated DTC's troubleshooting.
DTC P0112: IAT Sensor Circuit Low Voltage
NOTE: Before you troubleshoot, record all freeze data and any on-board snapshot, and review the general troubleshooting information.
1. Turn the ignition switch ON (II).
2. Check the IAT SENSOR in the DATA LIST with the HDS.
Is about 356 ºF (180 ºC) or more, or 0.08 V or less indicated? YES-Go to step 3.
NO-Intermittent failure, the system is OK at this time. Check for poor connections or loose terminals at the MAF sensor/IAT sensor and the PCM.
3. Turn the ignition switch OFF.
4. Disconnect the MAF sensor/IAT sensor 5P connector.
5. Turn the ignition switch ON (II).
6. Check the IAT SENSOR in the DATA LIST with the HDS.
Is about 356 ºF (180 ºC) or more, or 0.08 V or less indicated? YES-Go to step 7.
NO-Go to step 11.
7. Turn the ignition switch OFF.
8. Jump the SCS line with the HDS.
9. Disconnect PCM connector B (44P).
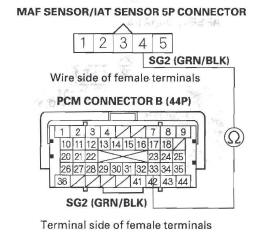
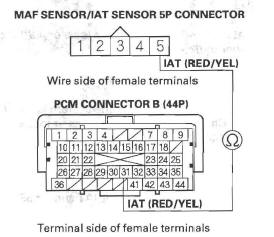
10. Check for continuity between MAF sensor/IAT sensor 5P connector terminal No.5 and body ground.
Is there continuity? YES-Repair short in the wire between the IAT sensor and the PCM (B31), then go to step 13.
NO-Go to step 18.
11. Turn the ignition switch OFF.
12. Replace the MAF sensor/IAT sensor.
13. Reconnect all connectors.
14. Turn the ignition switch ON (II).
15. Reset the PCM with the HDS.
16. Do the PCM idle learn procedure.
17. Check for Temporary DTCs or DTCs with the HDS.
Is DTC P0112 indicated? YES-Check for poor connections or loose terminals at the MAF sensor/IAT sensor and the PCM, then go to step 1.
NO-Troubleshooting is complete. If any other Temporary DTCs or DTCs are indicated, go to the indicated DTC's troubleshooting.
18. Reconnect all connectors.
19. Update the PCM if it does not have the latest software, or substitute a known-good PCM.
20. Check for Temporary DTCs or DTCs with the HDS.
Is DTC P0112 indicated? YES-Check for poor connections or loose terminals at the MAF sensor/IAT sensor and the PCM. If the PCM was updated, substitute a known-good PCM, then recheck. If the PCM was substituted, go to step 1.
NO-If the PCM was updated. troubleshooting is complete. If the PCM was substituted, replace the original PCM. If any other Temporary DTCs or DTCs are indicated, go to the indicated DTC's troubleshooting.
DTC P0113: IAT Sensor Circuit High Voltage
NOTE: Before you troubleshoot, record all freeze data and any on-board snapshot, and review the general troubleshooting information.
1. Turn the ignition switch ON (II).
2. Check the IAT SENSOR in the DATA LIST with the HDS.
Is about - 40 ºF (-40ºC) or less, or 4.90 V or higher indicated? YES-Go to step 3.
NO-Intermittent failure, the system is OK at this time. Check for poor connections or loose terminals at the MAF sensor/IAT sensor and the PCM.
3. Turn the ignition switch OFF.
4. Disconnect the MAF sensor/IAT sensor 5P connector.
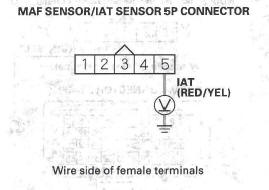
5. Connect MAF sensor/IAT sensor 5P connector terminals No.4 and No.5 with a jumper wire.
6. Turn the ignition switch ON (II).
7. Check the IAT SENSOR in the DATA LIST with the HDS.
Is about - 40 ºF (-40ºC) or less, or 4.90 V or higher indicated? YES-Go to step 8.
NO-Go to step 20
8. Turn the ignition switch OFF.
9. Remove the jumper wire from the MAF sensor/IAT sensor 5P connector.
10. Turn the ignition switch ON (II).
11. Measure voltage between MAF sensor/IAT sensor 5P connector terminal No.5 and body ground.
Is there about 5 V? YES-Go to step 12.
NO-Go to step 16.
12. Turn the ignition switch OFF.
13. Jump the SCS line with the HDS.
14. Disconnect PCM connector B (44P).
15. Check for continuity between MAF sensor/IAT sensor 5P connector terminal No.4 and PCM connector terminal B33.
Is there continuity? YES-Go to step 27.
NO-Repair open in the wire between the PCM (B33) and the IAT sensor, then go to step 22.
16. Turn the ignition switch OFF.
17. Jump the SCS line with the HDS.
18. Disconnect PCM connector B (44P).
19. Check for continuity between MAF sensor/IAT sensor 5P connector terminal No.5 and PCM connector terminal B31.
Is there continuity? YES-Go to step 27.
NO-Repair open in the wire between the PCM (B31) and the IAT sensor, then go to step 22.
20. Turn the ignition switch OFF.
21. Replace the MAF sensor/IAT sensor.
22. Reconnect all connectors.
23. Turn the ignition switch ON (II).
24. Reset the PCM with the HDS.
25. Do the PCM idle learn procedure.
26. Check for Temporary DTCs or DTCs with the HDS.
Is DTC P0113 indicated? YES-Check for poor connections or loose terminals at the MAF sensor/IAT sensor and the PCM, then go to step 1.
NO-Troubleshooting is complete. If any other Temporary DTCs or DTCs are indicated, go to the indicated DTC's troubleshooting.
27. Reconnect all connectors.
28. Update the PCM if it does not have the latest software, or substitute a known-good PCM.
29. Check for Temporary DTCs or DTCs with the HDS.
Is DTC P0113 indicated? YES-Check for poor connections or loose terminals at the MAF sensor/IAT sensor and the PCM. If the PCM was updated, substitute a known-good PCM, then recheck. If the PCM was substituted, go to step 1.
NO-If the PCM was updated, troubleshooting is complete. If the PCM was substituted, replace the original PCM. If any other Temporary DTCs or DTCs are indicated, go to the indicated DTC's troubleshooting.
READ NEXT:
 DTC P0116: ECT Sensor 1 Range/Performance Problem
NOTE: Before you troubleshoot, record all freeze data
and any on-board snapshot, and review the general
troubleshooting information.
1. Turn the ignition switch ON (II).
2. Check ECT SENSOR 1 in the
DTC P0128: Cooling System Malfunction
NOTE: Before you troubleshoot, record all freeze data
and any on-board snapshot, and review the general
troubleshooting information.
1. Turn the ignition switch ON (II).
2. Clear the DTC with the HDS
DTC P0137: Secondary HO2S (Sensor 2)
Circuit Low Voltage
NOTE: Before you troubleshoot, record all freeze data
and any on-board snapshot, and review the general
troubleshooting information.
1. Turn the ignition switch ON (II).
2. Clear the DTC with the HDS
SEE MORE:
Cylinder Head
Special Tools
Air Pressure Regulator
Valve Guide Reamer, 5.5 mm
Socket, 19 mm
Holder Handle
Adjuster
Locknut Wrench
Stem Seal Driver
VTEC Air Adapter
VTEC Air Stopper
Air Joint Adapter
Crankshaft Pulley Holder
Valve Guide Driver, 5.5 mm
Attachment, 52 x 55 mm
Driver
Valve Spring Co
AuthorizedManuals
Purchasing Factory Authorized Manuals (U.S. only)
The publications shown below can be purchased from Helm
Incorporated. You can order by phone or online:
- Call Helm Inc. at 1-800-782-4356 (credit card orders
only)
- Go online at www. helminc. com
If you are interested in other years or mode
