Honda CR-V: DTC P0137: Secondary HO2S (Sensor 2) Circuit Low Voltage
NOTE: Before you troubleshoot, record all freeze data and any on-board snapshot, and review the general troubleshooting information.
1. Turn the ignition switch ON (II).
2. Clear the DTC with the HDS.
3. Start the engine. Hold the engine speed at 3,000 rpm without load (in Park or neutral) until the radiator fan comes on, then let it idle.
4. Check the HO2S S2 in the DATA LIST with the HDS.
Does the voltage stay at 0.29 V or less? YES-Go to step 5.
NO-Intermittent failure, the system is OK at this time. Check for poor connections or loose terminals at the secondary HO2S (Sensor 2) and the PCM.
5. Turn the ignition switch OFF.
6. Disconnect the secondary HO2S (Sensor 2) 6P connector.
7. Turn the ignition switch ON (II).
8. Check the HO2S S2 in the DATA LIST with the HDS.
Does the voltage stay at 0.29 V or less? YES-Go to step 9.
NO-Go to step 13.
9. Turn the ignition switch OFF.
10. Jump the SCS line with the HDS.
11. Disconnect PCM connector C (44P).
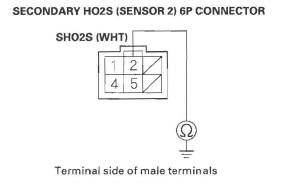
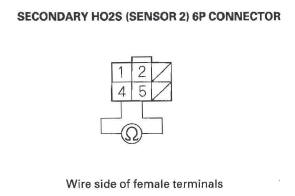
12. Check for continuity between secondary HO2S (Sensor 2) 6P connector terminal No.2 and body ground.
Is there continuity? YES-Repair short in the wire between the PCM (C27) and the secondary HO2S (Sensor 2), then go to step 15.
NO-Go to step 23.
13. Turn the ignition switch OFF.
14. Replace the secondary HO2S (Sensor 2).
15. Reconnect all connectors.
16. Turn the ignition switch ON (II).
17. Reset the PCM with the HDS.
18. Do the PCM idle learn procedure.
19. Start the engine. Hold the engine speed at 3,000 rpm without load (in Park or neutral) until the radiator fan comes on, then let it idle.
20. Test-drive under these conditions:
- Engine coolant temperature (ECT SENSOR 1) above 176 ºF (80 ºC)
- Transmission in D position
- Engine speed between 1,500 -3,000 rpm
- Drive about 1 minute or more
21. Check for Temporary DTCs or DTCs with the HDS.
Is DTC P0137 indicated? YES-Check for poor connections or loose terminals at the secondary HO2S (Sensor 2) and the PCM, then go to step 1.
NO-Go to step 22.
22. Monitor the OBD STATUS for DTC P0137 in the DTCs MENU with the HDS.
Does the screen indicate PASSED? YES-Troubleshooting is complete. If any other Temporary DTCs or DTCs were indicated in step 21, go to the indicated DTC's troubleshooting.
NO-If the screen indicates FAILED, check for poor connections or loose terminals at the secondary HO2S (Sensor 2) and the PCM, then go to step 1. If the screen indicates EXECUTING, keep driving until a result comes on. If the screen indicates OUT OF CONDITION, go to step 19.
23. Reconnect all connectors.
24. Update the PCM if it does not have the latest software, or substitute a known-good PCM.
25. Start the engine, Hold the engine speed at 3,000 rpm without load (in Park or neutral) until the radiator fan comes on, then let it idle.
26. Test-drive under these conditions:
- Engine coolant temperature (ECT SENSOR 1) above 176 ºF (80 ºC)
- Engine speed between 1,500-3,000 rpm
- Drive 1 minute or more
27. Check for Temporary DTCs or DTCs with the HDS.
Is DTC P0137 indicated? YES-Check for poor connections or loose terminals at the secondary HO2S(Sensor 2) and the PCM. If the PCM was updated, substitute a known-good PCM, then go to step 25. If the PCM was substituted, go to step 1.
NO-Go to step 28.
28. Monitor the OBD STATUS for DTC P0137 in the DTCs MENU with the HDS.
Does the screen indicate PASSED? YES-If the PCM was updated, troubleshooting is complete. If the PCM was substituted, replace the original PCM. If any other Temporary DTCs or DTCs were indicated in step 26, go to the indicated DTC's troubleshooting.
NO-If the screen indicates FAILED, check for poor connections or loose terminals at the secondary HO2S (Sensor 2) and the PCM. If the PCM was updated, substitute a known-good PCM , then go to step 25. If the PCM was substituted, go to step 1. If the screen indicates EXECUTING, keep driving until a result comes on. If the screen indicates OUT OF CONDITION, go to step 25.
DTC P0138: Secondary HO2S (Sensor 2) Circuit High Voltage
NOTE: Before you troubleshoot, record all freeze data and any on-board snapshot, and review the general troubleshooting information.
1. Turn the ignition switch ON (II).
2. Clear the DTC with the HDS.
3. Start the engine. Hold the engine speed at 3,000 rpm without load (in Park or neutral) until the radiator fan comes on, then let it idle.
4. Check the HO2S S2 in the DATA LIST with the HDS.
Does the voltage stay at 1.25 V or more? YES-Go to step 5.
NO-Intermittent failure, the system is OK at this time. Check for poor connections or loose terminals at the secondary HO2S (Sensor 2) and the PCM.
5. Turn the ignition switch OFF.
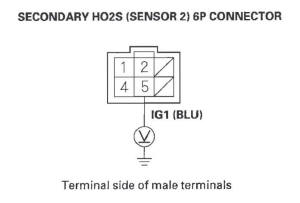
6. Disconnect the secondary HO2S (Sensor 2) 6P connector.
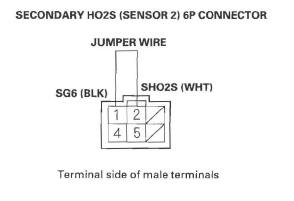
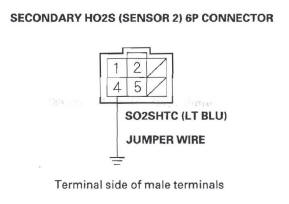
7. Connect secondary HO2S (Sensor 2) 6P connector terminals No.1 and No.2 with a jumper wire.
8. Turn the ignition switch ON (II).
9. Check the HO2S S2 in the DATA LIST with the HDS.
Does the voltage stay at 1.25 V or more? YES-Go to step 10.
NO-Go to step 19.
10. Turn the ignition switch OFF.
11. Remove the jumper wire from the secondary HO2S (Sensor 2) 6P connector.
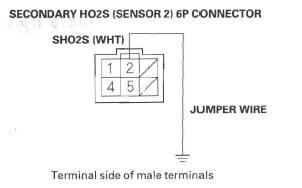
12. Connect secondary HO2S (Sensor 2) 6P connector terminal No.2 to body ground with a jumper wire.
13. Turn the ignition switch ON (II).
14. Check the HO2S S2 in the DATA LIST with the HDS.
Does the voltage stay at 1.25 V or more? YES-Go to step 15.
NO-Repair open in the wire between the PCM (B33) and the secondary HO2S (Sensor 2), then go to step 21.
15. Turn the ignition switch OFF.
16. Jump the SCS line with the HDS.
17. Disconnect PCM connector C (44P).
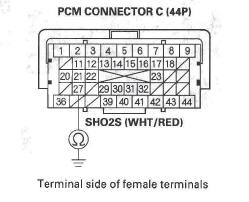
18. Check for continuity between PCM connector terminal C27 and body ground.
Is there continuity? YES-Go to step 29.
NO-Repair open in the wire between the PCM (C27) and the secondary HO2S (Sensor 2), then go to step 21.
19. Turn the ignition switch OFF.
20. Replace the secondary HO2S (Sensor 2).
21. Reconnect all connectors.
22. Turn the ignition switch ON (II).
23. Reset the PCM with the HDS.
24. Do the PCM idle learn procedure.
25. Start the engine. Hold the engine speed at 3,000 rpm without load (in Park or neutral) until the radiator fan comes on, then let it idle.
26. Test-drive under these conditions:
- Engine coolant temperature (ECT SENSOR 1) above 176 ºF (80 ºC)
- Transmission in D position
- Engine speed between 1,500-3,000 rpm
- Drive about 1 minute or more
27. Check for Temporary DTCs or DTCs with the HDS.
Is DTC P0138 indicated? YES-Check for poor connections or loose terminals at the secondary HO2S (Sensor 2) and the PCM, then go step 1.
NO-Go to step 28.
28. Monitor the OBD STATUS for DTC P0138 in the DTCs MENU with the HDS.
Does the screen indicate PASSED? YES-Troubleshooting is complete. If any other Temporary DTCs or DTCs were indicated in step 27, go to the indicated DTC's troubleshooting.
NO-If the screen indicates FAILED, check for poor connections or loose terminals at the secondary HO2S (Sensor 2) and the PCM, then go to step 1. If the screen indicates EXECUTING, keep driving until a result comes on. If the screen indicates OUT OF CONDITION, go to step 25.
29. Reconnect all connectors.
30. Update the PCM if it does not have the latest software, or substitute a known-good PCM.
31. Start the engine. Hold the engine speed at 3,000 rpm without load (in Park or neutral) until the radiator fan comes on, then let it idle.
32. Test-drive under these conditions:
- Engine coolant temperature (ECT SENSOR 1) above 176 ºF (80 ºC)
- Transmission in D position
- Engine speed between 1,500-3,000 rpm
- Drive about 1 minute or more
33. Check for Temporary DTCs or DTCs with the HDS.
Is DTC P0138 indicated? YES-Check for poor connections or loose terminals at the secondary HO2S (Sensor 2) and the PCM. If the PCM was updated, substitute a known-good PCM, then go to step 31. If the PCM was substituted, go to step 1.
NO-Go to step 34.
34. Monitor the OBD STATUS for DTC P0138 in the DTCs MENU with the HDS.
Does the screen indicate PASSED? YES-If the PCM was updated, troubleshooting is complete. If the PCM was substituted, replace the original PCM. If any other Temporary DTCs or DTCs were indicated in step 33, go to the indicated DTC's troubleshooting.
NO-If the screen indicates FAILED, check for poor connections or loose terminals at the secondary HO2S (Sensor 2) and the PCM. If the PCM was updated, substitute a known-good PCM, then go to step 31. If the PCM was substituted, go to step 1. If the screen indicates EXECUTING, keep driving until a result comes on. If the screen indicates OUT OF CONDITION, go to step 31.
DTC P0139: Secondary HO2S (Sensor 2) Slow Response
NOTE: Before you troubleshoot record all freeze data and any on-board snapshot, and review the general troubleshooting information.
1. Turn the ignition switch ON (II).
2. Clear the DTC with the HDS.
3. Start the engine. Hold the engine speed at 3,000 rpm without load (in Park or neutral) until the radiator fan comes on, then let it idle.
4. Test-drive under these conditions:
- Engine coolant temperature (ECT SENSOR 1) above 176 ºF (80 ºC)
- Transmission in D position
- Vehicle speed between 35-55 mph (56- 88 km/h)
- Drive 5 minutes or more
5. Monitor the OBD STATUS for DTC P0139 in the DTCs MENU with the HDS.
Does the screen indicate FAILED?.
YES-Go to step 6.
NO-If the screen indicates PASSED, intermittent failure, the system is OK at this time. Check for poor connections or loose terminals at the secondary HO2S (Sensor 2) and the PCM. If the screen indicates EXECUTING, keep driving until a result comes on. If the screen indicates OUT OF CONDITION, go to step 3 and recheck.
6. Turn the ignition switch OFF.
7. Replace the secondary HO2S (Sensor 2).
8. Turn the ignition switch ON (II).
9. Reset the PCM with the HDS.
10. Do the PCM idle learn procedure.
11. Start the engine. Hold the engine speed at 3,000 rpm without load (in Park or neutral) until the radiator fan comes on, then let it idle.
12. Test-drive under these conditions:
- Engine coolant temperature (ECT SENSOR 1) above 176 ºF (80 ºC)
- Transmission in D position
- Vehicle speed between 35-55 mph (56-88 km/h)
- Drive 5 minutes or more
13. Check for Temporary DTCs or DTCs with the HDS.
Is DTC P0139 indicated? YES-Check for poor connections or loose terminals at the secondary HO2S (Sensor 2) and the PCM, then go to step 1.
NO-Go to step 14.
14. Monitor the OBD STATUS for DTC P0139 in the DTCs MEN U with the HDS.
Does the screen indicate PASSED? YES-Troubleshooting is complete. If any other Temporary DTCs or DTCs were indicated in step 13, go to the indicated DTC's troubleshooting.
NO-If the screen indicates FAILED, check for poor connections or loose terminals at the secondary HO2S (Sensor 2) and the PCM, then go to step 1. If the screen indicates EXECUTING, keep driving until a result comes on. If the screen indicates OUT OF CONDITION, go to step 11.
DTC P0141: Secondary HO2S (Sensor 2) Heater Circuit Malfunction
NOTE: Before you troubleshoot, record all freeze data and any on-board snapshot, and review the general troubleshooting information.
1. Turn the ignition switch ON (II).
2. Clear the DTC with the HDS.
3. Start the engine.
4. Check for Temporary DTCs or DTCs with the HDS.
Is DTC P0141 indicated? YES-Go to step 5.
NO-Intermittent failure, the system is OK at this time. Check for poor connections or loose terminals at the secondary HO2S (Sensor 2) and the PCM.
5. Turn the ignition switch OFF.
6. Check the No.3 ALTERNATOR (10 A) fuse in the under-dash fuse/relay box.
Is the fuse OK? YES-Go to step 7.
NO-Repair short in the wire between the secondary HO2S (Sensor 2) and the No.3 ALTERNATOR (10 A) fuse. Also replace the No.3 ALTERNATOR (10 A) fuse, then go to step 23.
7. Disconnect the secondary HO2S (Sensor 2) 6P connector.
8. At the secondary HO2S (Sensor 2) side, measure resistance between secondary HO2S (Sensor 2) 6P connector terminals No.4 and No. 5.
Is there 5.4- 6.6 Ω at room temperature? YES-Go to step 9.
NO-Go to step 22.
9. At the secondary HO2S (Sensor 2) side, check for continuity between body ground and secondary HO2S (Sensor 2) 6P connector terminals No. 4 and No.5 individually.
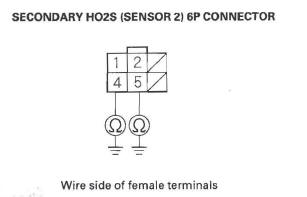
Is there continuity? YES-Go to step 22.
NO-Go to step 10.
10. Turn the ignition switch ON (II).
11. Measure voltage between secondary HO2S (Sensor 2) 6P connector terminals No.4 and No.5.
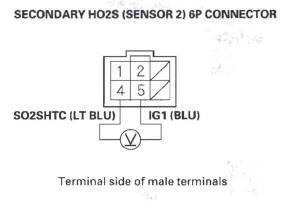
Is there battery voltage? YES-Go to step 12.
NO-Goto step 16.
12. Turn the ignition switch OFF.
13. Jump the SCS line with the HDS.
14. Disconnect PCM connector B (44P).
15. Check for continuity between PCM connector terminal B4 and body ground.
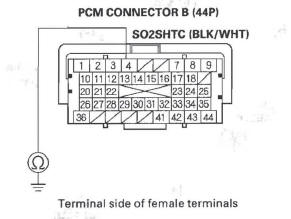
YES-Repair short in the wire between the PCM (B4) and the secondary HO2S (Sensor 2), then go to step 23.
NO-Go to step 29.
16. Measure voltage between secondary HO2S (Sensor 2) 6P connector terminal No. 5 and body ground.
Is there battery voltage? YES-Go to step 17.
NO-Repair open in the wire between the secondary HO2S (Sensor 2) and the No.3 ALTERNATOR (10 A) fuse, then go to step 23.
17. Turn the ignition switch OFF.
18. Jump the SCS line with the HDS.
19. Disconnect PCM connector B (44P).
20. Connect secondary HO2S (Sensor 2) 6P connector terminal No.4 to body ground with a jumper wire.
21. Check for continuity between PCM connector terminal B4 and body ground.
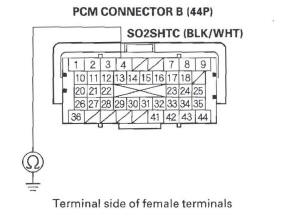
Is there continuity? YES-Go to step 29.
NO-Repair open in the wire between the PCM (B4) and the secondary HO2S (Sensor 2), then go to step 23.
22. Replace the secondary HO2S (Sensor 2).
23. Reconnect all connectors.
24. Turn the ignition switch ON (II).
25. Reset the PCM with the HDS.
26. Do the PCM idle learn procedure.
27. Check for Temporary DTCs or DTCs with the HDS.
Is DTC P0141 indicated? YES-Check for poor connections or loose terminals at the secondary HO2S (Sensor 2) and the PCM, then go to step 1.
NO-Go to step 28.
28. Monitor the OBD STATUS for DTC P0141 in the DTCs MENU with the HDS.
Does the screen indicate PASSED? YES-Troubleshooting is complete. If any other Temporary DTCs or DTCs were indicated in step 27, go to the indicated DTC's troubleshooting.
NO-If the screen indicates FAILED, check for poor connections or loose terminals at the secondary HO2S (Sensor 2) and the PCM, then go to step 1. If the screen indicates NOT COMPLETED, go to step 26.
29. Reconnect all connectors.
30. Update the PCM if it does not have the latest software, or substitute a known-good PCM.
31. Start the engine.
32. Check for Temporary DTCs or DTCs with the HDS.
Is DTC P0141 indicated? YES-Check for poor connections or loose terminals at the secondary HO2S (Sensor 2) and the PCM. If the PCM was updated, substitute a known-good PCM, then go to step 31. If the PCM was substituted, go to step 1.
NO-Go to step 33.
33. Monitor the OBD STATUS for DTC P0141 in the DTCs MENU with the HDS.
Does the screen indicate PASSED? YES-If the PCM was updated, troubleshooting is complete. If the PCM was substituted, replace the original PCM. If any other Temporary DTCs or DTCs were indicated in step 32, go to the indicated DTC's troubleshooting.
NO-If the screen indicates FAILED, check for poor connections or loose terminals at the secondary HO2S (Sensor 2) and the PCM. If the PCM was updated, substitute a known-good PCM, then go to step 31. If the PCM was substituted, go to step 1. If the screen indicates NOT COMPLETED, keep idling until a result comes on.
DTC P0171: Fuel System Too Lean
DTC P0172: Fuel System Too Rich
NOTE:
- Before you troubleshoot, record all freeze data and any on-board snapshot, and review the general troubleshooting information.
- If any of the DTCs listed below are indicated at the
same time as DTC P0171 and/or P0172, troubleshoot
those DTCs first, then recheck for P0171 and/or P0172.
P0101, P0102, P0103: Mass airflow (MAF) sensor
P0107, P0108, P1128, P1129: Manifold absolute pressure (MAP) sensor
P0133, P1172, P1157, P2195, P2238, P2252, P2A00: Air fuel ratio (A/F) sensor (Sensor 1)
P0134, P0135: Air fuel ratio (A/F) sensor (Sensor 1) heater
P0137, P0138, P0139, P2270, P2271: Secondary HO2S (Sensor 2)
P0141: Secondary HO2S (Sensor 2) heater
P2646, P2647, P2648, P2649: VTEC system
P0401,P0404,P0406,P2413:Exhaustgas recirculation (EGR) system
P0443, P0496: EVAP canister purge valve
1. Check the fuel pressure.
Is the fuel pressure OK? YES-Go to step 2.
NO-
- If the pressure is too high, replace the fuel pressure regulator, then go to step 7.
- If the pressure is too low, check the fuel pump, the fuel feed pipe and the fuel filter. If they are OK, replace the fuel pressure regulator, then go to step 7.
2. Check for vacuum leaks at these parts:
- PCV valve
- PCV hose
- EVAP canister purge valve
- Throttle body
- Intake manifold
- Brake booster
- Brake booster hose
- Air Intake duct
Are the parts OK? YES-Go to step 3.
NO-Repair or replace parts with leaks, then go to step 7.
3. Start the engine. Hold the engine speed at 3,000 rpm without load (in Park or neutral) until the radiator fan comes on, then let it idle.
4. Check for these conditions:
- Engine coolant temperature (ECT SENSOR 1) above 176 ºF (80 ºC)
- Transmission in Park or neutral
- All electrical loads off
5. Monitor the ENGINE SPEED in the DATA LIST with the HDS, and hold the engine speed at 4,500 rpm.
Once the engine speed is met, hold the accelerator pedal steady for more than 10 seconds.
Did the engine speed vary more than 100 rpm from 4,500 rpm? YES-Repeat step 5.
NO-Go to step 6.
6. While holding the engine speed at 4,500 rpm, check the MAF SENSOR in the DATA LIST with the HDS.
Is there about 14-20 gm/s? YES-Check the engine valve clearances and adjust if necessary. If the valve clearances are OK, replace the injectors, then go to step 7.
NO-Replace the MAF sensor/IAT sensor, then go to step 7.
7. Turn the ignition switch ON (II).
8. Reset the PCM with the HDS.
9. Do the PCM idle learn procedure.
10. Start the engine. Hold the engine speed at 3,000 rpm without load (in Park or neutral) until the radiator fan comes on, then let it idle.
11. Test-drive under these conditions:
- Engine coolant temperature (ECT SENSOR 1) above 176 ºF (80 ºC)
- Transmission in Park or neutral
- All electrical loads off
NOTE: DTC P0171 and/or P0l72 may take up to 80 minutes of test driving to set. Using the HDS, monitor the long term fuel trim (LT FUEL TRIM) or the air fuel feed back average (AF FB AVE). If the long term fuel trim/air fuel feed back average stays within 0.80-1.25, there is no problem at this time.
12. Check for Temporary DTCs or DTCs with the HDS.
(Is DTC P0171 or P0172 indicated? YES-Go to step 1 and recheck.
NO-Troubleshooting is complete. If any other Temporary DTCs or DTCs are indicated, go to the indicated DTC's troubleshooting.
READ NEXT:
 DTC P0300: Random Misfire and Any Combination of the Following
DTC P0301: No.1 Cylinder Misfire Detected
DTC P0302: No.2 Cylinder Misfire Detected
DTC P0303: No.3 Cylinder Misfire Detected
DTC P0304: No.4 Cylinder Misfire Detected
Special Tools Required
Pressur
DTC P0325: Knock Sensor Circuit Malfunction
NOTE: Before you troubleshoot, record all freeze data and any on-board
snapshot, and review the general troubleshooting information.
1. Turn the ignition switch ON (II).
2. Clear the DTC with the HD
DTC P0335: CKP Sensor No Signal
NOTE: Before you troubleshoot, record all freeze data and any on-board
snapshot, and review the general troubleshooting information.
1. Turn the ignition switch ON (II).
2. Clear the DTC with the H
SEE MORE:
DTC P050A: Cold Start Idle Air Control
System Performance Problem
NOTE: Before you troubleshoot, record all freeze data
and any on-board snapshot, and review the general
troubleshooting information.
1. Turn the ignition switch ON (II).
2. Check for Temporary DTCs or DTCs with the HDS.
Are any Temporary DTCs or DTCs other than P050A indicated? YES-Go to the
indi
DTC Troubleshooting
DTC P0461: Fuel Level Sensor (Fuel Gauge
Sending Unit) Range/Performance Problem
NOTE:
Before you troubleshoot, record all freeze data and any on-board
snapshot, and review the general troubleshooting information.
Because it requires 162 miles (260 km) of driving
without refueling to complete
