Honda CR-V: DTC P0300: Random Misfire and Any Combination of the Following
DTC P0301: No.1 Cylinder Misfire Detected
DTC P0302: No.2 Cylinder Misfire Detected
DTC P0303: No.3 Cylinder Misfire Detected
DTC P0304: No.4 Cylinder Misfire Detected
Special Tools Required
- Pressure gauge adapter 07NAJ-P07010A
- A/T low pressure gauge w/panel 07406-0070301
- A/T pressure hose 07406-0020201
- A/T pressure hose, 2,210 mm 07MAJ-PY4011A
- A/T pressure adapter 07MAJ-PY 40120
- Oil pressure hose 07ZAJ-S5AA200
NOTE:
- Before you troubleshoot, record all freeze data and any on-board snapshot, and review the general troubleshooting information.
- If the misfire is frequent enough to trigger detection of increased emissions during two consecutive driving cycles, the MIL will come on, and DTC P0300 (and some of the combination of P0301 through P0304) will be stored.
- If the misfire is frequent enough to damage the catalyst, the MIL will flash whenever the misfire occurs, and DTC P0300 (and some of the combination of P0301 through P0304) will be stored. When the misfire stops, the MIL will remain on.
- If any of the DTCs listed below are indicated at the
same time as the random misfire DTCs, troubleshoot
those DTCs first, then recheck for random misfire
DTCs:
P0101, P0102, P0103: Mass air flow (MAF) sensor
P0107, P0108: Manifold absolute pressure (MAP) sensor
P0171, P0172: Fuel system
P0335, P0339: Crankshaft position (CKP) sensor
P0365, P0369: Camshaft position (CMP) sensor B
P0506, P507: Idle control system
P2646, P2647, P2648, P2649: VTEC system
P0401, P0404, P0416, P2413: Exhaustgas recirculation (EGR) system
1. Turn the ignition switch ON (II).
2. Clear the DTC with the HDS.
3. Start the engine, and let it idle without load (in Park or neutral).
4. Monitor the OBD STATUS for DTC P0301, P0302, P0303, or P0304 in the DTCs MENU with the HDS.
Does the screen indicate FAILED? YES-Go to step 9.
NO-If the screen indicates PASSED, go to step 5. If the screen indicates EXECUTING, let the engine idle until a result comes on. If the screen indicates OUT OF CONDITION, wait for several minutes, then recheck;
5. Check the CYL1 MISFIRE, CYL2 MISFIRE, CYL3 MISFIRE, and/or CYL4 MISFIRE in the DATA LIST for 10 minutes with the HDS.
Does the CYL1 MISFIRE, CYL2 MISFIRE, CYL3 MISFIRE, and/or CYL4 MISFIRE show misfire counts? YES-Go to step 9.
NO-Go to step 6.
6. Test-drive the vehicle for several minutes in the range of these recorded freeze data parameters:
- ENGINE SPEED
- VSS
- REL TP SENSOR
- CLV (calculated load value)
- APP SENSOR
7. Monitor the OBD STATUS for DTC P0301, P0302, P0303, or P0304 in the DTCs MENU with the HDS.
Does the screen indicate FAILED? YES-Go to step 9.
NO-If the screen indicates PASSED, go to step 8. If the screen indicates EXECUTING, keep driving until a result comes on. if the screen indicates OUT OF CONDITION, go to step 6 and recheck.
8. Check the CYL1 MISFIRE, CYL2 MISFIRE, CYL3 MISFIRE, and/or CYL4 MISFIRE in the DATA LIST for 10 minutes with the HDS.
Does the CYL1 MISFIRE, CYL2 MISFIRE, CYL3 MISFIRE, and/or CYL4 MISFIRE show misfire counts? YES-Go to step 9.
NO-Intermittent failure, the system is OK at this time.
9. Turn the ignition switch OFF.
10. Check the fuel quality.
Is the quality good? YES-Go to step 11.
NO-Drain the tank and fill with a known-good fuel, then go to step 24.
11. Inspect the spark plugs. If the spark plugs are fouled or worn, replace them.
12. Test-drive the vehicle for several minutes in the range of these recorded freeze data parameters:
- ENGINE SPEED
- VSS
- REL TP SENSOR
- CLV (calculated load value)
- APP SENSOR
13. Check the CYL1 MISFIRE, CYL2 MISFIRE, CYL3 MISFIRE, and/or CYL4 MISFIRE in the DATA LIST for 10 minutes with the HDS.
Does the CYL4 MISFIRE, CYL2 MISFIRE, CYL3 MISFIRE, and/or CYL4 MISFIRE show misfire counts? YES-Go to step 14.
NO-Go to step 24.
14. Check the fuel pressure.
Is the fuel pressure OK? YES-Go to step 15.
NO-
- If the fuel pressure is too high, replace the fuel pressure regulator, then go to step 24.
- If the fuel pressure is too low, check the fuel pump, the fuel feed pipe, and the fuel filter. If they are OK, replace the fuel pressure regulator, then go to step 24.
15. Start the engine. Hold the engine speed at 3,000 rpm without load (in Park or neutral) until the radiator fan comes on, then let it idle.
16. Check for these conditions:
Engine coolant temperature (ECT SENSOR 1) above 176 ºF (80 ºC)
- Transmission in Park or neutral
- All electrical loads off
17. Monitor the ENGINE SPEED in the DATA LIST with the HDS, and hold the engine speed at 4,500 rpm.
Once the engine speed is met, hold the accelerator pedal steady for more than 10 seconds.
Did the engine speed vary more than 100 rpm from 4,500 rpm? YES-Repeat step 17.
NO-Go to step 18.
18. While holding the engine speed at 4,500 rpm, check the MAF SENSOR in the DATA LIST with the HDS.
Is there about 14-20 gm/s? YES-Go to step 19.
NO-Replace the MAF sensor/IAT sensor, then go to step 24.
19. Turn the ignition switch OFF.
20. Remove the rocker arm oil pressure switch (A), and install the special tools as shown, then install the rocker arm oil pressure switch in the pressure gauge attachment (B).
NOTE: Install the parts in the reverse order of removal with a new O-ring.
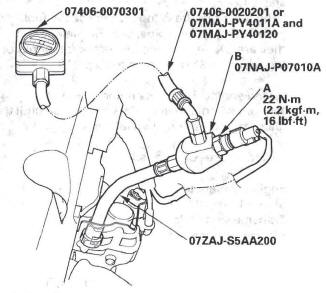
21. Reconnect the rocker arm oil pressure switch 2P connector.
22. Start the engine. Hold the engine speed at 3,000 rpm without load (in Park or neutral) until the radiator fan comes on, then let it idle.
23. Check the oil pressure at engine speeds of 1,000 rpm and 2,000 rpm.
Is the oil pressure below 49 kPa (0.5 kgf/cm2, 7 psi)? YES-Check for air in the fuel line, then go to step 24.
NO-Inspect the VTEC system, then go to step 24.
24. Turn the ignition switch ON (II).
25. Reset the PCM with the HDS.
26. Clear the CKP pattern with the HDS.
27. Do the PCM idle learn procedure.
28. Do the CKP pattern learn procedure.
29. Test-drive the vehicle for several minutes in the range of these recorded freeze data parameters:
- ENGINE SPEED
- VSS
- REL TP SENSOR
- CLV (calculated load value)
- APP SENSOR
30. Check for Temporary DTCs or DTCs with the HDS.
Are DTC P0300, P0301, P0302, P0303, or P0304 indicated? YES-Check for a poor connection or loose terminals at the ignition coil, the injector, and the PCM, then go to troubleshooting DTC P0301, P0302, P0303, or P0304.
NO-Go to step 31.
31. Monitor the OBD STATUS for DTC P0301, P0302, P0303, or P0304 in the DTCs MENU with the HDS.
Does the screen indicate PASSED? YES-Troubleshooting is complete. If any other Temporary DTCs or DTCs were indicated instep 30, go to the indicated DTC's troubleshooting.
NO-If the screen indicates FAILED, check for poor connections or loose terminals at the ignition coil, the injector, and the PCM, then go to step 1. If the screen indicates EXECUTING, keep driving until a result comes on. If the screen indicates OUT OF CONDITION, go to step 29.
DTC P0301: No.1 Cylinder Misfire Detected
DTC P0302: No.2 Cylinder Misfire Detected
DTC P0303: No.3 Cylinder Misfire Detected
DTC P0304: No.4 Cylinder Misfire Detected
NOTE: Before you troubleshoot, record all freeze data and any on-board snapshot, and review the general troubleshooting information.
1. Turn the ignition switch ON (II).
2. Clear the DTC with the HDS.
3. Start the engine, and let it idle without load (in Park or neutral).
4. Monitor the OBD STATUS for DTC P0301, P0302, P0303, or P0304 in the DTCs MENU with the HDS.
Does the screen indicate FAILED? YES-Go to step 9.
NO-If the screen indicates PASSED, go to step 5. If the screen indicates EXECUTING, let the engine idle until a result comes on. If the screen indicates OUT OF CONDITION, wait for several minutes, and recheck.
5. Check the CYL1 MISFIRE, CYL2 MISFIRE, CYL3 MISFIRE, and/or CYL4 MISFIRE in the DATA LIST for 10 minutes with the HDS.
Does the CYL1 MISFIRE, CYL2 MISFIRE, CYL3 MISFIRE, and/ or CYL4 MISFIRE show misfire counts? YES-Go to step 9.
NO-Go to step 6.
6. Test-drive the vehicle for several minutes in the range of these recorded freeze data parameters:
- ENGINE SPEED
- VSS
- REL TP SENSOR
- CLV (calculated load value)
- APP SENSOR
7. Monitor the OBD STATUS for DTC P0301 , P0302, P0303, or P0304 in the DTCs MENU with the HDS.
Does the screen indicate FAILED? YES-Go to step 9.
NO-If the screen indicates PASSED, go to step 8. If the screen indicates EXECUTING, keep driving until a result comes on. If the screen indicates OUT OF CONDITION, go to step 6 and recheck.
8. Check the CYL1 MISFIRE, CYL2 MISFIRE, CYL3 MISFIRE, and/or CYL4 MISFIRE in the DATA LIST for 10 minutes with the HDS.
Does the CYL1 MISFIRE, CYL2 MISFIRE, CYL3 MISFIRE, and/or CYL4 MISFIRE show misfire counts? YES-Go to step 9.
NO-Intermittent failure, the system is OK at this time. Check for loose wires or poor connections in the fuel system circuit.
9. Turn the ignition switch OFF.
10. Remove the intake manifold cover (see step 5).
11. Start the engine, and listen for a clicking sound at the injector of the problem cylinder.
Does the injector click? YES-Go to step 12.
NO-Go to step 42.
12. Turn the ignition switch OFF.
13. Exchange the ignition coil from the problem cylinder with one from another cylinder.
14. Test-drive the vehicle for several minutes in the range of these recorded freeze data parameters:
- ENGINE SPEED
- VSS
- REL TP SENSOR
- CLV (calculated load value)
- APP SENSOR
15. Check the CYL 1 MISFIRE, CYL2 MISFIRE, CYL3 MISFIRE, and/or CYL4 MISFIRE in the DATA LIST for 10 minutes with the HDS.
Does the CYL 1 MISFIRE, CYL2 MISFIRE, CYL3 MISFIRE, and/or CYL4 MISFIRE show misfire counts? YES-Go to step 16.
NO-Intermittent misfire due to poor contact at the ignition coil connector or poor quality fuel (no misfire at this time). Make sure the coil connections are secure.
16. Determine which cylinder had the misfire.
Does the misfire occur in the cylinder where the ignition coil was exchanged? YES-Replace the faulty ignition coil, then go to step 60.
NO-Go to step 17.
17. Turn the ignition switch OFF.
18. Exchange the spark plug from the problem cylinder with one from another cylinder.
19. Test-drive the vehicle for several minutes in the range of these recorded freeze data parameters:
- ENGINE SPEED
- VSS
- REL TP SENSOR
- CLV (calculated load value)
- APP SENSOR
20. Check the CYL 1 MISFIRE, CYL2 MISFIRE, CYL3 MISFIRE, and/or CYL4 MISFIRE in the DATA LIST for 10 minutes with the HDS.
Does the CYL1 MISFIRE, CYL2 MISFIRE, CYL3 MISFIRE, and/or CYL4 MISFIRE show misfire counts? YES-Go to step 21.
NO-Intermittent misfire due to spark plug fouling (no misfire at this time).
21. Determine which cylinder had the misfire.
Does the misfire occur in the cylinder where the spark plug was exchanged? YES-Replace the faulty spark plug, then go to step 60.
NO-Go to step 22.
22. Turn the ignition switch OFF.
23. Exchange the injector from the problem cylinder with one from the another cylinder.
24. Start the engine, and let it idle for 2 minutes.
25. Test-drive the vehicle for several minutes in the range of these recorded freeze data parameters:
- ENGINE SPEED
- VSS
- REL TP SENSOR
- CLV (calculated load value)
- APP SENSOR
26. Check the CYL 1 MISFIRE, CYL2 MISFIRE, CYL3 MISFIRE, and/or CYL4 MISFIRE in the DATA LIST for 10 minutes with the HDS.
Does the CYL 1 MISFIRE, CYL2 MISFIRE, CYL3 MISFIRE, and/ or CYL4 MISFIRE show misfire counts? YES-Go to step 27.
NO-Intermittent misfire due to bad contact at the injector connector (no misfire at this time). Check for poor connections or loose terminals at the injector.
27. Determine which cylinder had the misfire.
Does the misfire occur in the cylinder where the injector was exchanged? YES-Replace the faulty injector, then go to step 60.
NO-Go to step 28.
28. Turn the ignition switch OFF.
29. Disconnect the ignition coil 3P connector from the problem cylinder.
30. Turn the ignition switch ON (II).
31. Measure voltage between ignition coil 3P connector terminal No.3 and body ground.
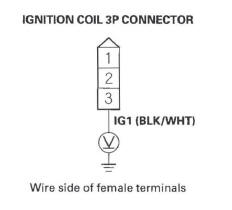
Is there battery voltage? YES-Go to step 32.
NO-Repair open in the wire between the ignition coil and the ignition coil relay, then go to step 60.
32. Turn the ignition switch OFF.
33. Check for continuity between ignition coil 3P connector terminal No.2 and body ground.
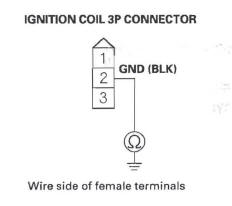
Is there continuity? YES-Go to step 34.
NO-Repair open in the wire between the ignition coil and G101, then go to step 60.
34. Turn the ignition switch OFF.
35. Jump the SCS line with the HDS.
36. Disconnect PCM connector C (44P).
37. Check for continuity between body ground and the appropriate PCM connector terminal of the problem cylinder (see table).

Is there continuity? YES-Repair short in the wire between the PCM and the ignition coil, then go to step 60.
NO-Go to step 38.
38. Check for continuity between appropriate ignition coil 3P connector terminal No. 1 and the appropriate PCM connector terminal of the problem cylinder (see table).
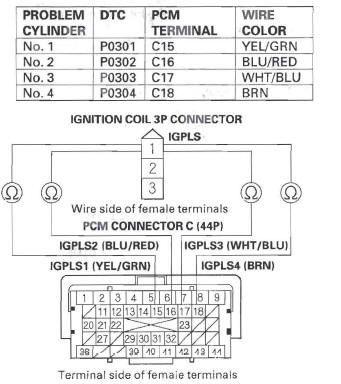
Is there continuity? YES-Go to step 39.
NO-Repair open in the wire between the PCM and the ignition coil, then go to step 60.
39. Reconnect all connectors.
40. Do an engine compression and a cylinder leakdown test.
Did the engine pass both tests? YES-Go to step 41.
NO-Repair the engine, then go to step 60.
41. Do the VTEC rocker arm test.
Did the engine pass the test? YES-Go to step 70.
NO-Repair the VTEC rocker arm , then go to step 60.
42. Turn the ignition switch OFF.
43. Jump the SCS line with the HDS.
44. Disconnect PCM connector C (44P).
45. Turn the ignition switch ON (II).
46. Measure voltage between body ground and the appropriate PCM connector terminal of the problem cylinder (see table).

Is there battery voltage? YES-Go to step 54.
NO-Go to step 47.
47. Turn the ignition switch OFF.
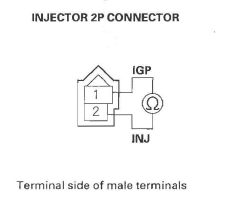
48. Disconnect the injector 2P connector from the problem cylinder.
49. Turn the ignition switch ON (II).
50. Measure voltage between injector 2P connector terminal No. 1 and body ground.
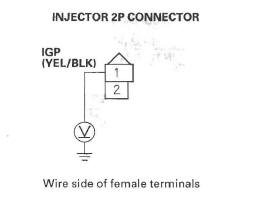
Is there battery voltage? YES-Go to step 51.
NO-Repair open in the wire between the injector and PGM-FI main relay 1, then go to step 60.
51. Turn the ignition switch OFF.
52. Check for continuity between body ground and the appropriate PCM connector terminal of the problem cylinder (see table).

Is there continuity? YES-Repair short in the wire between the PCM and the injector, then go to step 60.
NO-Go to step 53.
53. Check for continuity between appropriate injector 2P connector terminal No.2 and the appropriate PCM connector terminal of the problem cylinder (see table).
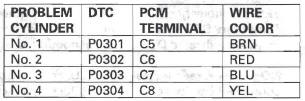
Is there continuity? YES-Go to step 54.
NO-Repair open in the wire between the PCM and the injector, then go to step 60.
54. At the injector side, measure resistance between injector 2P connector terminals No.1 and No.2.
Is there 10- 13 Ω ? YES-Go to step 55.
NO-Replace the injector, then go to step 60.
55. Substitute a known-good injector into the problem cylinder.
56. Reconnect all connectors.
57. Start the engine, and let it idle for 2 minutes.
58. Test-drive the vehicle for several minutes in the range of these recorded freeze data parameters:
- ENGINE SPEED
- VSS
- REL TP SENSOR
- CLV (calculated load value)
- APP SENSOR
59. Check the CYL 1 MISFIRE, CYL2 MISFIRE, CYL3 MISFIRE, and/or CYL4 MISFIRE in the DATA LIST for 10 minutes with the HDS.
Does the CYL 1 MISFIRE, CYL2 MISFIRE, CYL3 MISFIRE, and/ or CYL4 MISFIRE show misfire counts? YES-Go to step 70.
NO-Replace the original injector, then go to step 60.
60. Turn the ignition switch OFF.
61. Reconnect all connectors.
62. Turn the ignition switch ON (II).
63. Reset the PCM with the HDS.
64. Clear the CKP pattern with the HDS.
65. Do the PCM idle learn procedure.
66. Do the CKP pattern learn procedure.
67. Test-drive the vehicle for several minutes in the range of these recorded freeze data parameters:
- ENGINE SPEED
- VSS
- REL TP SENSOR
- CLV (calculated load value)
- APP SENSOR
68. Check for Temporary DTCs or DTCs with the HDS.
Is DTC P0301, P0302, P0303, or P0304 indicated? YES-Check for poor connections or loose terminals at the ignition coil, the injector, and the PCM, then go to troubleshooting DTC P0300, P0301, P0302, P0303, or P0304.
NO-Go to step 69.
69. Monitor the OBD STATUS for DTC P0301, P0302, P0303, or P0304 in the DTCs MENU with the HDS.
Does the screen indicate PASSED?
YES-Troubleshooting is complete. If any other Temporary DTCs or DTCs were indicated in step 68, go to the indicated DTC's troubleshooting.
NO-If the screen indicates FAILED, check for poor connections or loose terminals at the ignition coil, the injector, and the PCM, then go to step 1. If the screen indicates EXECUTING, keep driving until a result comes on. If the screen indicates OUT OF CONDITION, go to step 67.
70. Update the PCM if it does not have the latest software, or substitute a known-good PCM.
71. Test-drive the vehicle for several minutes in the range of these recorded freeze data parameters:
- ENGINE SPEED
- VSS
- REL TP SENSOR
- CLV (calculated load value)
- APP SENSOR
72. Check for Temporary DTCs or DTCs with the HDS.
Is DTC P0301, P0302, P0303, or P0304 indicated? YES-Check for poor connections or loose terminals at the ignition coil, the injector, and the PCM. If the PCM was updated, substitute a known-good PCM, then go to step 71. If the PCM was substituted, go to step 1.
NO-Go to step 73.
73. Monitor the OBD STATUS for DTC P0301, P0302, P0303, or P0304 in the DTCs MENU with the HDS.
Does the screen indicate PASSED? YES-If the PCM was updated, troubleshooting is complete. If the PCM was substituted, replace the original PCM. If any other Temporary DTCs or DTCs were indicated in step 72, go to the indicated DTC's troubleshooting.
NO-If the screen indicates FAILED, check for poor connections or loose terminals at the ignition coil, the injector, and the PCM. If the PCM was updated, substitute a known-good PCM, then go to step 71. If the PCM was substituted, go to step 1. If the screen indicates EXECUTING, keep driving until a result comes on. If the screen indicates OUT OF CONDITION, go to step 71.
READ NEXT:
 DTC P0325: Knock Sensor Circuit Malfunction
NOTE: Before you troubleshoot, record all freeze data and any on-board
snapshot, and review the general troubleshooting information.
1. Turn the ignition switch ON (II).
2. Clear the DTC with the HD
DTC P0335: CKP Sensor No Signal
NOTE: Before you troubleshoot, record all freeze data and any on-board
snapshot, and review the general troubleshooting information.
1. Turn the ignition switch ON (II).
2. Clear the DTC with the H
DTC P050A: Cold Start Idle Air Control
System Performance Problem
NOTE: Before you troubleshoot, record all freeze data
and any on-board snapshot, and review the general
troubleshooting information.
1. Turn the ignition switch ON (II).
2. Check for Temporary DTCs o
SEE MORE:
Auto Door Unlocking
The auto door unlocking feature has
five possible settings:
The auto door unlocking is
deactivated all the time.
The driver’s door unlocks when
you move the shift lever to the
Park (P) position with the brake
pedal depressed.
This is the default setting.
All doors and tailgate unlock
Radio Reception
How well the radio receives stations
is dependent on many factors, such
as the distance from the station’s
transmitter, nearby large objects,
and atmospheric conditions.
A radio station’s signal gets weaker
as you get farther away from its
transmitter. If you are listening to an
A
