
Honda CR-V: Sleep and Wake-up Mode Test
1. Shift to the sleep mode: Turn the ignition switch OFF, and remove the key. If the MICU receives no signals from the inputs listed below, it will go into sleep mode in less than 40 seconds.
- Driver's door lock switch (LOCK or UNLOCK)
- Driver's door key cylinder switch (LOCK or UNLOCK)
- Front passenger's door lock switch (LOCK or UNLOCK)
- Tailgate latch switch (tailgate closed)
- Tailgate outer handle switch
- Hazard warning switch (OFF)
2. Confirm the sleep mode: Check for voltage on the B-CAN communication line; there should be battery voltage in the sleep mode. Check the parasitic draw at the battery while shifting into the sleep mode; amperage should change from about 200 mA to less than 35 mA.
3. Shift to the wake up mode: When the ignition switch is turned ON (II), the MICU, gauge control module, immobilizer-keyless control unit-receiver, and PCM wake up at the same time without "talking" to each other through the communication lines.
When any switch in the multiplex integrated control system is turned on, it wakes up its related control unit which, in turn, wakes up the other units. After confirming the sleep mode, look in the following table for the switch most related to the problem. Operate that switch and see if its control unit wakes up.
NOTE: If any control unit is faulty and will not wake up, several circuits in the system will malfunction at the same time. The MICU is followed by a list of the switches and input signals that can wake it up.
- Door switches (door open)
- Driver's door lock switch (LOCK or UNLOCK)
- Driver's door lock knob switch (LOCK or UNLOCK)
- Driver's door key cylinder switch (LOCK or UNLOCK)
- Front passenger's door lock switch (LOCK or UNLOCK)
- Front passenger's door lock knob switch (UNLOCK)
- Left rear door lock knob switch
- Right rear door lock knob switch
- Tailgate latch switch (tailgate open)
- Tailgate outer handle switch
- Hood switch (with security) (hood open)
- Hazard warning switch (ON)
- Combination light switch (parking, headlight, dimmer, passing ON)
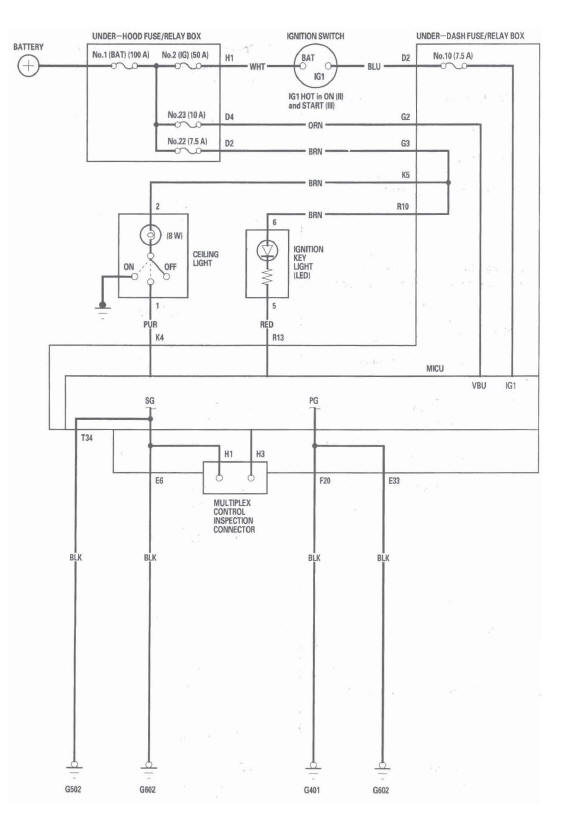
- Ignition key switch (key inserted)
Circuit Diagram
READ NEXT:
 DTC Troubleshooting
DTC B1000: Communication Bus Line Error
(Bus-off)
1. Clear the DTCs with the HDS.
2. Turn the ignition switch OFF, and then back ON (II).
3. Wait for 6 seconds or more.
4. Check for DTCs with the H
MICU Input Test
NOTE: Before testing, troubleshoot the B-CAN System Diagnosis Test Mode A.
1. Turn the ignition switch OFF.
2. Disconnect the under-dash fuse/relay box connectors E, F, G, K, R, and T.
NOTE: All con
Keyless/Power Door Locks/Security
System
Component Location Index
NAVIGATION UNIT or
AUDIO UNIT
IMMOBILIZER-KEYLESS
CONTROL UNIT
(Built-in receiver)
MICU (Built into the under-dash fuse/relay box)
HEADLIGHTS
HORN
HOOD SWITCH
SECUR
SEE MORE:
Calculating Fuel Economy
Measuring Techniques
Direct calculation is the
recommended source of information
about your actual fuel economy.
Using frequency of fill-ups or taking
fuel gauge readings are NOT
accurate measures of fuel economy.
Fuel economy may improve over the
first several thousand miles
(kilomet
XM Radio Display Messages
‘‘LOADING’’ - XM is loading the
audio or program information.
‘‘OFF AIR’’ - The channel
currently selected is no longer
broadcasting.
‘‘UPDATING’’ - The encryption
code is being updated. Wait until the
encryption code is fully updated.
Channels 0 and 1 should
