Honda CR-V: Side Engine Mount Bracket Replacement
1. Support the engine with a jack and wood block under the oil pan.
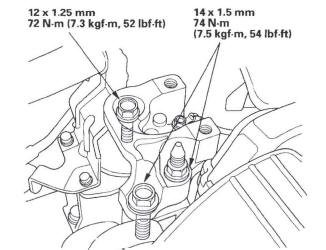
2. Remove the upper torque rod.
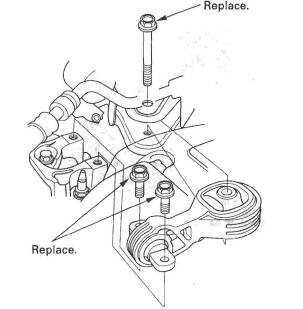
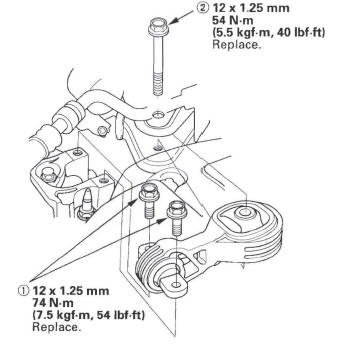
3. Remove the ground cable (A), then remove the side engine mount bracket (B).
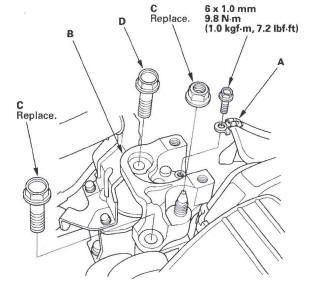
4. Install the side engine mount bracket, then loosely tighten the new bolt and nut (C), and loosely tighten the bolt (D).
5. Install the ground cable.
6. Remove the air cleaner housing assembly.
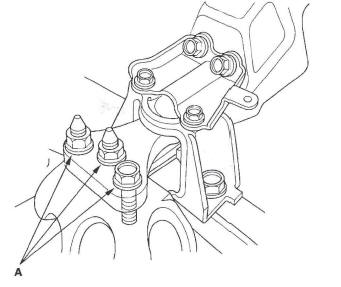
7. Loosen the transmission mounting bolt and nuts (A).
8. Raise the lift to full height.
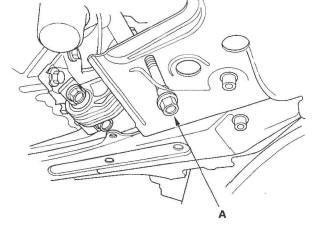
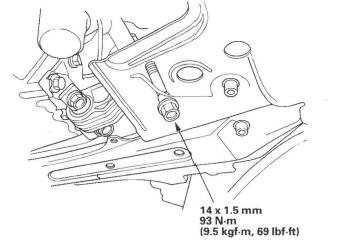
9. Loosen the lower torque rod mounting bolt (A).
10. Lower the vehicle on the lift.
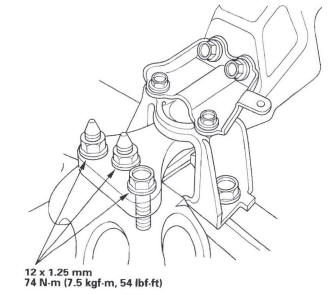
11. Tighten the side engine mount mounting bolts and nut.
12. Tighten the transmission mounting bolt and nuts.
13. Raise the lift to full height.
14. Tighten the lower torque rod mounting bolt.
15. Lower the vehicle on the lift.
16. Install the air cleaner housing assembly.
17. Install the upper torque rod, then tighten the new upper torque rod mounting bolts in the numbered sequence shown.
Engine Assembly
Special Tools

READ NEXT:
 Cylinder Head
Special Tools
Air Pressure Regulator
Valve Guide Reamer, 5.5 mm
Socket, 19 mm
Holder Handle
Adjuster
Locknut Wrench
Stem Seal Driver
VTEC Air Adapter
VTEC Air Stopper
Air Joint Adapter
C
Engine Compression Inspection
NOTE: After this inspection, you must reset the
powertrain control module (PCM), otherwise the PCM
will continue to stop the injectors from functioning.
Select PCM reset using the Honda Diagnostic Sy
Valve Clearance Adjustment
Special Tools Required
Adjuster 07MAA-PR70110
Locknut wrench 07MAA-PR70120
NOTE: Adjust the valves only when the cylinder head
temperature is less than 100 ºF (38 ºC).
1. Remove the cylinder hea
SEE MORE:
Entry Lights Control System
Component Location Index
With moonroof
INDIVIDUAL MAP LIGHTS
IGNITION KEY SWITCH
IGNITION KEY LIGHT
CEILING LIGHT
CARGO AREA LIGHT
RIGHT REAR DOOR SWITCH
FRONT PASSENGER'S
DOOR SWITCH
LEFT REAR DOOR SWITCH
DRIVER'S DOOR
SWITCH
DRIVER'S DOOR
LOCK KNOB SWITCH
MICU (Built into the under
CKP Pulse Plate Replacement
1. Remove the front wheels.
2. Remove the splash shield (see step 21).
3. Remove the drive belt.
4. Remove the cylinder head cover.
5. Set the No.1 piston at top dead center (TDC). The
punch mark on the variable valve timing control
(VTC) actuator and the punch mark on the exhaust
camshaft sproc
