Honda CR-V: Valve Clearance Adjustment
Special Tools Required
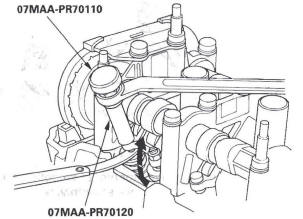
- Adjuster 07MAA-PR70110
- Locknut wrench 07MAA-PR70120
NOTE: Adjust the valves only when the cylinder head temperature is less than 100 ºF (38 ºC).
1. Remove the cylinder head cover.
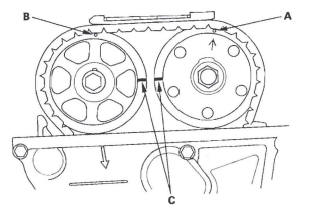
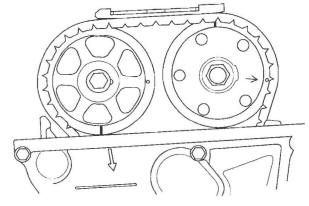
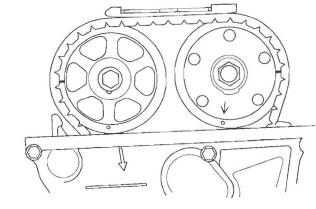
2. Set the No.1 piston at top dead center (TDC). The punch mark (A) on the variable valve timing control (VTC) actuator and the punch mark (B) on the exhaust camshaft sprocket should be at the top.
Align the TDC marks (C) on the VTC actuator and exhaust camshaft sprocket.
3. Select the correct thickness feeler gauge for the valves you're going to check.
Valve Clearance
Intake: 0.21-0.25 mm (0.008-0.010 in.)
Exhaust: 0.28-0.32 mm (0.011-0.013 in.)
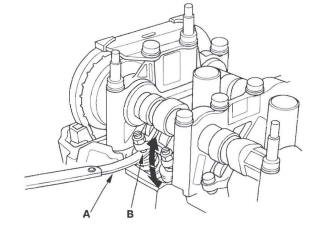
4. Insert the feeler gauge (A) between the adjusting screw (B) and the end of the valve stem, and slide it back and forth; you should feel a slight amount of drag.
5. If you feel too much or too little drag, loosen the locknut with the locknut wrench and adjuster, and turn the adjusting screw until the drag on the feeler gauge is correct.
6. Tighten the locknut to the specified torque, and recheck the clearance. Repeat the adjustment if necessary.
Specified Torque
Intake:
7 x 0.75 mm
20 N*m (2.0 kgf*m, 14 Ibf*tt)
Apply engine oil to the nut threads.
Exhaust:
7x 0.75mm
14 N*m (1.4 kgf*m, 10 Ibf*tt)
Apply engine oil to the nut threads.
7. Rotate the crankshaft 180 º clockwise (camshaft pulley turns 90 º).
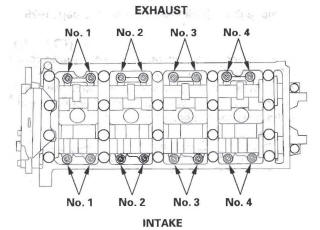
8. Check and, if necessary, adjust the valve clearance on No.3 cylinder.
9. Rotate the crankshaft 180 ºclockwise (camshaft pulley turns 90 º).
10. Check and, if necessary, adjust the valve clearance on No.4 cylinder.
11. Rotate the crankshaft 180 º clockwise (camshaft pulley turns 90 º).

12. Check and, if necessary, adjust the valve clearance on No.2 cylinder.
13. Install the cylinder head cover.
Crankshaft Pulley Removal and Installation
Special Tools Required
- Holder handle 07JAB-001020A
- Crankshaft pulley holder 070AB-RJA0100
- Socket, 19 mm 07JAA-001020A or a commercially available 19 mm socket
Removal
1. Remove the front wheels.
2. Remove the splash shield (see step 21).
3. Remove the drive belt.
4. Hold the pulley with holder handle (A) and holder attachment (B).
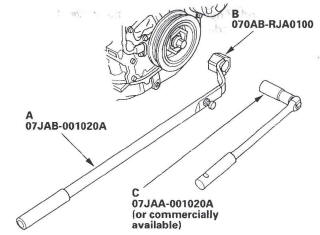
5. Remove the bolt with a 19 mm socket (C) and breaker bar, then remove the crankshaft pulley.
Installation
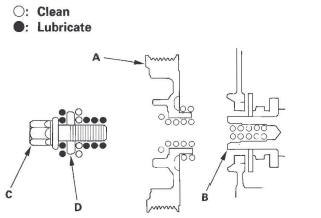
1. Clean the crankshaft pulley (A), crankshaft (B), bolt (C), and washer (D). Lubricate as shown.
2. Install the crankshaft pulley, and hold the pulley with holder handle (A) and holder attachment (B).
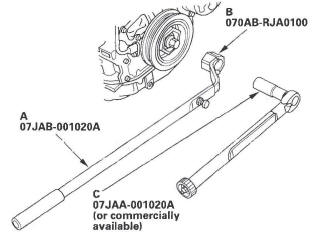
3. Tighten the bolt to 49 N*m (5.0 kgf*m, 36 Ibf*ft) with a torque wrench and 19 mm socket (C). Do not use an impact wrench.
4. Tighten the pulley bolt an additional 90 º.
5. Install the drive belt.
6. Install the splash shield (see step 34).
7. Install the front wheels.
READ NEXT:
 Cam Chain Removal
NOTE: Keep the cam chain away from magnetic fields.
1. Remove the front wheels.
2. Remove the splash shield (see step 21).
3. Remove the drive belt.
4. Remove the cylinder head cover.
5. Set the N
Cam Chain Installation
NOTE:
Keep the cam chain away from magnetic fields.
Before this procedure, check that the variable valve
timing control (VTC) actuator is locked by turning the
VTC actuator counterclockwise. If n
Auto-tensioner Removal and Installation
Removal
1. Remove the chain case cover.
2. Turn the crankshaft counterclockwise to compress
the auto-tensioner.
3. Align the holes on the lock (A) and the auto-tensioner
(B), then insert a 1.2 mm (0
SEE MORE:
Wipers/Washers
Component Location Index
WINDSHIELD WIPER BLADES
WIPER/WASHER SWITCH
WINDSHIELD WIPER
ARMS and LINK
WINDSHIELD WIPER MOTOR
UNDER-DASH FUSE/RELAY BOX
UNDER-HOOD FUSE/RELAY BOX
INTERMITTENT WIPER RELAY CIRCUIT
(Built into the MICU)
REAR WIPER BLADE
REAR WIPER ARM
REAR WINDOW WIPER MOT
To Stop Playing a Disc
To play the radio when a disc is
playing, press the AM/FM button or
touch the FM1, FM2, AM, XM1, or
XM2 icon. If a PC card is in the audio
unit, touch the CARD icon to play
the PC card. If a CD or CDs are
loaded in the CD changer, touch the
CDC icon to play the CD changer.
Press the C
