Honda CR-V: Cam Chain Installation
NOTE:
- Keep the cam chain away from magnetic fields.
- Before this procedure, check that the variable valve
timing control (VTC) actuator is locked by turning the
VTC actuator counterclockwise. If not locked, turn the
VTC actuator clockwise until it stops, then recheck it.
If it is still not locked, replace the VTC actuator.
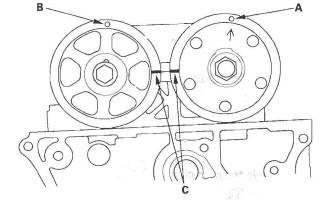
1. Set the crankshaft to top dead center (TDC). Align the TDC mark (A) on the crankshaft sprocket with the pointer (B) on the engine block.

2. Set the camshafts to TDC. The punch mark (A) on the VTC actuator and the punch mark (B) on the exhaust camshaft sprocket should be at the top.
Align the TDC marks (C) on the VTC actuator and exhaust camshaft sprocket.
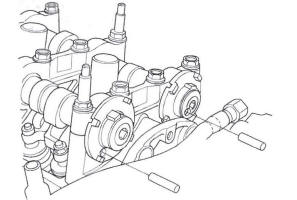
3. To hold the intake camshaft, insert a change detent arm shaft (P/N 24635-P6H-003) (A) into the maintenance hole in the camshaft position (CMP) pulse plate A (B) and through No.5 rocker shaft holder (C).

4. To hold the exhaust camshaft, insert a change detent arm shaft (P/N 24635-PSH-003) (A) into the maintenance hole in the CMP pulse plate B (D) and through No.5 rocker shaft holder (C).
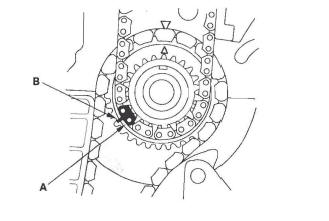
5. Install the cam chain on the crankshaft sprocket with the colored link plate (A) aligned with the mark (B) on the crankshaft sprocket.
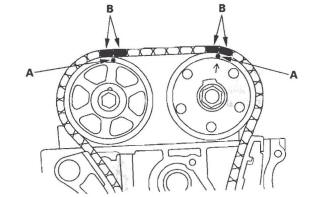
6. Install the cam chain on the VTC actuator and the exhaust camshaft sprocket with the punch marks (A) aligned with the center of the two colored link plates (B).
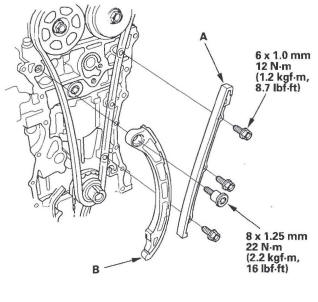
7. Install cam chain guide A and tensioner arm (B).
8. Install the auto-tensioner.
9. Install cam chain guide B.
10. Remove the pin or lock pin (P/N 14511 -PNA-003) from the auto-tensioner.
11. Remove the change detent arm shafts (P/N 24635-P6H-003).
12. Check the chain case oil seal for damage. If the oil seal is damaged, replace the chain case oil seal.
13. Remove old liquid gasket from the chain case mating surfaces, bolts, and bolt holes.
14. Clean and dry the chain case mating surfaces.
15. Apply liquid gasket, P/N 08717-0004, 08718-0001, 08718-0003, or 08718-0009, evenly to the engine block mating surface of the chain case. Install the component within 5 minutes of applying the liquid gasket.
NOTE:
- If you apply liquid gasket P/N 08718-0012, the component must be installed within 4 minutes.
- If too much time has passed after applying the liquid gasket, remove the old liquid gasket and residue, then reapply new liquid gasket.
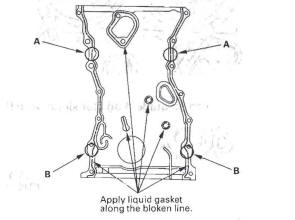
16. Apply liquid gasket to the engine block upper surface contact areas (A) on the chain case and lower block upper surface contact areas (B) on the chain case.
17. Apply liquid gasket, P/N 08717-0004, 08718-0001 , 08718-0003, or 08718-0009, evenly to the oil pan mating surface of the chain case. Install the component within 5 minutes of applying the liquid gasket.
NOTE:
- If you apply liquid gasket P/N 08718-0012, the component must be installed within 4 minutes.
- If too much time has passed after applying the liquid gasket, remove the old liquid gasket and residue, then reapply new liquid gasket.

18. Install the new O-ring (A), side engine mount bracket (B), and mounting bolts (C) on the chain case. Set the edge of the chain case (D) to the edge of the oil pan (E), then install the chain case on the engine block (F). Wipe off the excess liquid gasket on the oil pan and chain case mating area.
NOTE:
- When installing the chain case, do not slide the bottom surface onto the oil pan mounting surface.
- Wait at least 30 minutes before filling the engine with oil.
- Do not run the engine for at least 3 hours after installing the cha in case.
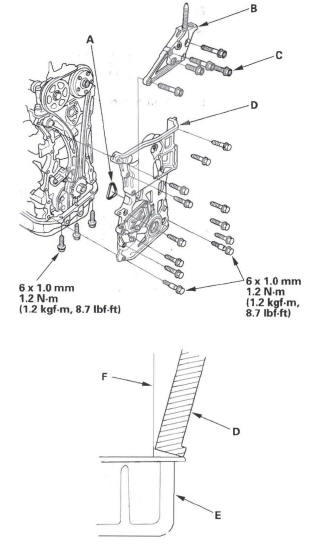
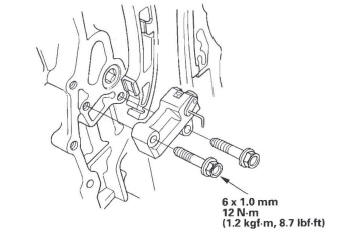
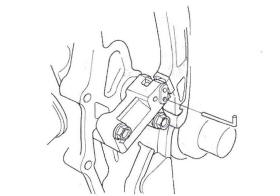
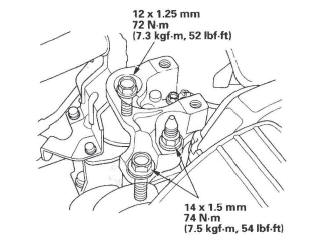
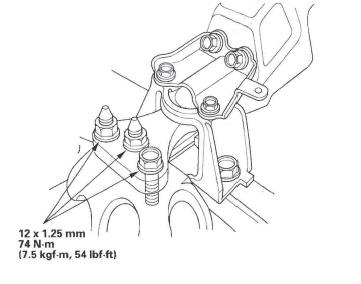
19. Tighten the side engine mount bracket mounting bolts.
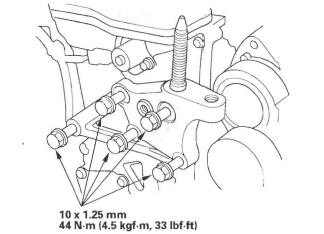
20. Install the side engine mount bracket (A), then loosely tighten the new bolt and nut (B), and loosely tighten the bolt (C).
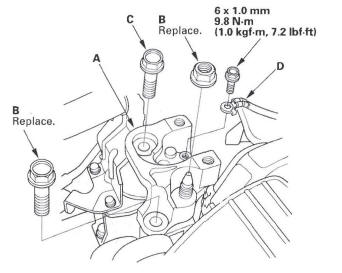
21. Install the ground cable (D).
22. Remove the air cleaner housing assembly.
23. Loosen the transmission mounting bolt and nuts (A).

24. Raise the lift to full height.
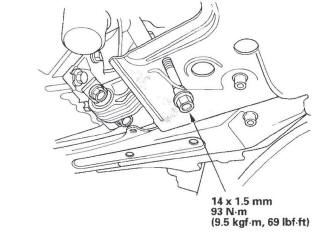
25. Loosen the lower torque rod mounting bolt (A).

26. Lower the vehicle on the lift.
27. Tighten the side engine mount mounting bolts and nut.
28. Tighten the transmission mounting bolt and nuts.
29. Raise the lift to full height.
30. Tighten the lower torque rod mounting bolt.
31. Lower the vehicle on the lift.
32. Install the air cleaner housing assembly.
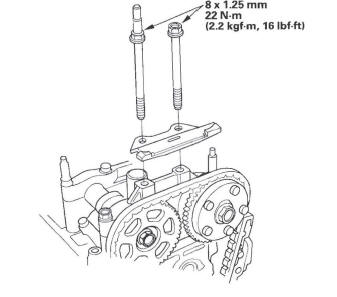
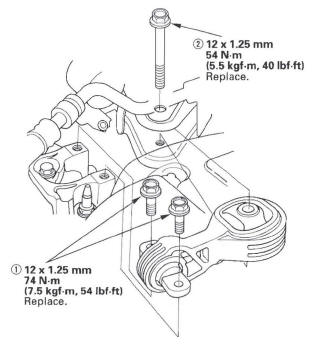
33. Install the upper torque rod, then tighten the new upper torque rod mounting bolts in the numbered sequence shown.
34. Install the crankshaft pulley.
35. Install the VTC oil control solenoid valve.
36. Connect the crankshaft position (CKP) sensor connector (A) and VTC oil control solenoid valve connector (B).

37. Install the cylinder head cover.
38. Install the drive belt.
39. Do the CKP pattern clear/CKP learn procedure.
READ NEXT:
 Auto-tensioner Removal and Installation
Removal
1. Remove the chain case cover.
2. Turn the crankshaft counterclockwise to compress
the auto-tensioner.
3. Align the holes on the lock (A) and the auto-tensioner
(B), then insert a 1.2 mm (0
Cam Chain Inspection
1. Remove the front wheels.
2. Remove the splash shield (see step 21).
3. Remove the drive belt.
4. Remove the cylinder head cover.
5. Set the No.1 piston at top dead center (TDC). The
punch mark
CKP Pulse Plate Replacement
1. Remove the front wheels.
2. Remove the splash shield (see step 21).
3. Remove the drive belt.
4. Remove the cylinder head cover.
5. Set the No.1 piston at top dead center (TDC). The
punch mark
SEE MORE:
Front Passenger's Airbag Replacement
Removal
1. Disconnect the negative cable from the battery, and
wait at least 3 minutes before beginning work.
2. Remove the passenger's vent panel.
3. Remove the dashboard center upper panel.
4. Remove the access panel (see step 5).
5. Detach the hook of the glove box damper and
release the glov
Recirculation Control Motor
Circuit Troubleshooting
1. Check the No. 36 (10 A) fuse in the under-dash fuse/
relay box.
Is the fuse OK?
YES-Go to step 2.
NO-Replace the fuse, and recheck. If the fuse blows again, check for a short in
the No. 36 (10 A) fuse circuit.
2. Disconnect the recirculation control motor 7P
connector.
3. Turn the ignition s
