Honda CR-V: Low Oil Pressure Indicator Circuit Troubleshooting (Open)
1. Connect the Honda Diagnostic System (HDS) to the data link connector (DLC) (see step 2).
2. Turn the ignition switch ON (II).
3. Make sure the HDS communicates with the vehicle and the powertrain control module (PCM). If it doesn't communicate, troubleshoot the DLC circuit.
4. Check for DTCs. If a DTC is present, diagnose, and repair the cause before continuing with this test.
5. Turn the ignition switch ON (II), select PGM-FI, and check the OIL PRESSURE SWITCH in the DATA LIST with the HDS.
Is "ON" indicated? YES-Replace the gauge control module.
NO-Go to step 6.
6. Check the oil pressure switch.
Is the oil pressure switch OK? YES-Go to step 7.
NO-Replace the oil pressure switch.
7. Turn the ignition switch ON (II), and jump the SCS line with the HDS, then turn the ignition switch OFF.
NOTE: This step must be done to protect the PCM from damage.
8. Disconnect PCM connector B (44P) and the oil pressure switch connector.
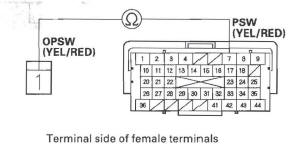
9. Check for continuity between PCM connector terminal B7 and the oil pressure switch connector.
OIL PRESSURE SWITCH CONNECTOR
PCM CONNECTOR B (44P)
Is there continuity? YES-Update the PCM if it does not have the latest software, or substitute a known-good PCM, then recheck. If the symptom/indication goes away with a known-good PCM, replace the original PCM.
NO-Repair open in the wire between the oil pressure switch and the PCM.
Low Oil Pressure Indicator Circuit Troubleshooting (Short)
1. Connect the Honda Diagnostic System (HDS) to the data link connector (DLC) (see step 2).
2. Turn the ignition switch ON (II).
3. Make sure the HDS communicates with the vehicle and the powertrain control module (PCM). If it doesn't communicate, troubleshoot the DLC circuit.
4. Check for DTCs. If a DTC is present, diagnose, and repair the cause before continuing with this test.
5. Start the engine, select PGM-FI, and check the OIL PRESSURE SWITCH in the DATA LIST with the HDS.
Is "OFF" indicated? YES-Replace the gauge control module.
NO-Go to step 6.
6. Turn the ignition switch OFF.
7. Disconnect the oil pressure switch connector.
8. Start the engine, and check the OIL PRESSURE SWITCH in the DATA LIST with the HDS.
Is "OFF" indicated? YES-Go to step 9.
NO-Go to step 10.
9. Check the oil pressure switch.
Is the oil pressure switch OK? YES-Do the oil pressure test.
NO-Replace the oil pressure switch.
10. Turn the ignition switch ON (II), and jump the SCS line with the HDS, then turn the ignition switch OFF.
NOTE: This step must be done to protect the PCM from damage.
11. Disconnect PCM connector B (44P) and the oil pressure switch connector.
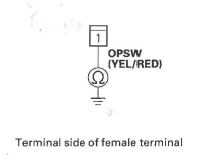
12. Check for continuity between the oil pressure switch connector and body ground.
OIL PRESSURE SWITCH CONNECTOR
Is there continuity? YES-Repair short in the wire between the oil pressure switch and the PCM.
NO-Update the PCM if it does not have the latest software, or substitute a known-good PCM, then recheck. If the symptom/indication goes away with a known-good PCM, replace the original PCM.
Oil Pressure Switch Test
1. Remove the oil pressure switch connector (A) from the engine oil pressure switch (B).
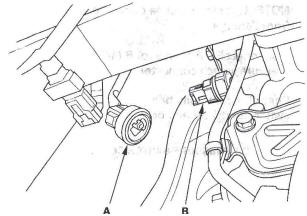
2. Check for continuity between the oil pressure switch terminal and the engine (ground). There should be continuity with the engine stopped.
There should be no continuity with the engine running.
Oil Pressure Switch Replacement
1. Disconnect the oil pressure switch connector, then remove the oil pressure switch.
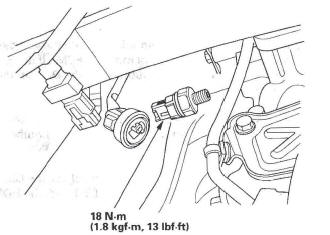
2. Remove any old liquid gasket from the switch and switch mounting hole.
3. Apply a very small amount of liquid gasket to the oil pressure switch threads, then install the oil pressure switch.
NOTE: Using too much liquid gasket may cause liquid gasket to enter the oil passage or the end of the new oil pressure switch.
Oil Pressure Test
NOTE: If the oil pressure warning light stays on with the engine running, check the engine oil level. If the oil level is correct:
1. Remove the oil pressure switch, and install an oil pressure gauge (A).
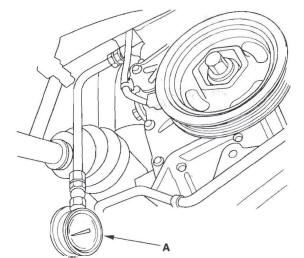
2. Start the engine. Shut it off immediately if the gauge registers no oil pressure. Repair the problem before continuing.
3. Allow the engine to reach operating temperature (fan comes on at least twice). The pressure should be:
Engine Oil Temperature: 176 ºF (80 ºC)
Engine Oil Pressure:
At Idle: 70 kPa (0.7 kgf/cm2, 10 psi) min.
At 3,000 rpm: 300 kPa (3.1 kgf/cm2, 44 psi) min.
4. If the oil pressure is out of specifications, inspect these items:
- Replace the oil filter.
- Inspect the oil pressure relief valve.
- Check the oil screen for clogging.
- Inspect the oil pump.
Engine Oil Replacement
1. Warm up the engine.
2. Remove the drain bolt (A), and drain the engine oil.
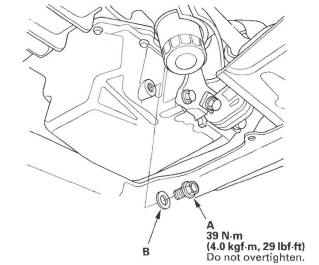
3. Re install the drain bolt with a new washer (B).
4. Refill the engine with the recommended oil.
Capacity
At Oil Change:
4.0 L (4.2 US qt)
At Oil Change Including Filter:
4.2 L (4.4 US qt)
After Engine Overhaul:
5.3 L (5.6 US qt)
5. If the maintenance minder required to replace the engine oil, reset the maintenance minder and this procedure is complete. If the maintenance minder did not require to replace the engine oil, go to step 6.
6. Connect the Honda Diagnostic System (HDS) to the data link connector (DLC) (see step 2).
7. Turn the ignition switch ON (II).
8. Make sure the HDS communicates with the vehicle and the powertrain control module (PCM). If it doesn't troubleshoot the DLC circuit.
9. Select the BODY ELECTRICAL with the HDS.
10. Select the ADJUSTMENT in GAUGE MENU with the HDS.
11. Select the RESET in the MAINTENANCE MINDER with the HDS.
12. Select the RESETIING THE ENGINE OIL LIFE with the HDS.
NOTE: If you changed the automatic transmission flu id (ATF) at the same time with the engine oil, select RESETIING THE ENGINE OIL LIFE AND ATF with the HDS instead.
13. Run the engine for more than 3 minutes, then check for oil leaks.
Engine Oil Filter Replacement
Special Tools Required
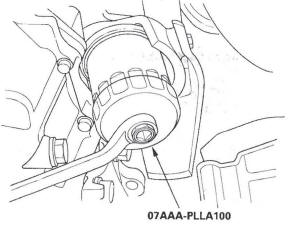
Oil filter wrench 07AAA-PLLA100
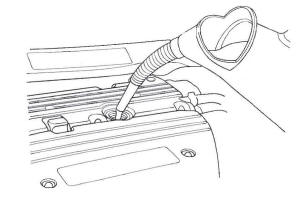
1. Remove the oil filter with the special oil filter wrench.
2. Inspect the filter to make sure the rubber seal is not stuck to the oil filter seating surface of the engine.
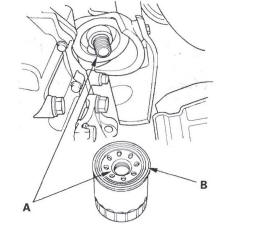
3. Inspect the threads (A) and rubber seal (B) on the new filter. Clean the seat on the engine block, then apply a light coat of new engine oil to the filter rubber seal. Use only filters with a built-in bypass system.
4. Install the oil filter by hand.
5. After the rubber seal seats, tighten the oil filter clockwise with the oil filter wrench
Tighten: 3/4 Turn Clockwise
Tightening Torque: 12 N*m (1.2 kgf*m, 8.7Ibf*ft)
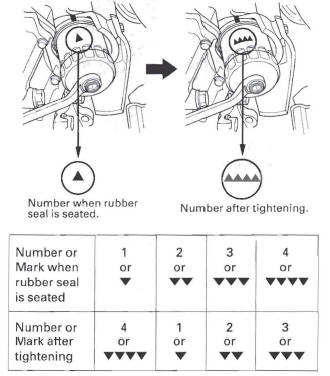
6. If four numbers or marks (1 to 4 or  to
to  )
are printed around the outside of the filter, use the
following procedure to tighten the filter.
)
are printed around the outside of the filter, use the
following procedure to tighten the filter.
- Spin the filter on until its seal lightly seats against the block, and note which number or mark is at the bottom.
- Tighten the filter by turning it clockwise three numbers or marks from the one you noted. For example, if number 2 is at the bottom when the seal is seated, tighten the filter until the number 1 comes around the bottom.
7. After installation, fill the engine with oil up to the specified level, run the engine for more than 3 minutes, then check for oil leakage.
Oil Filter Base Replacement
1. Remove the oil filter.
2. Remove the oil filter base (A), then remove the oil filter cover (B).
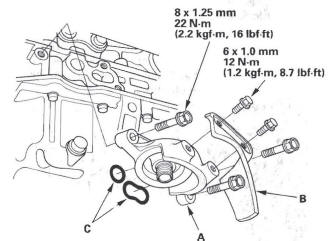
3. Clean the O-ring grooves and mating surface with the oil filter base.
4. Install the oil filter cover, then install the oil filter base with new O-rings (C).
5. Install the oil filter.
Oil Filter Feed Pipe Replacement
1. Remove the oil filter base.
2. Remove the oil filter holder.

3. Install the two 20 x 1.5 mm nuts (A) onto the new oil filter feed pipe. Hold one nut with a wrench, then use a second wrench to tighten the other nut.

4. Tighten the oil filter feed pipe to the block to 49 N*m (5.0 kgf*m, 36 Ibf*ft), then remove the nuts from the oil filter feed pipe.
5. Install the oil filter base.
Engine Oil Gallery Cap Replacement
1. Remove the engine oil gallery cap (A).

2. Clean the O-ring groove and mating surface with the engine oil gallery cap.
3. Install the engine oil gallery cap with new O-rings (B).
READ NEXT:
 Oil Pump Overhaul
Exploded View
Oil Pump Removal
1. Turn the crankshaft pulley so its top dead center
(TDC) mark (A) lines up with the pointer (B).
2. Remove the oil pan.
3. Remove and discard the oil pump chain ten
Intake Manifold and Exhaust System
Intake Manifold Removal and Installation
Exploded View
Removal
1. Remove the hood support rod, then use it as shown
to prop the hood in the wide-open position.
2. Remove the bulkhead cover.
3. Disc
SEE MORE:
Trim Removal/Installation
Trim Removal/Installation-Door Areas
Special Tools Required
KTC trim tool set SOJATP2014 *
* Available through the American Honda Tool and
Equipment Program; call 888-424-6857
SRS components are located in this area. Review the
SRS component locations and the
precautions and procedures before
doin
Alternator Removal and
Installation
Removal
1. Make sure you have the anti-theft code for the
audio system and the navigation system (if
equipped), then write down the XM radio presets.
2. Disconnect the negative cable from the battery first,
then disconnect the positive cable.
3. Remove the drive belt.
4. Remove the drive belt aut
