Honda CR-V: Interior Lights
Component Location Index
With moon roof
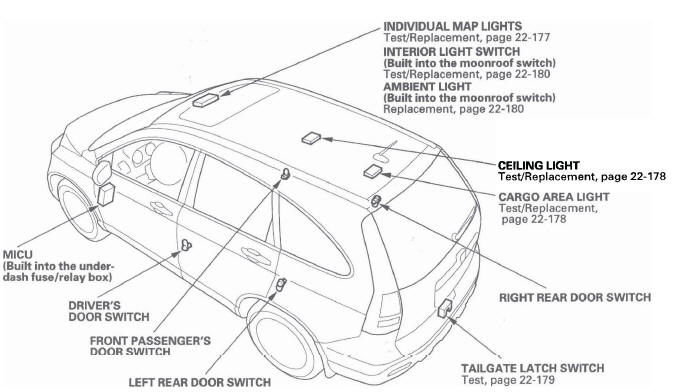
- INDIVIDUAL MAP LIGHTS
- INTERIOR LIGHT SWITCH (Built into the moonroof switch)
- AMBIENT LIGHT (Built into the moonroof switch)
- CEILING LIGHT
- CARGO AREA LIGHT
- RIGHT REAR DOOR SWITCH
- TAILGATE LATCH SWITCH
- LEFT REAR DOOR SWITCH
- FRONT PASSENGER'S DOOR SWITCH
- DRIVER'S DOOR SWITCH
- MICU (Built into the under-dash fuse/relay box)
Without moonroof
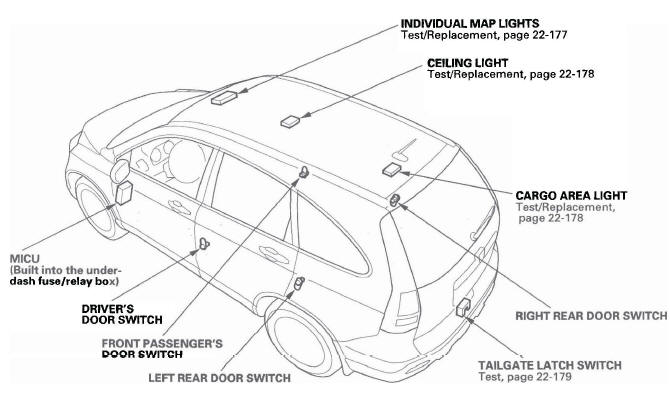
- INDIVIDUAL MAP LIGHTS
- CEILING LIGHT
- CARGO AREA LIGHT
- TAILGATE LATCH SWITCH
- MICU (Built into the under-dash fuse/relay box)
- DRIVER'S DOOR SWITCH
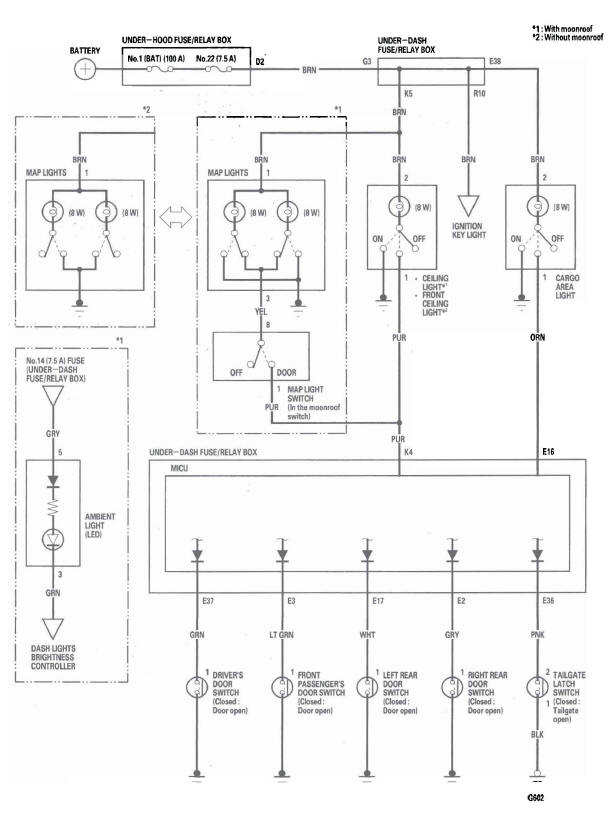
Circuit Diagram
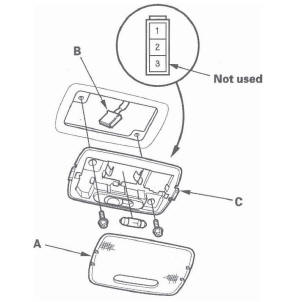
Front Individual Map Light Test/Replacement
With moonroof
1. Turn the map light switch OFF.
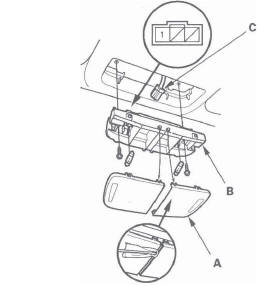
2. Carefully pry the lens (A) off with a small screwdriver.
Front Map Light: 8 W x 2
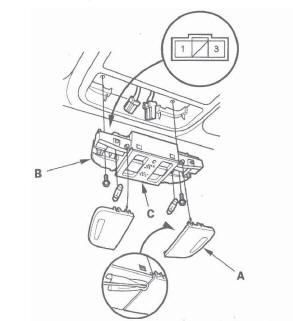
3. Remove the screws, then remove the map lights (B) and moon roof switch or navigation microphone (C).
4. Disconnect the 3P connector from the map lights and the 10P connector from the moonroof switch or navigation microphone.
5. Check for continuity between the terminals in each switch position according to the table.
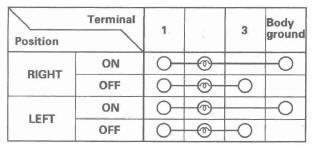
6. If the continuity is not as specified, check the bulb(s). If the bulb(s) are OK, replace the light assembly.
7. Install in the reverse order of removal.
Without moonroof
1. Turn the map light switch OFF.
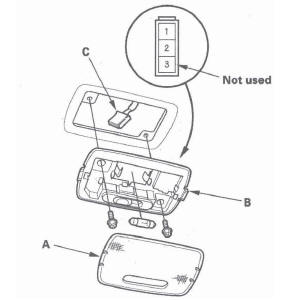
2. Carefully pry the lens (A) off with a small screwdriver.
Front Map Light: 8 W x 2
3. Remove the screws, then remove the map lights (B).
4. Disconnect the 3P connector (C) from the map lights.
5. Check for continuity between the terminals in each switch position according to the table.
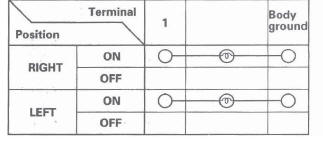
6. If the continuity is not as specified, check the bulb(s). If the bulb(s) are OK, replace the light assembly.
7. Install in the reverse order of removal.
Ceiling Light Test/Replacement
1. Turn the ceiling light switch OFF.
2. Carefully pry the lens (A) off with a small screwdriver.
Ceiling Light: 5 W
3. Remove the screws, then remove the ceiling light (B).
4. Disconnect the 3P connector (C) from the ceiling light.
5. Check for continuity between the terminals.
- There should be continuity between the No.1 and No.2 terminals with the switch in the MIDDLE position.
- There should be continuity between the No.2 and No.3 (Body ground) terminals with the switch in the ON position.
- There should be no continuity between the No.1 and No.2 terminals, and between the No.2 and body ground with the switch in the OFF position.
6. If the continuity is not as specified, check the bulb.
If the bulb is OK, replace the light.
7. Install in the reverse order of removal.
Cargo Area Light Test/Replacement
1. Open the tailgate, and turn the cargo area light switch OFF.
2. Carefully pry the lens (A) off with a small screwdriver.
Cargo Area Light: 5 W
3. Remove the screws, then remove the cargo area light (B).
4. Disconnect the 3P connector (C) from the cargo area light.
5. Check for continuity between the terminals.
- There should be continuity between the No.1 and No.2 terminals with the switch in the MIDDLE position.
- There should be continuity between the No.2 and No.3 (Body ground) terminals with the switch in the ON position.
- There should be no continuity between the No.1 and No.2 terminals, and between the No.2 and body ground with the switch in the OFF position.
6. If the continuity is not as specified, check the bulb.
If the bulb is OK, replace the light.
7. Install in the reverse order of removal.
Tailgate Latch Switch Test
1. Open the tailgate.
2. Remove the tailgate lower trim.
3. Disconnect the 2P connector (A) from the tailgate latch switch (B).

4. Check for continuity between the No.1 and No.2 terminals.
- There should be continuity with the tailgate open.
- There should be no continuity with the tailgate closed.
5. If the continuity is not as specified, replace the tailgate latch assembly.
Interior Light Switch Test/Replacement
With moonroof
NOTE: The interior light switch is built into the moonroof switch, and it switches the front individual map lights between the OFF and DOOR positions.
1. Remove the front individual map lights.
2. Disconnect the 10P connector (A) from the moonroof switch.
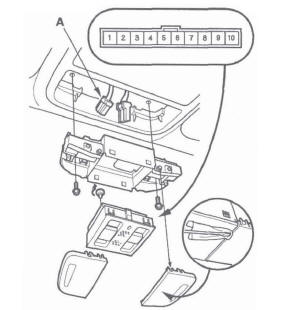
3. Check for continuity between the No.1 and No.8 terminals.
- There should be continuity when the interior light switch is in the DOOR position.
- There should be no continuity when the interior light switch is in the OFF position.
4. If the continuity is not as specified, replace the switch.
5. Install the switch and light in the reverse order of removal.
Ambient Light Test/Replacement
With moonroof
NOTE: The ambient light is built into the moonroof switch.
1. Remove the front individual map lights.
2. Disconnect the 10P connector (A) from the moon roof switch.
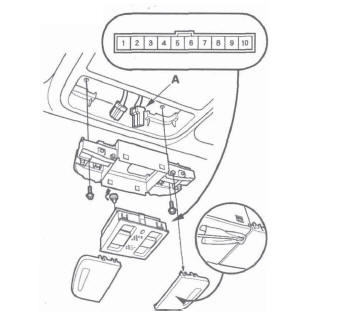
3. Connect the battery power to the No.5 terminal and ground to the No.3 terminal. The ambient light should turn on. If the light does not turn on, replace the moonroof switch as an assembly.
4. Install the switch and light in the reverse order of removal.
READ NEXT:
 Entry Lights Control System
Component Location Index
With moonroof
INDIVIDUAL MAP LIGHTS
IGNITION KEY SWITCH
IGNITION KEY LIGHT
CEILING LIGHT
CARGO AREA LIGHT
RIGHT REAR DOOR SWITCH
FRONT PASSENGER'S
DOOR SWITCH
LEFT
Power Windows
Component Location Index
POWER WINDOW MASTER SWITCH
(With built-in control unit)
FRONT PASSENGER'S POWER WINDOW SWITCH
FRONT PASSENGER'S POWER WINDOW MOTOR
RIGHT REAR POWER WINDOW SWITCH
RIGHT
Wipers/Washers
Component Location Index
WINDSHIELD WIPER BLADES
WIPER/WASHER SWITCH
WINDSHIELD WIPER
ARMS and LINK
WINDSHIELD WIPER MOTOR
UNDER-DASH FUSE/RELAY BOX
UNDER-HOOD FUSE/RELAY BOX
INTERMITTENT WI
SEE MORE:
Installing a Child Seat
After selecting a proper child seat
and a good place to install the seat,
there are three main steps in
installing the seat:
1. Properly secure the child seat to
the vehicle. All child seats must be
secured to the vehicle with the lap
part of a lap/shoulder belt or with
the LATCH (Low
Fan, Fan Motor, Shroud Removal and Installation
Removal
1. Remove the hood support rod, then use it as shown
to prop the hood in the wide-open position.
2. Remove the bulkhead cover.
3. Disconnect the fan motor connectors (A) and hood
switch connector (B), then remove the harness clips
(C).
4. Remove the radiator upper brackets (A), then
remov
