Honda CR-V: Power Windows
Component Location Index
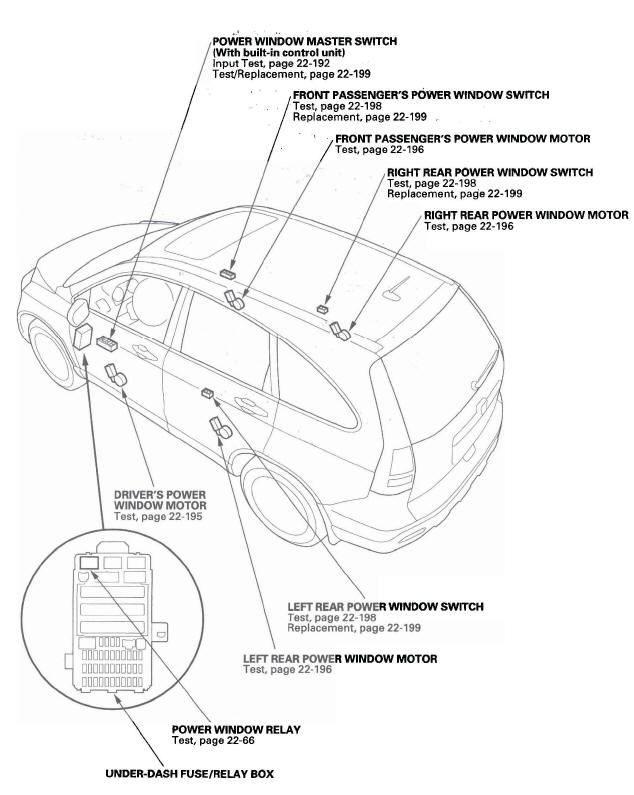
- POWER WINDOW MASTER SWITCH (With built-in control unit)
- FRONT PASSENGER'S POWER WINDOW SWITCH
- FRONT PASSENGER'S POWER WINDOW MOTOR
- RIGHT REAR POWER WINDOW SWITCH
- RIGHT REAR POWER WINDOW MOTOR
- LEFT REAR POWER WINDOW SWITCH
- LEFT REAR POWER WINDOW MOTOR
- POWER WINDOW RELAY
- UNDER-DASH FUSE/RELAY BOX
System Description
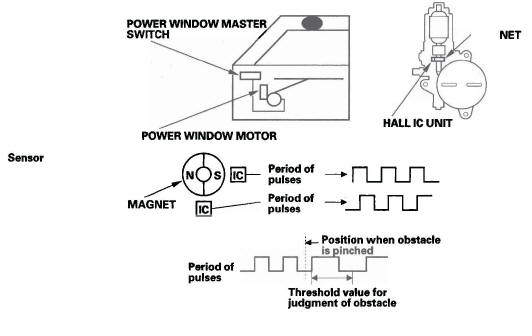
Auto Reverse Operation
The system is composed of the power window master switch and the driver's power window motor.
The driver's power window motor incorporates a pulser which generates pulses during the motor's operation and sends the pulses to the driver's power window control unit. As soon as the power window control unit detects no pulses from the pulser (the window stops short of full travel), the driver's power window control unit makes the power window motor stop and reverse. If the window is more than halfway closed, it will reverse to half open position. If the window is less than halfway closed, it will stop and reverse about 2 inches. This is to prevent pinching an obstacle during auto-up operation. The auto reverse operation is not active when the switch is held in the up position.
Resetting the Power Window Control Unit
Resetting the driver's power window is required when any of the following have occurred:
- Power window regulator replacement or repair
- Power window motor replacement or repair
- Window run channel replacement or repair
- Driver's door glass replacement or repair
- Power is removed from the power window control unit while the power window timer is ON
- Power window master switch replacement
1. Turn the ignition switch ON (II).
2. Move the driver's window all. the way down by using the driver's window DOWN switch.
3. Open the driver's door.
NOTE: Steps 4-7 must be done within 5 seconds of each other.
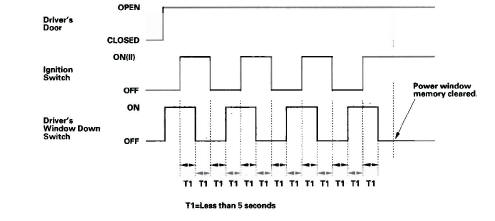
4. Turn the ignition switch OFF.
5. Push and hold the driver's window DOWN switch.
6. Turn the ignition switch ON (II).
7. Release the driver's window DOWN switch.
8. Repeat step 4-7 three more times.
9. Wait for at least 1 second.
10. Check if the AUTO UP and AUTO DOWN functions still work. If they do, go back to step 1 (the AUTO function has not been cleared; repeat the clear procedure again). If they do not, go to step 11.
11. Move the driver's window all the way down by using the driver's window DOWN switch.
12. Pull up and hold the driver's window UP switch until the window reaches the fully closed position, then continue to hold the switch for 1 second.
13. Confirm that the power window control unit is reset by using the driver's window AUTO UP and AUTO DOWN functions.
If the window still does not work in AUTO, repeat the procedure several times, paying close attention to the 5 second time limit between steps. If it still does not work, refer to the master switch input test.
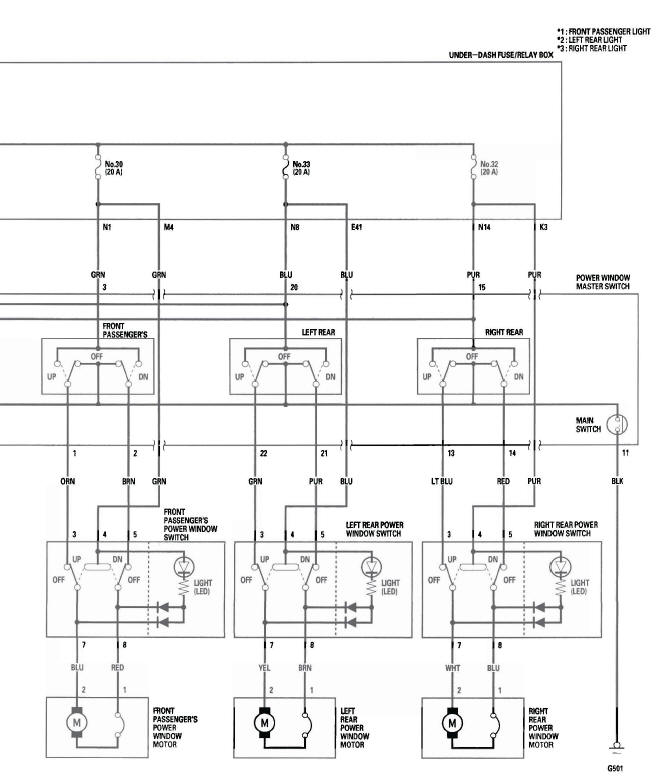
Circuit Diagram
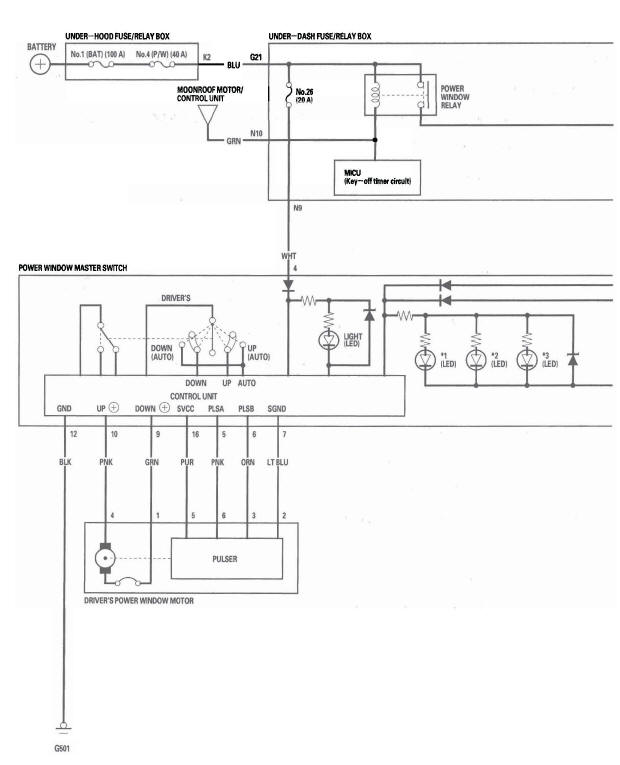
Master Switch Input Test
NOTE: The power window control unit is built into the power window master switch.
1. Remove the power window switch panel.
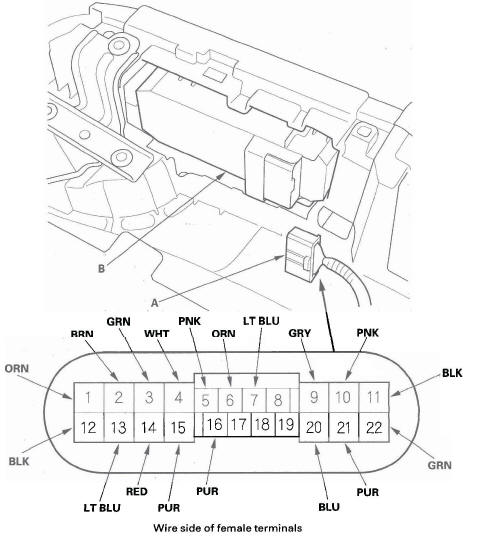
2. Disconnect the 22P connector (A) from the master switch (B).
3. Inspect the connector and socket terminals to be sure they are all making good contact.
- If the terminals are bent, ,loose or corroded, repair them as necessary, and recheck the system.
- If the terminals look OK, go to step 4.
4. With the connector still disconnected, do these input tests at the connector.
- If any test indicates a problem, find and correct the cause, then recheck the system.
- If all the input tests prove OK, go to step 5.
5. Reconnect the 22P connector to the power window master switch, and do these input tests at the connector.
- If any test indicates a problem, find and correct the cause, then recheck the system.
- If all the input tests prove OK, the control unit must be faulty; replace the power window master switch, and go to step 6.
6. Resetthe power window control unit.
Driver's Power Window Motor Test
Motor Test
1. Remove the door panel, and disconnect the connectors.
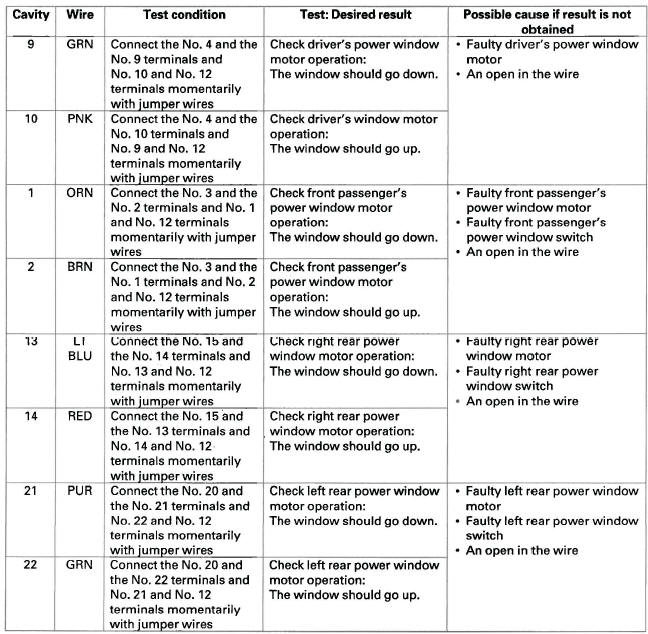
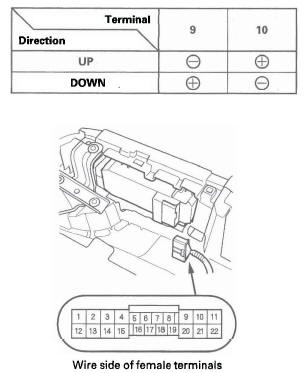
2. Test the motor in each direction by connecting battery power and ground to the power window master switch 22P connector according to the table.
3. If the motor does not run or fails to run smoothly, go to step 4.
4. Disconnect the 6P connector from the driver's power window motor.
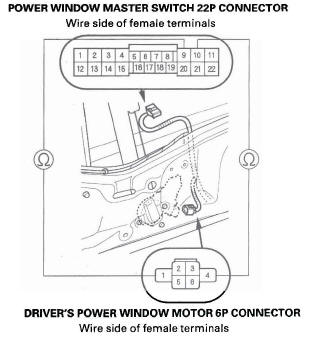
5. Check for continuity between the power window master switch 22P connector No.9 and No. 10 terminals and the driver's power window motor 6P connector No.1 and No.4 terminals, respectively.
POWER WINDOW
MASTER SWITCH
22P CONNECTOR
No. 9 terminal
No. 10 terminal
DRIVER'S POWER
WINDOW MOTOR
6P CONNECTOR
No. 1 terminal
No. 4 terminal
6. If the wire harness is OK, replace the driver's power window motor.
Pulser Test (With AUTO UP/AUTO DOWN)
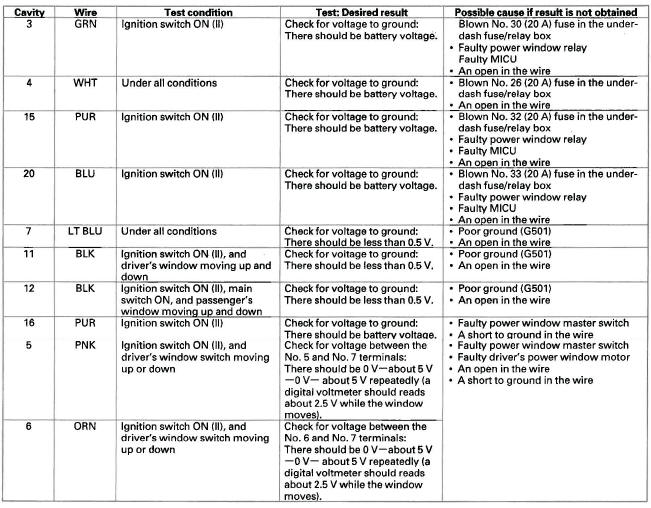
7. Do the power window master switch input test No.5, No.6, No.7, and No. 16 terminals.
Passenger's Power Window Motor Test
1. Remove the door panel, and disconnect the connectors.
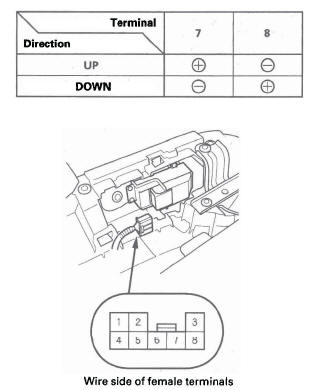
2. Test the motor in each direction by connecting battery power and ground to the passenger's power window switch 8P connector according to the table.
3. If the motor does not run or fails to run smoothly, go to step 4.
4. Disconnect the 6P connector (A) from the passenger's power window motor (B).
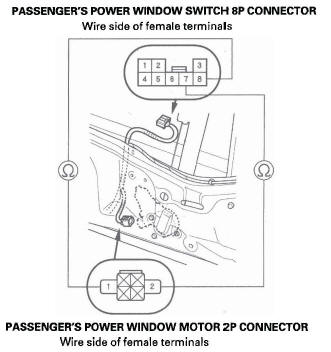
5. Check for continuity between the passenger's power window switch 8P connector No.7 and No.8 terminals and the passenger's power window motor 2P connector No.1 and No.2 terminals.
PASSENGER'S POWER
WINDOW SWITCH
8P CONNECTOR
No. 7 terminal
No. 8 terminal
PASSENGER'S POWER
WINDOW SWITCH
2P CONNECTOR
No. 2 terminal
No. 1 terminal
6. If the wire harness is OK, replace the appropriate power window motor.
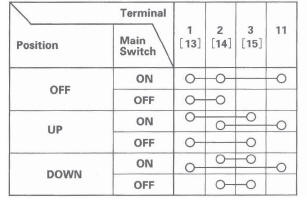
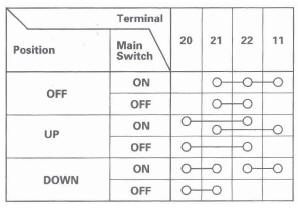
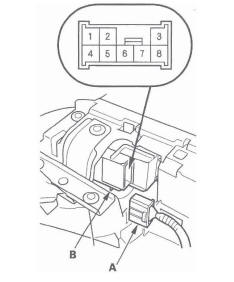
Master Switch Test
1. Remove the driver's door panel.
2. Disconnect the 22P connector (A) from the power window master switch (B).
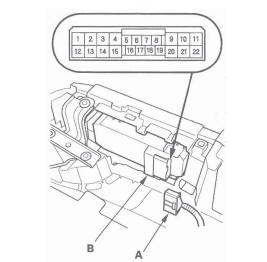
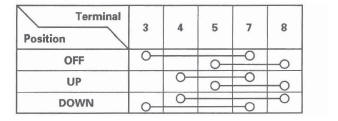
3. Check for continuity between the terminals in each switch position according to the tables.
Driver's Switch
The driver's switch is combined with the control unit, so you cannot isolate the switch to test it.
Instead, run the master switch input test procedures. If the tests are normal, the driver's switch is faulty. Replace the switch.
Front Passenger's Switch (Right Rear Switch)
Left Rear Switch
4. If the continuity is not as specified, replace the switch.
Passenger's Power Window Switch Test
1. Remove the passenger's door panel.
- Front
- Rear
2. Disconnect the 8P connector (A) from the passenger's power window switch (B).
Front passenger's
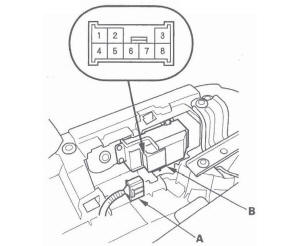
Rear
3. Check for continuity between the terminals in each switch position according to the table.
4. Connect battery power to the No.4 terminal and ground the No.7 (or No.8) terminal. The switch light should come on.
5. If the continuity or switch light tests is not as specified, replace the switch.
Power Window Switch Replacement
Driver's
1. Remove the driver's door panel.
2. Disconnect the 22P connector (A) from the power window master switch (B).
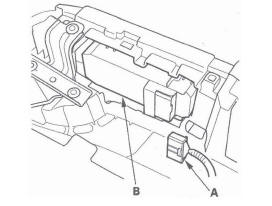
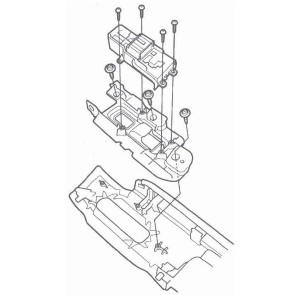
3. Remove the four screws and the power window master switch.

4. Install the switch in the reverse order of removal.
5. After replacement, reset the power window control unit.
Passenger's
1. Remove the passenger's door panel.
- Front
- Rear
2. Disconnect the 8P connector (A) from the passenger's power window switch (B).

3. Remove the four screws and the passenger's power window switch.
4. Install the switch in the reverse order of removal.
READ NEXT:
 Wipers/Washers
Component Location Index
WINDSHIELD WIPER BLADES
WIPER/WASHER SWITCH
WINDSHIELD WIPER
ARMS and LINK
WINDSHIELD WIPER MOTOR
UNDER-DASH FUSE/RELAY BOX
UNDER-HOOD FUSE/RELAY BOX
INTERMITTENT WI
DTC Troubleshooting
DTC B1028: Rear Window Wiper Motor (As)
Signal Error
NOTE: If you are troubleshooting multiple DTCs, be
sure to follow the instructions in B-CAN System
Diagnosis Test Mode A.
1. Clear the DTCs with th
MICU Input Test
1. Before testing, troubleshoot the B-CAN System Diagnosis Test Mode A, and
check the No.8
(10 A), No. 10 (7.5 A), and No. 38 (30 A) fuses in the under-dash fuse/relay
box.
2. Disconnect under-dash
SEE MORE:
Cruise Control
Cruise control allows you to maintain
a set speed above 25 mph (40 km/h)
without keeping your foot on the
accelerator pedal. It should be used
for cruising on straight, open
highways. It is not recommended for
city driving, winding roads, slippery
roads, heavy rain, or bad weather.
Fuses
The vehicle’s fuses are contained in
three fuse boxes.
The interior fuse box is located
under the dashboard on the driver’s
side. The fuse label is attached
under the steering column.
The auxiliary fuse box is located
next to the interior fuse box.
To open the fuse box lid, pull
