Honda CR-V: DTC Troubleshooting
DTC B1028: Rear Window Wiper Motor (As) Signal Error
NOTE: If you are troubleshooting multiple DTCs, be sure to follow the instructions in B-CAN System Diagnosis Test Mode A.
1. Clear the DTCs with the HDS.
2. Turn the. ignition switch OFF, and then back ON (II).
3. Operate the rear window wiper for 15 seconds or more, then turn the rear window wiper switch OFF.
Does the rear window wiper stop in the normal park position? YES-Go to step 4.
NO-Go to step 14.
4. Check for DTCs with the HDS.
Is DTC B1028 indicated? YES-Go to step 5.
NO-Intermittent failure, the system is OK at this time. Check for loose or poor connections.
5. Do the rear window wiper motor test.
Is the rear window wiper motor OK? YES-Go to step 6.
NO-Replace the rear window wiper motor.
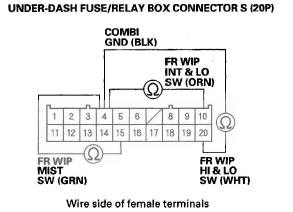
6. Make sure the ignition switch is OFF, and disconnect the under-dash fuse/relay box connector S (20P).
7. Disconnect the rear window wiper motor 4P connector.
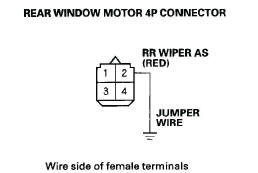
8. Connect the rear window wiper motor 4P connector No.2 terminal and body ground with a jumper wire.
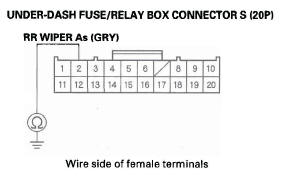
9. Check for continuity between the under-dash fuse/ relay box connector S (20P) No.2 terminal and body ground.

Is there continuity? YES-Go to step 10.
NO-Repair an open in the wire.
10. Remove the jumper wire from the rear window wiper motor 4P connector.
11. Check for continuity between the under-dash fuse/ relay box connector S (20P) No.2 terminal and body ground.
Is there continuity? YES-Repair a short to ground in the wire.
NO-Go to step 12.
12. Turn the ignition switch ON (II).
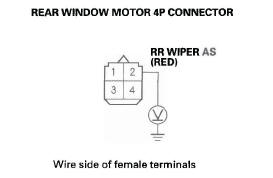
13. With the rear window wiper motor 4P connector still disconnected, measure voltage between the rear window wiper motor 4P connector No.2 terminal and body ground.
Is there voltage? YES-Repair a short to power in the wire.
NO-Faulty MICU; replace the under-dash fuse/ relay box.
14. Check the No.8 (7.5 A) fuse in the under-dash fuse/ relay box.
Is the fuse OK? YES-Go to step 15.
NO-Replace the blown fuse and recheck.
15. Do the rear window wiper motor test.
Is the rear window wiper motor OK? YES-Go to step 16.
NO-Replace the rear window wiper motor.
16. Do the rear window wiper motor relay test.
Is the rear window wiper motor relay OK? YES-Go to step 17.
NO-Replace the rear window wiper motor relay.
17. Disconnect the under-hood fuse/relay box connector D (8P).
18. Turn the ignition switch ON (II).
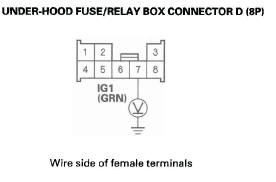
19. Measure voltage between the under-hood fuse/ relay box connector D (8P) No.7 terminal and body ground, and the under-hood fuse/relay box connector F (20P) No. 15 terminal and body ground.
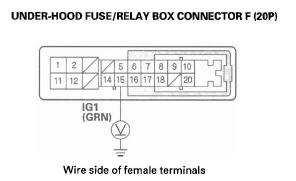
Is there battery voltage? YES-Go to step 20.
NO-Repair an open in the wire.
20. Turn the ignition switch OFF.
21. Disconnect the under-hood fuse/relay box connector E (10P).
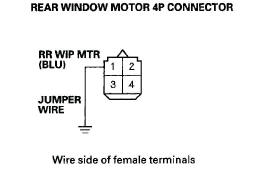
22. Disconnect the rear window wiper motor 4P connector.
23. Connect the rear window wiper motor 4P connector No.1 terminal and body ground with a jumper wire.
24. Check for continuity between the under-hood fuse/ relay box connector E (10P) No.2 terminal and body ground.
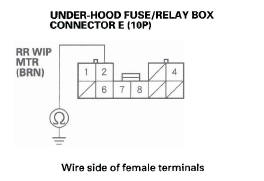
Is there continuity? YES-Go to step 25.
NO-Repair an open in the wire.
25. Check for continuity between the rear window wiper motor 4P connector No.3 terminal and body ground.
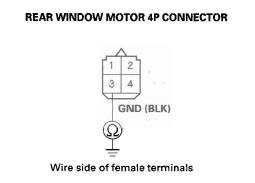
Is there continuity? YES-Go to step 26.
NO-Repair an open in the wire or poor ground (G602).
26. Check for continuity between the under-hood fuse/ relay box connector F (20P) No.8 terminal and the under-dash fuse/relay box connector S (20P) No.3 terminal.
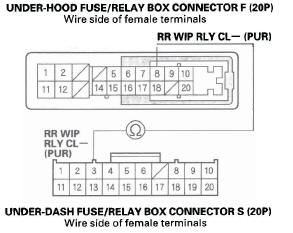
Is there continuity? YES-Faulty MICU; replace the under-dash fuse/ relay box.
NO-Repair an open in the wire.
DTC B1077: Windshield Wiper (As) Signal Error
NOTE: If you are troubleshooting multiple DTCs, be sure to follow the instructions in B-CAN System Diagnosis Test Mode A.
1. Clear the DTCs with the HDS.
2. Turn the ignition switch OFF, and then back ON (II).
3. Turn the wiper switch to LOW or HIGH for at least 15 seconds, then turn the switch OFF.
Do the wiper arms stop at the AUTO STOP (park) position? YES-Go to step 4.
NO-Go to step 12.
4. Check for DTCs with the HDS.
Is DTC B1077 indicated? YES-Go to step 5.
NO-Intermittent failure, the windshield wiper system is OK at the time. Check for loose or poor connections.
5. Turn the ignition switch OFF.
6. Do the windshield wiper motor test.
Does the wiper motor run normally? YES-Go to step 7.
NO-Replace the windshield wiper motor and recheck.
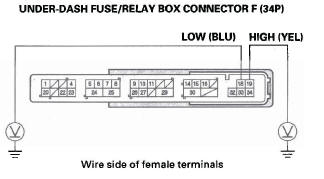
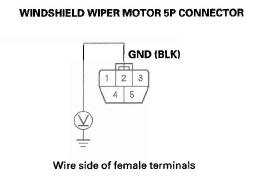
7. Disconnect the under-dash fuse/relay box connector F (34P) and windshield wiper motor 5P connector.
8. Check for continuity between the windshield wiper motor 5P connector No.4 terminal and the under-dash fuse/relay box connector F (34P) No. 32 terminal.
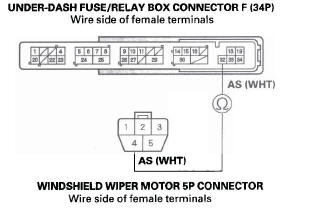
Is there continuity? YES-Go to step 9.
NO-Repair an open in the WHT wire.
9. Check for continuity between the windshield wiper motor 5P connector No.4 terminal and body ground.
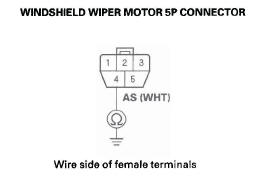
Is there continuity? YES-Repair a short in the WHT wire.
NO-Go to step 10.
10. Turn the ignition switch ON (II).
11. Measure voltage between the windshield wiper motor 5P connector No.4 terminal and body ground.
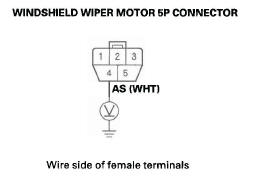
Is there voltage? YES-Repair a short to power in the WHT wire.
NO-Faulty MICU; replace the under-dash fuse/ relay box.
12. Turn the ignition switch OFF.
13. Check the No. 38 (30 A) fuse in the under-dash fuse/ relay box.
Is the fuse OK? YES-Go to step 14.
NO-Replace the fuse and recheck the system.
14. Do the windshield wiper motor test.
15. Reconnect the windshield wiper motor 5P connector.
16. Run the windshield wiper motor at LOW or HIGH, and measure voltage between body ground and the under-dash fuse/relay box connector F (34P) No. 18 terminal (Low) and No. 19 terminal (High) respectively.
Is there battery voltage? YES-Go to step 17.
NO-Faulty MICU; replace the under-dash fuse/ relay box.
17. Measure voltage between the windshield wiper motor 5P connector No.2 terminal and body ground.
Is there less than 0.5 V?
YES-Repair an open or high resistance in the BLU (LO) or YEL (HI) wire.
NO-Repair an open in the BLK wire or poor ground (G302).
DTC B1281: Windshield Wiper Switch MIST Position Circuit Malfunction
DTC B1282: Windshield Wiper Switch INT (AUTO) Position Circuit Malfunction
DTC B1283: Windshield Wiper Switch LOW Position Circuit Malfunction
DTC B1284: Windshield Wiper Switch HIGH Position Circuit Malfunction
NOTE: If you are troubleshooting multiple DTCs, be sure to follow the instructions in B-CAN System Diagnosis Test Mode A.
1. Clear the DTCs with the HDS.
2. Turn the ignition switch OFF, and then back ON (II).
3. Turn the windshield wiper switch in MIST, INT, LOW, HIGH and OFF positions.
4. Check the DTCs with the HDS.
Is DTC B1281, B1282, B1283, or B1284 indicated? YES-Go to step 5.
NO-Intermittent failure, the wiper system is OK at this time. Check for loose or poor connections.
5. Select WIPERS from the BODY ELECTRICAL menu, and enter the DATA LIST.
6. Check the ON/OFF information of the WINDSHIELD WIPER SWITCH (MIST), WINDSHIELD WIPER SWITCH (lNT), WINDSHIELD WIPER SWITCH (LOW), and WINDSHIELD WIPER SWITCH (HIGH) in the DATA LIST.
Is the WINDSHIELD WIPER SWITCH (MIST) information indicator OFF, WINDSHIELD WIPER SWITCH (lNT) information indicator OFF, WINDSHIELD WIPER SWITCH (LOW) information indicator OFF, and WINDSHIELD WIPER SWITCH (HIGH) information indicator OFF with the windshield wiper switch in the OFF position?
YES-Go to step 14.
NO-Go to step 7.
7. Turn the ignition switch OFF.
8. Disconnect the BP connector from the windshield wiper switch.
9. Check the ON/OFF information of the WINDSHIELD WIPER SWITCH (MIST), WINDSHIELD WIPER SWITCH (INT), WINDSHIELD WIPER SWITCH (LOW), and WINDSHIELD WIPER SWITCH (HIGH) in the DATA LIST.
Are the information indicators OFF? YES-Faulty windshield wiper switch; replace it.
NO-Go to step 10.
10. Turn the ignition switch OFF.
11. Disconnect under-dash fuse/relay box connector S (20P).
12. Check for continuity between body ground and under-dash fuse/relay box connector S (20P) terminals No. 10, No. 20, and No. 15 individually.

Is there continuity? YES-Repair a short to ground in the wire.
NO-Go to step 13.
13. Check for continuity between under-dash fuse/relay box connector S (20P) No.4 and terminals No. 10, No. 15 and No. 20 terminals individually.
Is there continuity? YES-Repair a short between the wires.
NO-Faulty MICU; replace the under-dash fusel relay box.
14. Check for continuity between the under-dash fuse/ relay box connector S (20P) terminals No.10, No. 15 and. No. 20 as shown:

Is there continuity? YES-Repair a short between the wires.
NO-Faulty MICU; replace the under-dash fuse/ relay box.
READ NEXT:
 MICU Input Test
1. Before testing, troubleshoot the B-CAN System Diagnosis Test Mode A, and
check the No.8
(10 A), No. 10 (7.5 A), and No. 38 (30 A) fuses in the under-dash fuse/relay
box.
2. Disconnect under-dash
Wiper/Washer Switch Test/Replacement
1. Remove the steering column covers.
2. Disconnect the dashboard wire harness 8P
connector (A) from the wiper/washer switch (B).
3. Remove the two screws, then slide out the wiper/
washer switch.
Gauges
Component Location Index
GAUGE CONTROL MODULE
Self-diagnostic Function
Input Test
Rewriting the ODO Data and Transferring Smart
Maintenance on a New Gauge Control Module
Replacement
Out
SEE MORE:
Starting System
Component Location Index
STARTER CUT RELAY
UNDER-DASH
FUSE/RELAY BOX
STARTER
Starter Circuit Troubleshooting
Performance Test
Removal and Installation
Overhaul
TRANSMISSION RANGE SWITCH
Test
Replacement
Symptom Troubleshooting
Index
Engine
Front Driveshaft Disassembly
Special Tools Required
Threaded adapter, 26 x 1.5 mm 07XAC-001030A
Slide hammer, 5/8"-18 UNF, commercially available
Inboard Joint Side
1. Remove the set ring (A) from the inboard joint.
2. Remove the boot bands. Be careful not to damage the boot.
3. Make marks (A) on each roller (B) and inboa
