Honda CR-V: Oil Pan Removal
1. If the engine is already out of the vehicle, go to step 20.
2. Raise the vehicle on the lift to full height.
3. Drain the engine oil.
4. Remove the front wheels.
5. Remove the splash shield (see step 21).
6. Disconnect the air fuel ratio (A/F) sensor connector and secondary heated oxygen sensor (secondary HO2S) connector, then remove the three way catalytic converter (TWC) (see step 25).
7. Remove the shift cable.
8. Separate the knuckles from the lower arms.
9. Remove the propeller shaft.
10. Remove a bolt securing the P/S fluid line bracket, and unclamp the P/S fluid line clamps on the front subframe (see step 31).
11. Remove the bolts securing the left steering gearbox mounting bracket (see step 32).
12. Remove the bolts securing the right steering gearbox mounting brackets (see step 33).
13. Remove the bolt securing the automatic transmission fluid (ATF) filter.
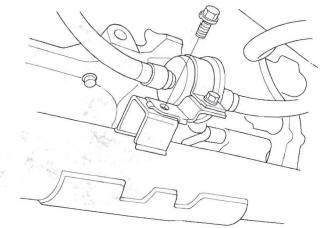
14. Remove the lower torque rod (see step 44).
15. Make the appropriate reference lines at both ends of the subframe that line up with the body (see step 45).
16. Remove the subframe mounting bolts on both side (see step 46).
17. Attach the subframe adapter to the subframe and hang the belt of the subframe adapter over the front of the subframe, then secure the belt with its stop (see step 47).
18. Raise the jack and line up the slots in the arms with the bolt holes on the corner of the jack base, then attach them with bolts securely (see step 48).
19. Remove the subframe (see step 49),
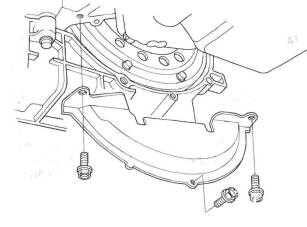
20. Remove the lower torque rod bracket.

21. Remove the torque converter cover.
22. Remove the bolts securing the oil pan.
23. Using a flat blade screwdriver, separate the oil pan from the block in the places shown.
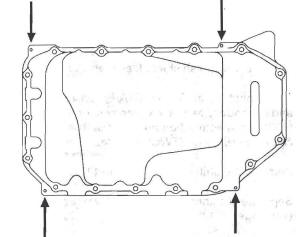
24. Remove the oil pan.
READ NEXT:
 Crankshaft and Piston Removal
1. Remove the engine assembly.
2. Remove the transmission.
3. Remove the drive plate.
4. Remove the oil pan.
5. Remove the oil pump.
6. Remove the cylinder head.
7. Remove the baffle plates.
8.
Block and Piston Inspection
1. Remove the crankshaft and pistons.
2. Check the piston for distortion or cracks.
3. Measure the piston diameter at a point 13 mm
(0.5 in.) from the bottom of the skirt. There are two
standard-siz
Piston, Pin, and Connecting Rod Replacement
Disassembly
1. Remove the piston from the engine block.
2. Apply new engine oil to the piston pin snap rings
(A), and turn them in the ring grooves until the end
gaps are lined up with the cutouts in
SEE MORE:
VTEC/VTC
Component Location Index
ROCKER ARM OIL CONTROL VALVE
Removal/Installation
ROCKER ARM OIL PRESSURE SWITCH
Removal/Installation
CAMSHAFT POSITION (CMP) SENSOR A (INTAKE)
Replacement
POWERTRAIN CONTROL
MODULE (PCM)
Gene
Rear Seat Adjustments
To adjust the seats forward and
backward, pull up on the lever under
the seat cushion. After moving the
seat, make sure it is locked into
position.
The angle of each rear seat-back can
be adjusted separately. To change
the seat-back angle of the rear seatback,
pull up on the relea
