Honda CR-V: DTC Troubleshooting
DTC B1078: Daytime Running Lights Signal Error (Canada)
DTC B1079: Daytime Running Lights Signal Error (USA)
NOTE: If you are troubleshooting multiple DTCs, be sure to follow the instructions in B-CAN System Diagnosis Test Mode A.
1. Turn the ignition switch ON (II).
2. Pull the parking brake lever.
3. Clear the DTCs with the HDS.
4. Release the parking brake lever.
5. Turn the ignition switch OFF, and then back ON (II).
6. Check for DTCs with the HDS.
Is DTC B1078 (Canada) or B1079 (USA) indicated? YES-Go to step 7.
NO-Intermittent failure, the daytime running lights system is OK at this time. Check for loose or poor connections.
7. Turn the headlight switch ON (high beam).
Do both headlights (high beam) come on? YES-Go to step 8.
NO-Go to step 10.
8. Turn the ignition switch OFF.
9. Measure voltage between the No.6 and No. 33 terminals of the under-dash fuse/relay box connector E (42P) and body ground, and between the No. 20 terminal of the under-dash fuse/relay box connector F (34P) and body ground individually.
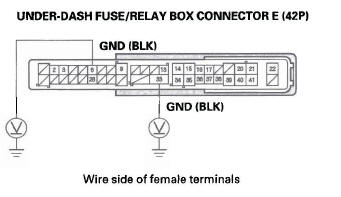
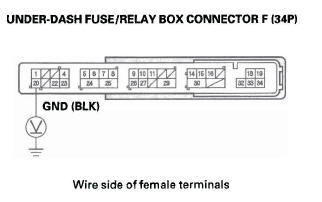
Is there less than 0.5 V? YES-Faulty MICU; replace the under-dash fuse/ relay box.
NO-Repair an open in the BLK wire or poor ground (G401 and G602).
10. Turn the ignition and headlight switches OFF.
11. Check the No. 12, No. 13, and No. 18 fuses in the under-dash fuse/relay box.
Are all of the fuses OK? YES-Go to step 12.
NO-Replace the blown fuse' and recheck. If the No. 18 (20 A) fuse is blown again, replace the under-dash fuse/relay box. If the No. 12 (10 A) or No. 13 (10 A) fuse is blown again, repair a short in the wire between the under-dash fuse/relay box and the appropriate headlight (high beam).
12. Check the headlight bulbs.
Are the headlight bulbs OK? YES-Go to step 13.
NO-Replace the faulty bulb.
13. Disconnect the under-dash fuse/relay box connectors F (34P) and G (21P).
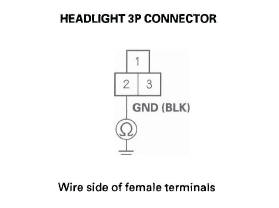
14. Disconnect both of the headlight 3P connectors.
15. Check for continuity between the No.3 terminal of the right headlight 3P connector and No. 22 terminal of the under-dash fuse/relay box connector F (34P).
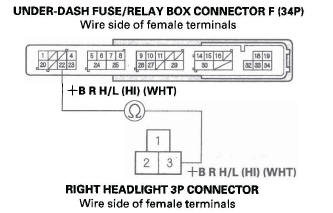
Is there continuity? YES-Go to step 16.
NO-Repair an open in the wire between the right headlight (high beam) and the under-dash fuse/ relay box.
16. Check for continuity between the No.3 terminal of the left headlight 3P connector and No. 15 terminal of the under-dash fuse/relay box connector G (21 P).
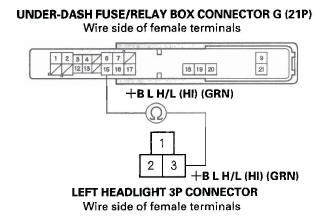
Is there continuity? YES-Go to step 17.
NO-Repair an open in the wire between the left headlight (high beam) and the under-dash fuse/ relay box.
17. Check for continuity between the No.2 terminal of each headlight 3P connector and body ground.
Is there continuity? YES-Faulty MICU; replace the under-dash fuse/ relay box.
NO-Repair an open in the BLK wire or poor ground (G301).
DTC B1275: Combination Light Switch OFF Position Circuit Malfunction
DTC B1276: Combination Light Switch Parking (SMALL) Position Circuit Malfunction
DTC B1278: Combination Light Switch ON Position Circuit Malfunction
NOTE: If you are troubleshooting multiple DTCs, be sure to follow the instructions in B-CAN System Diagnosis Test Mode A.
1. Clear the DTCs with the HDS.
2. Turn the ignition switch OFF, and then back ON (II).
3. Turn the combination light switch PARKING (SMALL) and ON (low beam) position, and then OFF position.
4. Clear the DTCs with the HDS.
Is DTC B1275, B1276, or B1278 indicated? YES-Go to step 5.
NO-Intermittent failure, the system is OK at this time. Check for loose or poor connections.
5. Select LIGHTING from the BODY ELECTRICAL system select menu, and enter the DATA LIST.
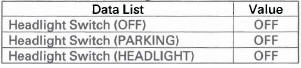
6. Check each combination light switch position value with the DATA LIST menu.
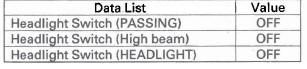
When the combination light switch is turned OFF
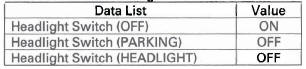
When the combination light switch is turned to PARKING (SMALL)
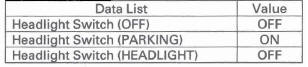
When the combination light switch is turned ON (HEADLIGHT)
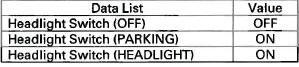
Are all data list values correct? YES-Faulty MICU; replace the under-dash fuse! relay box.
NO-Go to step 7.
7. Turn the ignition switch OFF.
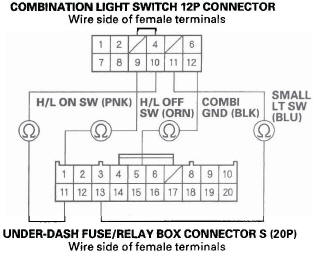
8. Disconnect the combination light switch 12P connector.
9. Turn the ignition switch ON (II).
10. Select LIGHTING from the BODY ELECTRICAL system select menu, and enter the DATA LIST.
11. Check each combination light switch position value with the DATA LIST menu.
When the combination light switch is turned OFF
Are all data list values indicated OFF? YES-Go to step 15.
NO-Go to step 12.
12. Turn the ignition switch OFF.
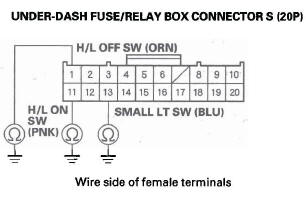
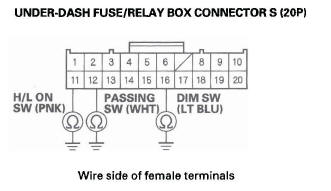
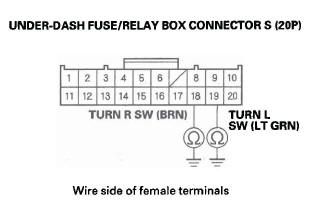
13. Disconnect the under-dash fuse/relay box connector S (20P).
14. Check for continuity between the body ground and the under-dash fuse/relay box connector S (20P) No.1, No.11, and No. 13 terminals individually.
Is there continuity? YES-Repair a short to ground in the wire.
NO-Faulty MICU; replace the under-dash fuse/ relay box.
15. Turn the ignition switch OFF.
16. Do the combination light switch test.
Is the combination light switch OK? YES-Go to step 17.
NO-Replace the combination light switch.
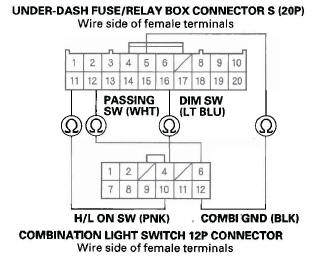
17. Disconnect the under-dash fuse/relay box connectors S (20P).
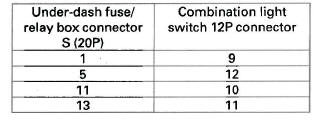
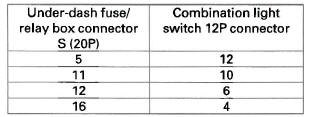
18. Check for continuity between the under-dash fuse/ relay box connector S (20P) terminals and the combination light switch 12P connector terminals as shown:
Is there continuity? YES-Go to step 19.
NO-Repair an open in the wire.
19. Check for continuity between the under-dash fuse/ relay box connector S (20P) terminals as shown:

Is there continuity? YES-Repair a short between the wire.
NO-Faulty MICU; replace the under-dash fuse/ relay box.
DTC B1279: Headlight Switch DIMMER Position Circuit Malfunction
NOTE: If you are troubleshooting multiple DTCs, be sure to follow the instructions in B-CAN System Diagnosis Test Mode A.
1. Clear the DTCs with the HDS.
2. Turn the ignition switch OFF, and then back ON (II).
3. Turn the combination light (headlight) switch ON.
4. Change the dimmer switch from low beam to high beam.
5. Turn the combination light switch OFF, and then PASSING position.
6. Check for DTCs with the HDS.
Is DTC B1279 indicated? YES-Go to step 7.
NO-Intermittent failure, the system is OK at this time. Check for loose or poor connections.
7. Select LIGHTING from the BODY ELECTRICAL system select menu, then enter the DATA LIST.
8. Check each combination light switch position value with the DATA LIST menu.
When the passing switch is operated

When the headlight switch is turned ON, and dimmer switch changed from low beam to high beam

Are all data list values correct? YES-Faulty MICU; replace the under-dash fuse/ relay box.
NO-Go to step 9.
9. Turn the ignition switch OFF.
10. Disconnect the combination light switch 12P connector.
11. Turn the ignition switch ON (II).
12. Select the BODY ELECTRICAL system select menu, then enter the LIGHTING SYSTEM.
13. Check each combination light switch position value with the DATA LIST menu.
When the combination light switch is turned OFF
Are all data list values indicated OFF? YES-Go to step 17.
NO-Go to step 14.
14. Turn the ignition switch OFF.
15. Disconnect the under-dash fuse/relay box connector S (20P).
16. Check for continuity between the body ground and the under-dash fuse/relay box connector S (20P) No. 11, No. 12, and No. 16 terminals individually.
Is there continuity? YES-Repair a short to ground in the wire.
NO-Faulty MICU; replace the under-dash fuse/ relay box.
17. Turn the ignition switch OFF.
18. Do the combination light switch test.
Is the combination light switch OK? YES-Go to step 19.
NO-Replace the combination light switch.
19. Disconnect the under-dash fuse/relay box connectors S (20P).
20. Check for continuity between the under-dash fuse! relay box connector S (20P) terminals and the combination light switch 12P connector terminals as shown:
Is there continuity? YES-Go to step 21.
NO-Repair an open in the wire.
21. Check for continuity between the under-dash fuse/ relay box connector S (20P) terminals as shown:

Is there continuity? YES-Repair a short between the wire.
NO-Faulty MICU; replace the under-dash fuse/relay box.
DTC B1280: Turn Signal Switch Circuit Malfunction
NOTE: If you are troubleshooting multiple DTCs, be sure to follow the instructions in B-CAN System Diagnosis Test Mode A.
1. Clear the DTCs with the HDS.
2. Turn the ignition switch OFF, and then back ON (II).
3. Operate the turn signal switch in left and right positions.
4. Check for DTCs with the HDS.
Is DTC B1280 indicated? YES-Go to step 5.
NO-Intermittent failure, the system is OK at this time. Check for loose or poor connections.
5. Select LIGHTING from the BODY ELECTRICAL system select menu, then enter the DATA LIST.
6. Check each turn signal switch position value with the DATA LIST menu.
When the turn signal switch is in 1eft position

When the turn signal switch is in right position

Are al/ data list values correct? YES-Faulty MICU; replace the under-dash fuse/ relay box.
NO-Go to step 7 7. Turn the ignition switch OFF.
8. Disconnect the combination light switch 12P connector.
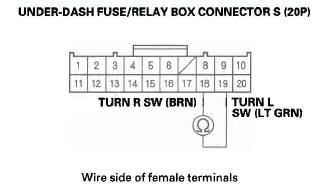
9. Disconnect the under-dash fuse/relay box connector S (20P).
10. Check for continuity between the body ground and the under-dash fuse/relay box connector S (20P) No. 18, and No. 19 terminals.
Is there continuity? YES-Repair a short to ground in the wire.
NO-Go to step 11.
11. Check for continuity between the under-dash fuse/ relay box connector S (20P) No. 18 and No. 19 terminals.
Is there continuity? YES-Repair a short between the wires.
NO-Replace the combination light switch.
READ NEXT:
 MICU Input Test
NOTE:
The MICU turns on the headlights (high beams) in a dim mode for the
daytime running lights under the following
conditions:
The ignition switch is ON (II)
The headlight switch is OFF
T
Headlight Adjustment
CAUTION
Headlights become very hot during use; do not
touch them or any attaching hardware immediately
after they have been turned off.
Before adjusting the headlights:
Park the vehicle on a level s
Turn Signal/Hazard Flasher
Component Location Index
TURN SIGNAL SWITCH
(Built into the combination light switch)
TURN SIGNAL INDICATORS
HAZARD WARNING SWITCH
MICU (Built into the under-dash fuse/relay box)
Circuit Diagr
SEE MORE:
To Defog and Defrost
To remove fog from the inside of the
windows:
1. Set the fan to the desired speed, or
high for faster defrosting.
2. Select
. The system
automatically switches to fresh air
mode and turns on the A/C. The
A/C indicator will not come on if it
was off to start with.
3. Adjust the temper
Connecting an iPod
1. Open the upper glove box.
2. Push the release button to release
the USB adapter cable.
3. Connect your dock connector to
the iPod correctly and securely.
4. Install the dock connector to the
USB adapter cable securely.
If the iPod indicator does not appear
in the audio display
