Honda CR-V: Headlight Adjustment
CAUTION
Headlights become very hot during use; do not touch them or any attaching hardware immediately after they have been turned off.
Before adjusting the headlights:
- Park the vehicle on a level surface.
- Make sure the tire pressures are correct.
- The driver or someone who weighs the same should sit in the driver's seat.
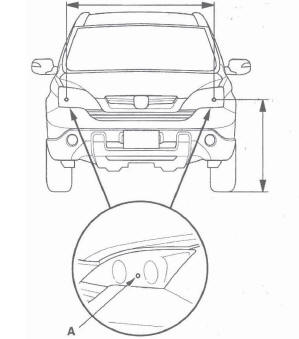
1. Clean the outer lens so that you can see the center (A) of the headlights.
2. Park the vehicle in front of a wall or a screen (A).
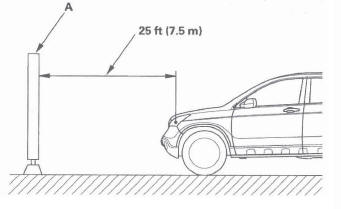
3. Turn the low beams on.
4. Determine if the headlights are aimed properly.
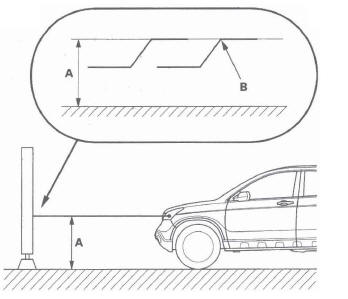
Vertical adjustment:
Measure the height of the headlights (A).
Adjust the cut line (B) to the light's height.
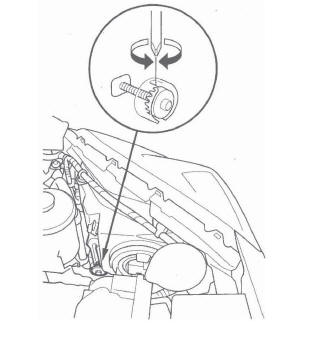
5. If necessary, open the hood and adjust the headlights by turning the vertical adjuster.
Headlight Replacement
1. Remove the front bumper and the front fender trim.
2. Remove the connectors (A) from the headlight assembly (B).
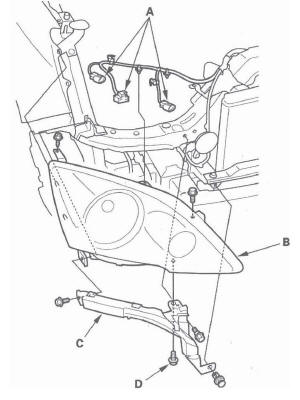
3. Remove the harness clips, screw, clip, and three bolts, then remove the headlight assembly with the corner upper beam (C).
4. Remove the bolt (D) and the corner upper beam from the headlight.
5. Install the headlight in the reverse order of removal.
6. After replacement, adjust the headlight.
Bulb Replacement
Headlight
1. Disconnect the 3P connector (A), then remove the rubber cap (B) from the headlight.
Headlight (high/low beam): 55/50 W
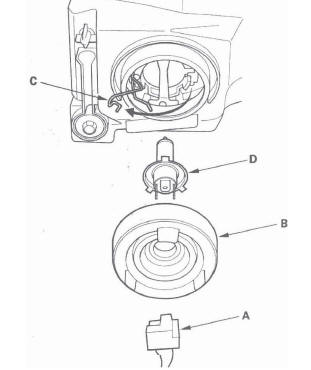
2. Pull the retaining spring (C) away from the bulb, then remove the bulb (D).
3. Install a new bulb in the reverse order of removal.
Front Side Marker/Parking Lights
1. Disconnect the 2P connector (A) from the front side marker/parking light.
Front Side Marker/Parking Lights: 3 CP
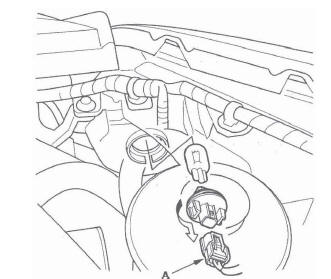
2. Turn the bulb socket 45º counterclockwise to remove the bulb.
3. Install a new bulb in the reverse order of removal.
Front Turn Signal Lights
1. Disconnect the 2P connector (A) from the front turn signal light.
Front Turn Signal Light: 21 W
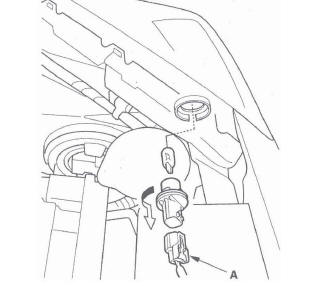
2. Turn the bulb socket 45º counterclockwise to remove the bulb.
3. Install a new bulb in the reverse order of removal.
Taillight Replacement
1. Open the tailgate.
2. Remove the caps and mounting bolts from the taillight (A), then carefully pull off the taillight.
Taillight: 5W
Brake Light/Taillight: 21/5W
Rear Turn Signal Light: 21W
Back-up Light: 21W
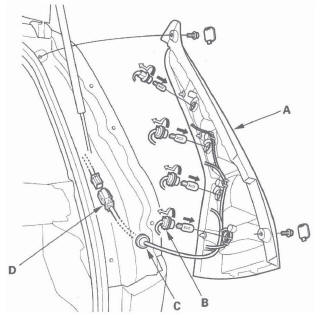
3. Turn the bulb sockets (B) 45º counterclockwise to remove them from the housing.
4. If replacement of the taillight harness is necessary, remove the grommet (C), and disconnect the 6P connector (D) from the side wire harness.
5. Install the taillight in the reverse order of removal.
License Plate Light Replacement
1. Open the tailgate and remove the tailgate lower trim.
2. Disconnect the 2P connector (A) from the license plate light.
License Plate Light: 5 W
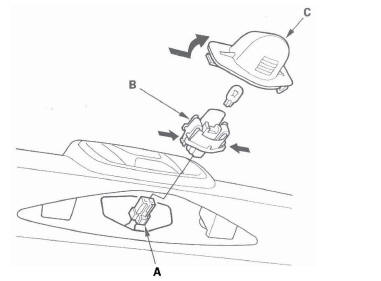
3. Release the bulb socket (B) from the lens (C) by pressing on the tabs.
4. Remove the lens from the tailgate by pressing on the tabs.
5. Install the light in the reverse order of removal.
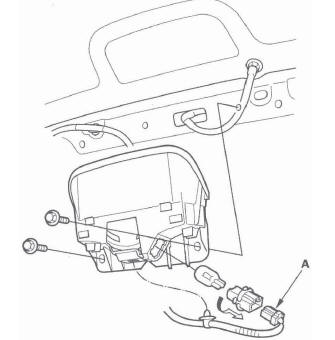
High Mount Brake Light Replacement
1. Open the tailgate, and remove the tailgate upper trim panel.
2. Disconnect the 2P connector (A) from the high mount brake light.
High Mount Brake Light: 21 W
3. Turn the bulb socket 45º counterclockwise to remove the bulb.
4. Remove the two bolts, then remove the housing.
5. Install the light in the reverse order of removal.
Brake Pedal Position Switch Test
1. Disconnect the 4P connector (A) from the brake pedal position switch (B).
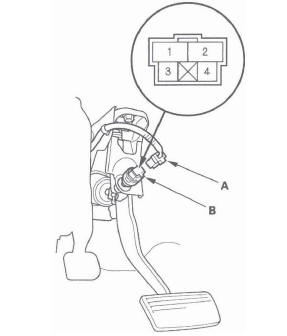
2. Check for continuity between the No.1 and No.2 terminals.
- There should be continuity when the brake pedal is pressed.
- There should be no continuity when the brake pedal is released.
3. Check for continuity between the No.3 and No.4 terminals.
- There should be no continuity when the brake pedal is pressed.
- There should be continuity when the brake pedal is released.
4. If necessary, adjust or replace the switch, or adjust the pedal height.
READ NEXT:
 Turn Signal/Hazard Flasher
Component Location Index
TURN SIGNAL SWITCH
(Built into the combination light switch)
TURN SIGNAL INDICATORS
HAZARD WARNING SWITCH
MICU (Built into the under-dash fuse/relay box)
Circuit Diagr
Interior Lights
Component Location Index
With moon roof
INDIVIDUAL MAP LIGHTS
INTERIOR LIGHT SWITCH
(Built into the moonroof switch)
AMBIENT LIGHT
(Built into the moonroof switch)
CEILING LIGHT
CARGO AREA LI
Entry Lights Control System
Component Location Index
With moonroof
INDIVIDUAL MAP LIGHTS
IGNITION KEY SWITCH
IGNITION KEY LIGHT
CEILING LIGHT
CARGO AREA LIGHT
RIGHT REAR DOOR SWITCH
FRONT PASSENGER'S
DOOR SWITCH
LEFT
SEE MORE:
DTC P0457: EVAP System Leak Detected/Fuel
Fill Cap Loose or Missing
NOTE: Before you troubleshoot, record all freeze data and any on-board
snapshot, and review the general troubleshooting information.
1. Check the fuel fill cap (the cap must say "Tighten to
click"). It should turn 1/4 turn after it's tight, then it
clicks.
Is the correct fuel fill cap installed a
Anti-lock Brakes (ABS)
The anti-lock brake system (ABS)
helps prevent the wheels from
locking up, and helps you retain
steering control by pumping the
brakes rapidly, much faster than a
person can do it.
The electronic brake distribution
(EBD) system, which is part of the
ABS, also balances the front-to-rea
