Honda CR-V: DTC Troubleshooting
DTC P0506: Idle Control System RPM Lower Than Expected
NOTE: Before you troubleshoot, record all freeze data and any on-board snapshot, and review the general troubleshooting information.
1. Turn the ignition switch ON (II).
2. Clear the DTC with the HDS.
3. Start the engine. Hold the engine speed at 3,000 rpm without load (in Park or neutral) until the radiator fan comes on, then let it idle.
4. Check under these DATA LIST parameter conditions with the HDS:
- ECT SENSOR 1 above 156 ºF (70 ºC)
- IAT SENSOR above 32 ºF (0 ºC)
- Vehicle speed is 0 mph (0 km/h)
- ST FUEL TRIM between 0.69-1.47
- FSS is CLOSED
5. Monitor the OBD STATUS for DTC P0506 in the DTCs MENU with the HDS.
Does the screen indicate FAILED? YES-Go to step 6.
NO-If the screen indicates PASSED, go to step 15.
If the screen indicates EXECUTING, keep idling until a result comes on. If the screen indicates OUT OF CONDITION, go to step 4 and recheck.
6. Remove the air intake duct from the throttle body.
7. Check for dirt, carbon, or damage in the throttle bore.
Is there dirt, carbon, or damage in the throttle bore? YES-If there is dirt or carbon, clean the throttle body. Also check for damage to the air cleaner element, then go to step 9. If there is damage in the throttle bore, go to step 8.
NO-Check the A/C system or power steering system, then go to step 9.
8. Replace the throttle body.
9. Reset the PCM with the HDS.
10. Do the PCM idle learn procedure.
11. Start the engine. Hold the engine speed at 3,000 rpm without load (in Park or neutral) until the radiator fan comes on, then let it idle.
12. Check under these DATA LIST parameter conditions with the HDS:
- ECT SENSOR 1 above 156 ºF (70 ºC)
- IAT SENSOR above 32 ºF (0 ºC)
- Vehicle speed is 0 mph (0 km/h)
- ST FUEL TRIM between 0.69 -1.47
- FSS is CLOSED
13. Check for Temporary DTCs or DTCs with the HDS.
Is DTC P0506 indicated? YES-Go to step 19.
NO-Go to step 14.
14. Monitor the OBD STATUS for DTC P0506 in the DTCs MENU with the HDS.
Does the screen indicate PASSED? YES-Troubleshooting is complete. If any other Temporary DTCs or DTCs were indicated in step 13, go to the indicated DTC's troubleshooting.
NO-If the screen indicates FAILED, go to step 19. If the screen indicates EXECUTING, keep idling until a result comes on. If the screen indicates OUT OF CONDITION, go to step 12.
15. Remove the air intake duct from the throttle body.
16. Check for dirt, carbon, or damage in the throttle bore.
Is there dirt, carbon, or damage in the throttle bore? YES-If there is dirt or carbon, clean the throttle body, Also check for damage to the air cleaner element, then go to step 9. If there is damage in the throttle bore, go to step 8.
NO-Go to step 17.
17. Recheck with different load conditions (turn on the headlights, blower motor, rear window defogger and/or A/C, change the gear position, etc.).
18. Monitor the OBD STATUS for DTC P0506 in the DTCs MENU with the HDS.
Does the screen indicate PASSED? YES-Intermittent failure, the system is OK at this time.
NO-If the screen indicates FAILED, check the A/C system and/or power steering system, then go to step 1 and recheck. If the screen indicates EXECUTING, keep idling until a result comes on. If the screen indicates OUT OF CONDITION, go to step 17 and recheck.
19. Update the PCM if it does not have the latest software, or substitute a known-good PCM.
20. Start the engine. Hold the. engine speed at 3,000 rpm without load (in Park or neutral) until the radiator fan comes on, then let it idle.
21. Check under these DATA LIST parameter conditions with the HDS:
- ECT SENSOR 1 above 156 F (70 ºC)
- IAT SENSOR above 32 F (0 ºC)
- Vehicle speed is 0 mph (0 km/h)
- ST FUEL TRIM between 0.69-1.47
- FSS is CLOSED
22. Check for Temporary DTCs or DTCs with the HDS.
Is DTC P0506 indicated? YES-Check for poor connections or loose terminals at the throttle body and the PCM. If the PCM was updated, substitute a known-good PCM, then go to step 20. If the PCM was substituted, go to step 1.
NO-Go to step 23.
23. Monitor the OBD STATUS for DTC P0506 in the DTCs MENU with the HDS.
Does the screen indicate PASSED? YES-If the PCM was updated, troubleshooting is complete. If the PCM was substituted, replace the original PCM. If any other Temporary DTCs or DTCs were indicated in step 22, go to the indicated DTC's troubleshooting.
NO-If the screen indicates FAILED, check for poor connections or loose terminals at the throttle body and the PCM. If the PCM was updated, substitute a known-good PCM, then go to step 20. If the PCM was substituted, go to step 1. If the screen indicates EXECUTING, keep idling until a result comes on. If the screen indicates OUT OF CONDITION, go to step 20.
DTC P0507: Idle Control System RPM Higher Than Expected
NOTE: Before you troubleshoot, record all freeze data and any on-board snapshot, and review the general troubleshooting information.
1. Turn the ignition switch ON (II).
2. Clear the DTC with the HDS.
3. Start the engine. Hold the engine speed at 3,000 rpm without load (in Park or neutral) until the radiator fan comes on, then let it idle.
4. Monitor the OBD STATUS for DTC P0507 in the DTCs MENU with the HDS.
Does the screen indicate FAILED? YES-Go to step 5.
NO-If the screen indicates PASSED, intermittent failure, the system is OK at this time. If the screen indicates EXECUTING, keep idling until a result comes on. If the screen indicates OUT OF CONDITION, recheck with different load conditions (electrical, A/C, gear position, etc.), then go to step 3.
5. Check for vacuum leaks at these parts:
- PCV valve
- PCV hose
- EVAP canister purge valve
- Throttle body
- Intake manifold
- Brake booster hose
- Brake booster
Are there any leaks? YES-Repair or replace the leaking part(s), then go to step 6.
NO-Go to step 6.
6. Turn the ignition switch ON (II).
7. Reset the PCM with the HDS.
8. Do the PCM idle learn procedure.
9. Start the engine. Hold the engine speed at 3,000 rpm without load (in Park or neutral) until the radiator fan comes on, then let it idle.
10. Check for Temporary DTCs or DTCs with the HDS.
Is DTC P0507 indicated? YES-Go to step 12.
NO-Go to step 11.
11. Monitor the OBD STATUS for DTC P0507 in the DTCs MENU with the HDS.
Does the screen indicate PASSED? YES-Troubleshooting is complete. If any other Temporary DTCs or DTCs were indicated in step 10, go to the indicated DTC's troubleshooting.
NO-If the screen indicates FAILED, go to step 12. If the screen indicates EXECUTING, keep idling until a result comes on. If the screen indicates OUT OF CONDITION, go to step 9.
12. Update the PCM if it does not have the latest software, or substitute a known-good PCM.
13. Start the engine. Hold the engine speed at 3,000 rpm without load (in Park or neutral) until the radiator fan comes on, then let it idle.
14. Check for Temporary DTCs or DTCs with the HDS.
Is DTC P0507 indicated? YES-Check for poor connections or loose terminals at the throttle body and the PCM. If the PCM was updated, substitute a known-good PCM, then go to step 13. If the PCM was substituted, go to step 1.
NO-Go to step 15.
15. Monitor the OBD STATUS for DTC P0507 in the DTCs MENU with the HDS.
Does the screen indicate PASSED? YES-If the PCM was updated, troubleshooting is complete. If the PCM was substituted, replace the original PCM. If any other Temporary DTCs or DTCs were indicated in step 14, go to the indicated DTC's troubleshooting.
NO-If the screen indicates FAILED, check for poor connections or loose terminals at the throttle body and the PCM. If the PCM was updated, substitute a known-good PCM, then go to step 13. If the PCM was substituted, go to step 1. If the screen indicates EXECUTING, keep idling until a result comes on. If the screen indicates OUT OF CONDITION, go to step 13.
DTC P0532: A/C Pressure Sensor Circuit Low Voltage
NOTE: Before you troubleshoot, record all freeze data and any on-board snapshot, and review the general troubleshooting information.
1. Start the engine, and let it idle.
2. Turn the blower switch on.
3. Turn the A/C switch on.
4. Check the A/C PRESSURE SENSOR in the DATA LIST with the HDS.
Is there about 0.3 V or less? YES-Go to step 5.
NO-Intermittent failure, the system is OK at this time. Check for poor connections or loose terminals at the A/C pressure sensor and the PCM.
5. Turn the ignition switch OFF.
6. Disconnect the A/C pressure sensor 3P connector.
7. Turn the ignition switch ON (II).
8. Check the A/C PRESSURE SENSOR in the DATA LIST with the HDS.
Is there about 0.3 V or less? YES-Go to step 10.
NO-Go to step 9.
9. Measure voltage between A/C pressure sensor 3P connector terminals No. 1 and No. 3.
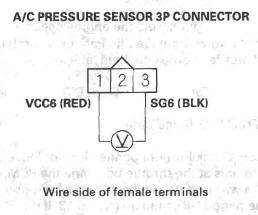
Is there about 5 V? YES-Go to step 18.
NO-Go to step 14.
10. Turn the ignition switch OFF.
11. Jump the SCS line with the HDS.
12. Disconnect PCM connector A (44P).
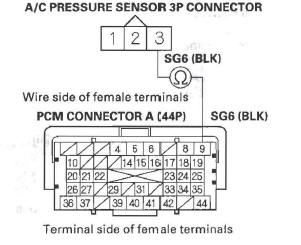
13. Check for continuity between A/C pressure sensor 3P connector terminal No.2 and body ground.

Is there continuity? YES-Repair short in the wire between the PCM (A16) and the A/C pressure sensor, then go to step 20.
NO-Go to step 28.
14. Turn the ignition switch OFF.
15. Jump the SCS line with the HDS.
16. Disconnect PCM connector A (44P).
17. Check for continuity between A/C pressure sensor 3P connector terminal No. 1 and PCM connector terminal A19.
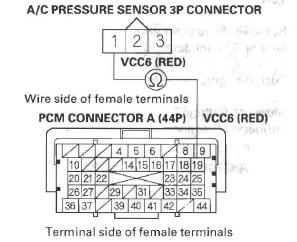
Is there continuity? YES-Go to step 28.
NO-Repair open in the wire between the PCM (A19) and the A/C pressure sensor, then go to step 20.
18. Turn the ignition switch OFF.
19. Replace the A/C pressure sensor.
20. Reconnect all connectors.
21. Turn the ignition switch ON (II).
22. Reset the PCM with the HDS.
23. Do the PCM idle learn procedure.
24. Start the engine, and let it idle.
25. Turn the blower switch on.
26. Turn the A/C switch on.
27. Check for Temporary DTCs or DTCs with the HDS.
Is DTC P0532 indicated? YES-Check for poor connections or loose terminals at the A/C pressure sensor and the PCM, then go to step 1.
NO-Troubleshooting is complete. If any other Temporary DTCs or DTCs are indicated, go to the indicated DTC's troubleshooting.
28. Reconnect all connectors.
29. Update the PCM if it does not have the latest software, or substitute a known-good PCM.
30. Start the engine, and let it idle.
31. Turn the blower switch on.
32. Turn the A/C switch on.
33. Check for Temporary DTCs or DTCs with the HDS.
Is DTC P0532 indicated? YES-Check for poor connections or loose terminals at the A/C pressure sensor and the PCM.
If the PCM was updated, substitute a known-good PCM, then go to step 30. If the PCM was substituted, go to step 1. NO-If the PCM was updated, troubleshooting is complete. If the PCM was substituted, replace the original PCM. If any other Temporary DTCs or DTCs are indicated, go to the indicated DTC's troubleshooting.
DTC P0533: A/C Pressure Sensor Circuit High Voltage
NOTE: Before you troubleshoot, record all freeze data and any on-board snapshot, and review the general troubleshooting information.
1. Start the engine, and let it idle.
2. Turn the blower switch on.
3. Turn the A/C switch on.
4. Check the A/C PRESSURE SENSOR in the DATA LIST with the HDS.
Is there about 4.75 V or more? YES-Go to step 5.
NO-Intermittent failure, the system is OK at this time. Check for poor connections or loose terminals at the A/C pressure sensor and the PCM.
5. Turn the ignition switch OFF.
6. Disconnect the A/C pressure sensor 3P connector.
7. Connect A/C pressure sensor 3P connector terminals No.2 and No.3 with a jumper wire.
8. Turn the ignition switch ON (II).
9. Check the A/C PRESSURE SENSOR in the DATA LIST with the HDS.
Is there about 4.75 V or more? YES-Go to step 10.
NO-Go to step 22.
10. Turn the ignition switch OFF.
11. Remove the jumper wire from the A/C pressure sensor 3P connector.
12. Turn the ignition switch ON (II).
13. Measure voltage between A/C pressure sensor 3P connector terminals No.1 and No.3.

Is there about 5 V? YES-Go to step 14.
NO-Go to step 18.
14. Turn the ignition switch OFF.
15. Jump the SCS line with the HDS.
16. Disconnect PCM connector A (44P).
17. Check for continuity between A/C pressure sensor 3P connector terminal No.2 and PCM connector terminal A16.

Is there continuity? YES-Go to step 32.
NO-Repair open in the wire between the PCM (A16) and the A/C pressure sensor, then go to step 24.
18. Turn the ignition switch OFF.
19. Jump the SCS line with the HDS.
20. Disconnect PCM connector A (44P).
21. Check for continuity between A/C pressure sensor 3P connector terminal No.3 and PCM connector terminal A9.
Is there continuity? YES-Go to step 32.
NO-Repair open in the wire between the PCM (A9) and the A/C pressure sensor, then go to step 24.
22. Turn the ignition switch OFF.
23. Replace the A/C pressure sensor.
24. Reconnect all connectors.
25. Turn the ignition switch ON (II).
26. Reset the PCM with the HDS.
27. Do the PCM idle learn procedure.
28. Start the engine, and let it idle.
29. Turn the blower switch on.
30. Turn the A/C switch on.
31. Check for Temporary DTCs or DTCs with the HDS.
Is DTC P0533 indicated? YES-Check for poor connections or loose terminals at the A/C pressure sensor and the PCM, then go to step 1.
NO-Troubleshooting is complete. If any other Temporary DTCs or DTCs are indicated, go to the indicated DTC's troubleshooting.
32. Reconnect all connectors.
33. Update the PCM if it does not have the latest software, or substitute a known-good PCM.
34. Start the engine, and let it idle.
35. Turn the blower switch on.
36. Turn the A/C switch on.
37. Check for Temporary DTCs or DTCs with the HDS.
Is DTC P0533 indicated? YES-Check for poor connections or loose terminals at the A/C pressure sensor and the PCM.
If the PCM was updated, substitute a known-good PCM, then go to step 34. If the PCM was substituted, go to step 1.
NO-If the PCM was updated, troubleshooting is complete. If the PCM was substituted, replace the original PCM. If any other Temporary DTCs or DTCs are indicated, go to the indicated DTC's troubleshooting.
READ NEXT:
 A/C Signal Circuit Troubleshooting
1. Start the engine, and let it idle.
2. Turn the blower switch on.
3. Turn the A/C switch on.
4. Check the A/C CLUTCH in the DATA LIST with the
HDS.
Does it indicate ON?
YES-Go to step 5.
5. Check t
PSP Switch Signal Circuit Troubleshooting
1. Start the engine, and let it idle.
2. Align the steering wheel straight ahead.
3. Check the PSP SWITCH in the DATA LIST with the
HDS.
Does it indicate ON?
YES-Go to step 4.
NO-Go to step 14.
4.
Brake Pedal Position Switch Signal Circuit Troubleshooting
1. Turn the ignition switch ON (II).
2. Check the BRAKE SWITCH in the DATA LIST with
the HDS.
Does it indicate OFF?
YES-Go to step 3.
NO-Inspect the brake pedal position switch.
3. Press the brake
SEE MORE:
Differential Disassembly
Special Tools Required
Holder handle 07JAB-001020A
Companion flange holder 07RAB-TB4010B
1. Remove the drain plug (A) and the oil filler plug (B)
with sealing washers (C).
2. Raise the locknut tab (A) from the groove of the
clutch guide, making sure the tab completely clears
the groove to preve
Accessory Power Sockets
Your vehicle has two or three
accessory power sockets depending
on the model.
To use an accessory power socket,
the ignition switch must be in the
ACCESSORY (I) or ON (II) position.
Each socket is intended to supply
power for 12 volt DC accessories
that are rated 120 watts or l
