Honda CR-V: DTC P0101: MAF Sensor Range/Performance Problem
NOTE:
- Before you troubleshoot, record all freeze data and any on-board snapshot, and review the general troubleshooting information.
- If DTC P1128, P1129, P2228, and/or P2229 are stored at the same time as DTC P0101, troubleshoot those DTCs first, then recheck for DTC P0101.
1. Check for poor connections or damage to these parts:
- PCV hose
- Air intake duct
- Air cleaner
- Purge (PCS) line
- Brake booster hose
Are the parts OK? YES-Go to step 2.
NO-Repair or replace the damaged parts, then go to step 15.
2. Check for damage or looseness at the air duct in the air cleaner.
Is it OK? YES-Go to step 3.
NO-Reconnect or replace the air duct in the air cleaner, then go to step 15.
3. Check for a dirty air cleaner element.
Is it dirty? YES-Replace the air cleaner element , then go to step 15.
NO-Go to step 4.
4. Turn the ignition switch OFF.
5. Turn the ignition switch ON (II).
6. Check the MAF SENSOR in the DATA LIST with the HDS.
Is there about 0.2 gm/s or 0.5 V? YES-Go to step 7.
NO-Go to step 13.
7. Start the engine.
8. Vary the engine speed between 2,000 rpm and 3,000 rpm.
9. Check the MAF SENSOR in the DATA LIST with the HDS.
Does the reading change? YES-Go to step 10.
NO-Go to step 13.
10. Hold the engine speed at 3,000 rpm without load (in Park or neutral) until the radiator fan comes on, then let it idle.
11. Test-drive the vehicle for several minutes in the range of these recorded freeze data parameters:
- ENGINE SPEED
- VSS
- MAP SENSOR
- MAF SENSOR
12. Monitor the OBO STATUS for DTC P0101 in the DTCs MENU with the HDS.
Does the screen indicate FAILED? YES-Go to step 13.
NO-If the screen indicates PASSED, intermittent failure, the system is OK at this time. Check for poor connections or loose terminals at the MAF sensor/IAT sensor and the PCM. If the screen indicates NOT COMPLETED, go to step 11 and recheck.
13. Turn the ignition switch OFF.
14. Replace the MAF sensor/IAT sensor.
15. Turn the ignition switch ON (II).
16. Reset the PCM with the HDS.
17. Do the PCM idle learn procedure.
18. Test-drive the vehicle for several minutes in the range of these recorded freeze data parameters:
- ENGINE SPEED
- VSS
- MAP SENSOR
- MAF SENSOR
19. Check for Temporary DTCs or DTCs with the HDS.
Is DTC P0101 indicated? YES-Check for poor connections or loose terminals at the MAF sensor/IAT sensor and the PCM, then go to step 1.
NO-Go.to step 20.
20. Monitor the OBD STATUS for DTC P0101 in the DTCs MENU with the HDS.
Does the screen indicate PASSED? YES-Troubleshooting is complete. If any other Temporary DTCs or DTCs were indicated in step 19, go to the indicated DTC's troubleshooting.
NO-If the screen indicates FAILED, check for poor connections or loose terminals at the MAF sensor/ IAT sensor and the PCM, then go to step 1. If the screen indicates NOT COMPLETED, go to step 18.
DTC P0102: MAF Sensor Circuit Low Voltage
NOTE: Before you troubleshoot, record all freeze data and any on-board snapshot, and review the general troubleshooting information.
1. Turn the ignition switch ON (II), and wait 2 seconds.
2. Check the MAF SENSOR in the DATA LIST with the HDS.
Is about 0 gm/s, or 0.1 V or less indicated? YES-Go to step 3.
NO-Intermittent failure, the system is OK at this time. Check for poor connections or loose terminals at the MAF sensor/IAT sensor and the PCM.
3. Check the No. 3 ALTERNATOR (10 A) fuse in the under-dash fuse/relay box.
Is the fuse OK? YES-Go to step 4.
NO-Repair short in the wire between the MAF sensor and the No.3 ALTERNATOR (10 A) fuse.
Also replace the No.3 ALTERNATOR (10 A) fuse, then go to step 20.
4. Turn the ignition switch OFF.
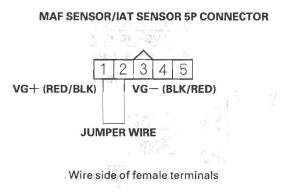
5. Disconnect the MAF sensor/IAT sensor 5P connector.
6. Turn the ignition switch ON (II).
7. Measure voltage between MAF sensor/IAT sensor 5P connector terminal No.3 and body ground.
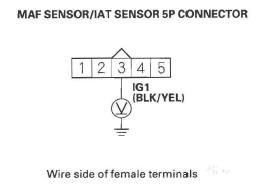
Is there battery voltage? YES-Go to step 8.
NO-Repair open in the wire between the No. 3 ALTERNATOR (10 A) fuse and the MAF sensor, then go to step 20.
8. Turn the ignition switch OFF.
9. Measure resistance between MAF sensor/IAT sensor 5P connector terminal No.1 and body ground.
Is there 190- 210 kΩ ? YES-Go to step 14.
NO-Go to step 10.
10. Jump the SCS line with the HDS.
11. Disconnect PCM connector B (44P).
12. Check for continuity between PCM connector terminal B30 and body ground.

Is there continuity? YES-Repair short in the wire between the PCM (B30) and the MAF sensor, then go to step 21.
NO-Go to step 13.
13. Check for continuity between MAF sensor/IAT sensor 5P connector terminal No.1 and PCM connector terminal B30.
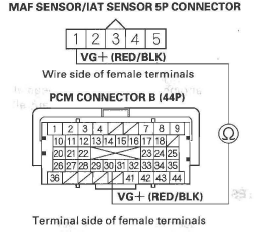
Is there continuity? YES-Go to step 26.
NO-Repair open in the wire between the PCM (B30) and the MAF sensor, then go to step 21.
14. Substitute a known-good MAF sensor/IAT sensor.
15. Reconnect, all connectors.
16. Turn the ignition switch ON (II).
17. Clear the DTC with the HDS.
18. Start the engine. Hold the engine speed at 2,000 rpm without load (in Park or neutral).
19. Check for Temporary DTCs or DTCs with the HDS.
Is DTC P0102 indicated? YES-Go to step 27.
NO-Replace the original MAF sensor/IAT sensor, then go to step 20.
20. Turn the ignition switch OFF.
21. Reconnect all connectors.
22. Turn the ignition switch ON (II).
23. Reset the PCM with the HDS.
24. Do the PCM idle learn procedure.
25. Check for Temporary DTCs or DTCs with the HDS.
Is DTC P0102 indicated? YES-Check for poor connections or loose terminals at the MAF sensor/IAT sensor and the PCM, then go to step 1.
NO-Troubleshooting is complete. If any other Temporary DTCs or DTCs are indicated, go to the indicated DTC's troubleshooting.
26. Reconnect all connectors.
27. Update the PCM if it does not have the latest software, or substitute a known-good PCM.
28. Check for Temporary DTCs or DTCs with the HDS.
Is DTC P0102 indicated? YES-Check for poor connections or loose terminals at the MAF sensor/IAT sensor and the PCM. If the PCM was updated, substitute a known-good PCM, then recheck. If the PCM was substituted, go to step 1.
NO-If the PCM was updated, troubleshooting is complete. If the PCM was substituted, replace the original PCM. If any other Temporary DTCs or DTCs are indicated, go to the indicated DTC's troubleshooting.
DTC P0103: MAF Sensor Circuit High Voltage
NOTE: Before you troubleshoot, record all freeze data and any on-board snapshot, and review the general troubleshooting information.
1. Turn the ignition switch ON (II), and wait 2 seconds.
2. Check the MAF SENSOR in the DATA LIST with the HDS.
Is about 202 gm/s, or 4.89 V or more indicated? YES-Go to step 3.
NO-Intermittent failure, the system is OK at this time. Check for poor connections or loose terminals at the MAF sensor/IAT sensor and the PCM.
3. Turn the ignition switch OFF.
4. Jump the SCS line with the HDS.
5. Disconnect the MAF sensor/IAT sensor 5P connector.
6. Disconnect PCM connector B (44P).
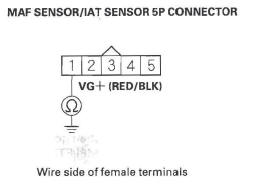
7. Check for continuity between MAF sensor/IAT sensor 5P connector terminal No.2 and PCM connector terminal B32.
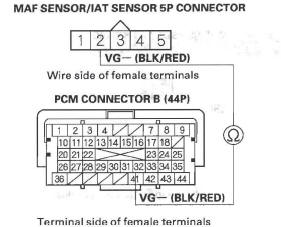
Is there continuity? YES-Go to step 8.
NO-Repair open in the wire between the PCM (B32) and the MAF sensor, then go to step 15.
8. Reconnect PCM connector B (44P).
9. Connect MAF sensor/IAT sensor 5P connector terminals No.1 and No.2 with a jumper wire.
10. Turn the ignition switch ON (II).
11. Clear the DTC with the HDS.
12. Check for Temporary DTCs or DTCs with the HDS.
Is DTC P0103 indicated? YES-Go to step 20.
NO-Go to step 13.
13. Turn the ignition switch OFF.
14. Replace the MAF sensor/IAT sensor.
15. Reconnect all connectors.
16. Turn the ignition switch ON (II).
17. Reset the PCM with the HDS.
18. Do the PCM idle learn procedure.
19. Check for Temporary DTCs or DTCs with the HDS.
Is DTC P0103 indicated? YES-Check for poor connections or loose terminals at the MAF sensor/IAT sensor and the PCM, then go to step 1.
NO-Troubleshooting is complete. If any other Temporary DTCs or DTCs are indicated, go to the indicated DTC's troubleshooting.
20. Reconnect all connectors.
21. Update the PCM if it does not have the latest software, or substitute a known-good PCM.
22. Check for Temporary DTCs or DTCs with the HDS.
Is DTC P0103 indicated? YES-Check for poor connections or loose terminals at the MAF sensor/IAT sensor and the PCM. If the PCM was updated, substitute a known-good PCM, then recheck. If the PCM was substituted, go to step 1.
NO-If the PCM was updated, troubleshooting is complete. If the PCM was substituted, replace the original PCM. If any other Temporary DTCs or DTCs are indicated, go to the indicated DTC's troubleshooting.
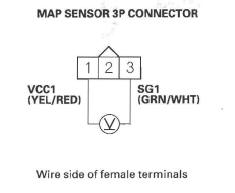
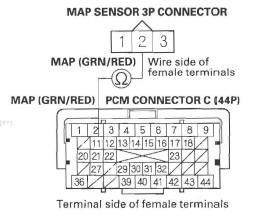
DTC P0107: MAP Sensor Circuit Low Voltage
NOTE: Before you troubleshoot, record all freeze data and any on-board snapshot, and review the general troubleshooting information.
1. Turn the ignition switch ON (II).
2. Check the MAP SENSOR in the DATA LIST with the HDS.
Is about 3 kPa (1.0 in.Hg, 26 mmHg), or 0.23 V or less indicated? YES-Go to step 3.
NO-Intermittent failure, the system is OK at this time. Check for poor connections or loose terminals at the MAP sensor and the PCM.
3. Turn the ignition switch OFF.
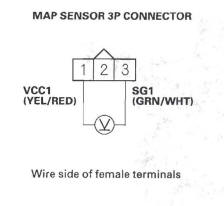
4. Disconnect the MAP sensor 3P connector.
5. Turn. the ignition switch ON (II).
6. Check the MAP SENSOR in the DATA LIST with the HDS.
Is about 3 kPa (1.0 in.Hg, 26 mmHg), or 0.23 V or less indicated? YES-Go to step 12.
NO-Go to step 7.
7. Measure voltage between MAP sensor 3P connector terminals No.1 and No. 3.
Is there about 5 V?
YES-Go to step 16.
NO-Go to step 8.
8. Turn the ignition switch OFF.
9. Jump the SCS line with the HDS.
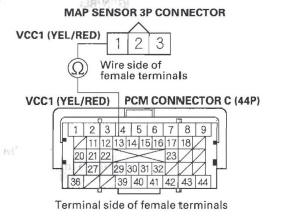
10. Disconnect PCM connector C (44P).
11. Check for continuity between PCM connector terminal C13 and MAP sensor 3P connector terminal No.1.
Is there continuity? YES-Go to step 23.
NO-Repair open in the wire between the PCM (C13) and the MAP sensor, then go to step 18.
12. Turn the ignition switch OFF.
13. Jump the SCS line with the HDS.
14. Disconnect PCM connector C (44P).
15. Check for continuity between MAP sensor 3P connector terminal No.2 and body ground.

Is there continuity? YES-Repair short in the wire between the PCM (C11) and the MAP sensor, then go to step 18.
NO-Go to step 23.
16. Turn the ignition switch OFF.
17. Replace the MAP sensor.
18. Reconnect all connectors.
19. Turn the ignition switch ON (II).
20. Reset the PCM with the HDS.
21. Do the PCM idle learn procedure.
22. Check for Temporary DTCs or DTCs with the HDS.
Is DTC P0107 indicated? YES-Check for poor connections or loose terminals at the MAP sensor and the PCM, then go to step 1.
NO-Troubleshooting is complete. If any other Temporary DTCs or DTCs are indicated, go to the indicated DTC's troubleshooting.
23. Reconnect all connectors.
24. Update the PCM if it does not have the latest software, or substitute a known-good PCM.
25. Check for Temporary DTCs or DTCs with the HDS.
Is DTC P0107 indicated? YES-Check for poor connections or loose terminals at the MAP sensor and the PCM. If the PCM was updated, substitute a known-good PCM, then recheck. If the PCM was substituted, go to step 1.
NO-If the PCM was updated, troubleshooting is complete. If the PCM was substituted, replace the original PCM . If any other Temporary DTCs or DTCs are indicated, go to the indicated DTC's troubleshooting.
DTC P0108: MAP Sensor Circuit High Voltage
NOTE: Before you troubleshoot, record all freeze data and any on-board snapshot, and review the general troubleshooting information.
1. Turn the ignition switch ON (II).
2. Check the MAP SENSOR in the DATA LIST with the HDS.
Is about 160 kPa (47.1 in.Hg, 1,197 mmHg), or 4.49 V or more indicated? YES-Go to step 3.
NO-Intermittent failure, the system is OK at this time. Check for poor connections or loose terminals at the MAP sensor and the PCM.
3. Turn the ignition switch OFF.
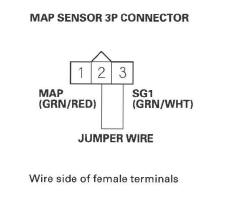
4. Disconnect the MAP sensor 3P connector.
5. Connect MAP sensor 3P connector terminals No.2 and No.3 with a jumper wire.
6. Turn the ignition switch ON (II).
7. Check the MAP SENSOR in the DATA LIST with the HDS.
Is about 160 kPa (47.1 in.Hg, 1,197 mmHg), or 4.49 V or more indicated? YES-Go to step 8.
NO-Go to step 18.
8. Remove the jumper wire from the MAP sensor 3P connector.
9. Measure voltage between MAP sensor 3P connector terminals No.1 and No. 3.
Is there about 5 V? YES-Go to step 14.
NO-Go to step 10.
10. Turn the ignition switch OFF.
11. Jump the SCS line with the HDS.
12. Disconnect PCM connector C (44P).
13. Check for continuity between PCM connector terminal C14 and MAP sensor 3P connector terminal No.3.
Is there continuity? YES-Go to step 25.
NO-Repair open in the wire between the PCM (C14) and the MAP sensor, then go to step 20.
14. Turn the ignition switch OFF.
15. Jump the SCS line with the HDS.
16. Disconnect PCM connector C (44P).
17. Check for continuity between PCM connector terminal C11 and MAP sensor 3P connector terminal No.2.
Is there continuity? YES-Go to step 25.
NO-Repair open in the wire between the PCM (C11) and the MAP sensor, then go to step 20.
18. Turn the ignition switch OFF.
19. Replace the MAP sensor.
20. Reconnect all connectors.
21. Turn the ignition switch ON (II).
22. Reset the PCM with the HDS.
23. Do the PCM idle learn procedure.
24. Check for Temporary DTCs or DTCs with the HDS.
Is DTC P010B indicated? YES-Check for poor connections or loose terminals at the MAP sensor and the PCM, then go to step 1.
NO-Troubleshooting is complete. If any other Temporary DTCs or DTCs are indicated, go to the indicated DTC's troubleshooting.
25. Reconnect all connectors.
26. Update the PCM if it does not have the latest software or substitute a known-good PCM.
27. Check for Temporary DTCs or DTCs with the HDS.
Is DTC P010B indicated? YES-Check for poor connections or loose terminals at the MAP sensor and the PCM. If the PCM was updated, substitute a known-good PCM. then recheck. If the PCM was substituted, go to step 1.
NO-If the PCM was updated, troubleshooting is complete. If the PCM was substituted, replace the original PCM. If any other Temporary DTCs or DTCs are indicated, go to the indicated DTC's troubleshooting.
READ NEXT:
 DTC P0111: IAT Sensor Circuit Range/Performance Problem
NOTE: Before you troubleshoot, record all freeze data
and any on-board snapshot, and review the general
troubleshooting information.
1. Check for poor connections or loose terminals at
ECT sensor 1/2
DTC P0116: ECT Sensor 1 Range/Performance Problem
NOTE: Before you troubleshoot, record all freeze data
and any on-board snapshot, and review the general
troubleshooting information.
1. Turn the ignition switch ON (II).
2. Check ECT SENSOR 1 in the
DTC P0128: Cooling System Malfunction
NOTE: Before you troubleshoot, record all freeze data
and any on-board snapshot, and review the general
troubleshooting information.
1. Turn the ignition switch ON (II).
2. Clear the DTC with the HDS
SEE MORE:
Changing the Set Speed
You can increase the set cruising
speed in any of these ways:
Press and hold the RES/ACCEL
button. When you reach the
desired cruising speed, release the
button.
To increase the speed in very
small amounts, tap the RES/
ACCEL button. Each time you do
this, your vehicle will speed up
Cam Chain Installation
NOTE:
Keep the cam chain away from magnetic fields.
Before this procedure, check that the variable valve
timing control (VTC) actuator is locked by turning the
VTC actuator counterclockwise. If not locked, turn the
VTC actuator clockwise until it stops, then recheck it.
If it is still not loc
