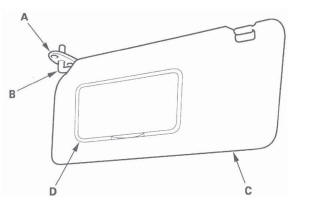
Honda CR-V: Sunvisor Removal/Installation
Special Tools Required
KTC trim tool set SOJATP2014 *
* Available through the American Honda Tool and Equipment Program; call 888-424-6857
NOTE:
- Put on gloves to protect your hands.
- Use the appropriate tool from the KTC trim tool set to avoid damage when prying components.
- Take care not to scratch the headliner.
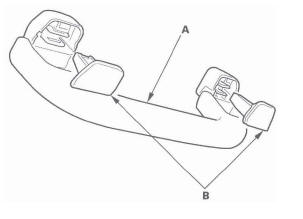
1. From both sides, using a trim tool, release the tabs (A) from the bracket (B).
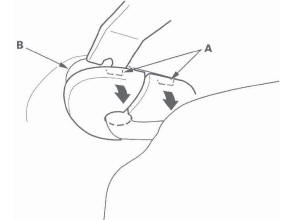
2. Remove the sunvisor cap (A) from the bracket (B).
Turn the cap, and remove it.
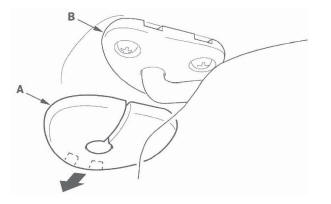
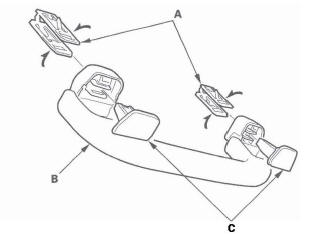
3. Remove the sunvisor (A).
- Using a T25 TORX bit, remove the screws.
- Remove the sunvisor from the body and holder (B).
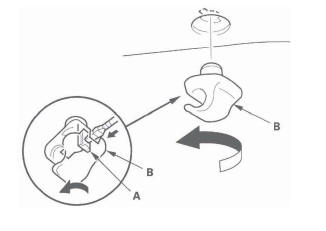
4. Using a flat-tip screwdriver, push the hook (A), and turn the holder (B) 90º , then pull it out.
5. Install the sunvisor in the reverse order of removal, and note these items:
- If the side curtain airbag has deployed, replace the sunvisor with a new one.
- To prevent the side curtain airbags from
deploying improperly and possibly causing
injury, inspect removed pieces and replace them
if they have any of these types of damage:
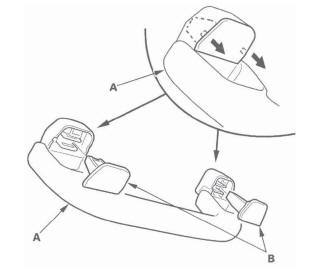
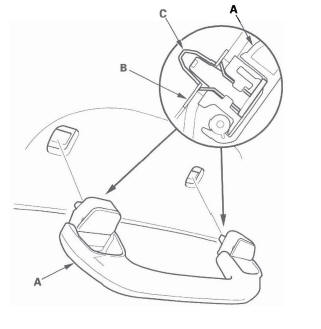
- Any cracks in the sunvisor stay base (A)
- Any bends or cracks in the sunvisor stay shaft (B)
- Any cracks in the sunvisor base (C)
- Any cracks or breakage in the vanity mirror base (D)
Grab Handle Removal/Installation
Special Tools Required
KTC trim tool set SOJATP2014 *
* Available through the American Honda Tool and Equipment Program; call 888-424-6857
NOTE: Use the appropriate tool from the KTC trim tool set to avoid damage when prying components.
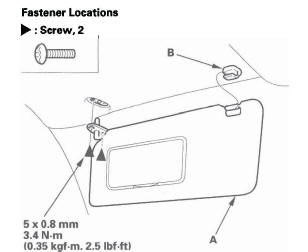
1. Lower the grab handle (A), then pull out the covers (B).
2. While pinching the clips (A), release the hooks (B), then remove the grab handle (C).
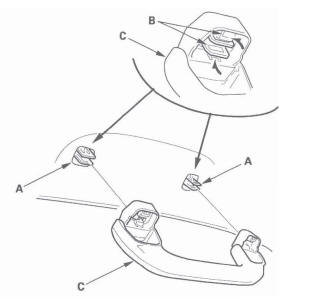
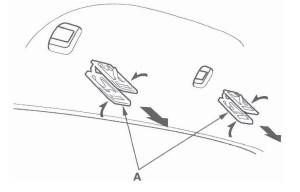
3. Using a pair of pliers, remove all of the clips (A) by pinching its hooks.
4. If the side curtain airbag has deployed, replace the grab handle with a new one.
5. If the side curtain airbag has not deployed, to prevent the side curtain airbags from deploying improperly and possibly causing injury, inspect removed pieces and replace them if they have any of these types of damage:
- Any cracks or breakage in the grab handle (A).
- Any cracked or stress-whitening in the covers (B).
6. Install the clips (A) to the grab handle (B), then install the covers (C) fully into the clips.
7. Position the grab handle (A) on the bracket (B), and push on the grab handle until the clips (C) snap into place securely.
READ NEXT:
 Headliner Removal/Installation
SRS components are located in this area. Review the SRS component locations
and the precautions and procedures before
doing repairs or service.
NOTE:
Put on gloves to protect your hands.
Use the a
Consoles
Center Console Removal/Installation
Special Tools Required
KTC trim tool set SOJATP2014 *
* Available through the American Honda Tool and
Equipment Program; call 888-424-6857
SRS components are locate
SEE MORE:
Cargo Pass-through
The rear center seat-back has a
cargo area pass-through. To use the
cargo area pass-through, pull up the
release on top of the center seatback
and fold it down.
If your vehicle is equipped with a
dual deck cargo shelf, do not use the
shelf when any seat-back is folded
down. Object
A/C Signal Circuit Troubleshooting
1. Start the engine, and let it idle.
2. Turn the blower switch on.
3. Turn the A/C switch on.
4. Check the A/C CLUTCH in the DATA LIST with the
HDS.
Does it indicate ON?
YES-Go to step 5.
5. Check the A/C system.
Does the A/C system operate? YES-The air conditioning system circuit is OK.
NO-Go t
