Honda CR-V: DLC Circuit Troubleshooting
NOTE: Make sure the HDS and the DLC cable of the HDS is not defective.
1. Turn the ignition switch OFF.
2. Connect the HDS to the DLC.
NOTE: Make sure the HDS is properly connected to the DLC.
3. Turn the ignition switch ON (II). and read the HDS.
Does the HDS identify the vehicle? YES-Go to step 4.
NO-Go to step 21.
4. Check for Temporary DTCs or DTCs in the PGM-FI system with the HDS.
Are any Temporary DTCs or DTCs indicated? YES-Go to the indicated DTC's troubleshooting.
NO-Go to step 5.
5. Turn the ignition switch OFF.
6. Turn the ignition switch ON (II), and watch the SRS indicator.
Does the SRS indicator stay on? YES-Go to the SRS system's general troubleshooting information.
NO-Go to step 7.
7. Turn the ignition switch OFF.
8. Turn the ignition switch ON (II), and watch the VSA indicator.
Does the VSA indicator stay on? YES-Go to the VSA system's general troubleshooting information.
NO-Go to step 9.
9. Turn the ignition switch OFF.
10. Turn the ignition switch ON (II). and watch the TPMS indicator.
Does the TPMS indicator stay on? YES-Go to the TPMS system's general troubleshooting information.
NO-Go to step 11.
11. Turn the ignition switch OFF.
12. Turn the ignition switch ON (II), and watch the immobilizer indicator.
Does the immobilizer indicator stay on or flash? YES-Go to the immobilizer system's troubleshooting.
NO-Go to step 13.
13. Do the gauge self-diagnostic function.
14. Check for B-CAN system DTCs without the HDS.
Are any B-CAN DTCs indicated? YES-Go to the indicated DTC's troubleshooting.
NO-Go to step 15.
15. Turn the ignition switch OFF.
16. Disconnect the HDS from the DLC.
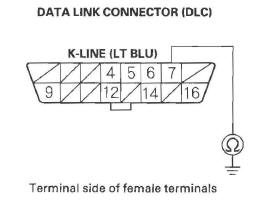
17. Check for continuity between DLC terminal No.7 and body ground.
Is there 5 Ω or less? YES-Go to step 18.
NO-Go to step 19.
18. Continue to check for continuity between DLC terminal No.7 and body ground, while disconnecting these parts, one at a time:
- SRS unit connector A (28P)
- VSA modulator-control unit 46P connector
- TPMS unit 20P connector
- Immobilizer-keyless control unit 7P connector
- Audio unit 17P connector
- Under-dash fuse/relay box (Q) (16P) connector
Does continuity go away when one of the above components is disconnected? YES-Replace the part that caused an open when it was disconnected.
NO-Repair short in the wire between the DLC (K-line) and the VSA modulator-control unit, the SRS unit, the TPMS unit, the immobilizer-keyless control unit, the audio unit, or the under-dash fuse/ relay box.
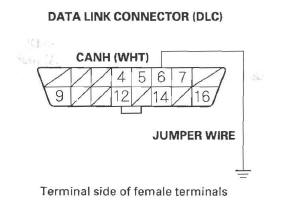
19. Connect DLC terminal No. 7 to body ground with a jumper wire.

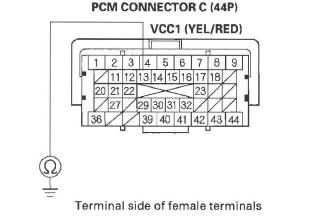
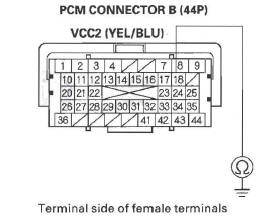
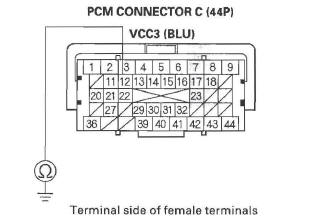
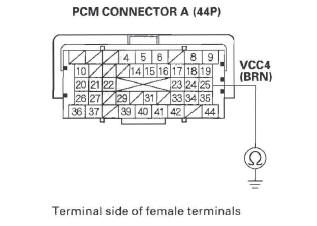
20. Check for continuity between body ground and these connector terminals:
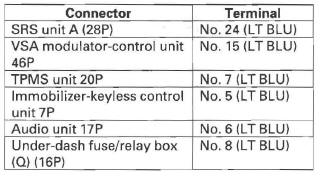
Is there continuity between the DLC terminal and each of the terminals in the chart? YES-Replace the part that does not communicate with the HDS.
NO-Repair open in the wire between the DLC (K-line) and the appropriate connector.
21. Do the gauge self-diagnostic function.
22. Check for B-CAN system DTCs without the HDS.
Is DTC B1168, B1169, and/or B1178 indicated? YES-Go to step 35.
NO-Go to step 23.
23. Turn the ignition switch OFF.
24. Disconnect the HDS from the DLC.
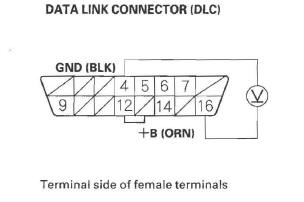
25. Measure voltage between DLC terminal No. 16 and body ground.
Is there battery voltage? YES-Go to step 26.
NO-Repair open in the wire between DLC terminal No. 16 and the No. 23 BACK UP (10 A) fuse in the under-hood fuse/relay box.
26. Measure voltage between DLC terminals No.4 and No. 16.
Is there battery voltage? YES-Go to step 27.
NO-Repair open in the wire between DLC terminal No.4 and body ground (G502).
27. Connect the HDS to the DLC.
28. Jump the SCS line with the HDS.
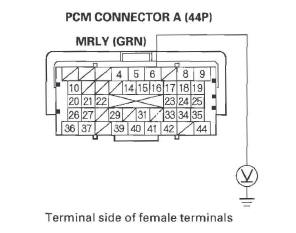
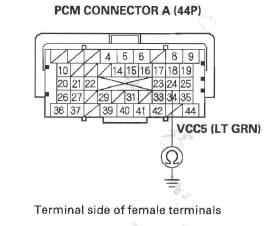
29. Disconnect PCM connector A (44P).
30. Disconnect the HDS from the DLC.
31. Connect DLC terminal No.6 to body ground with a jumper wire.
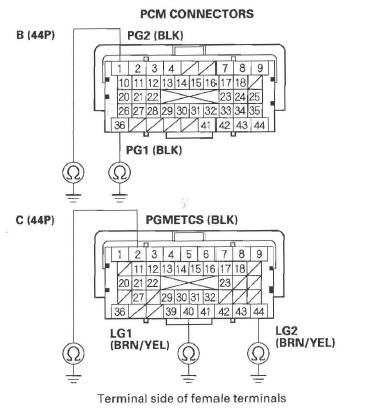
32. Check for continuity between PCM connector terminal A36 and body ground.
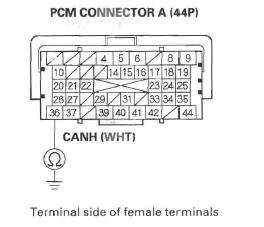
Is there continuity? YES-Go to step 33.
NO-Repair open in the wire between the PCM (A36) and DLC terminal No. 6.
33. Connect DLC terminal No. 14 to body ground with a jumper wire.
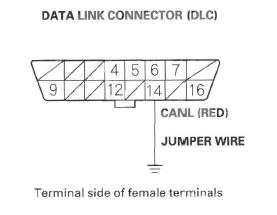
34. Check for continuity between PCM connector terminal A37 and body ground.
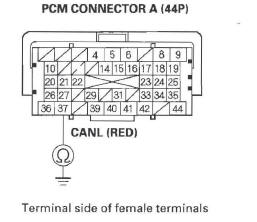
Is there continuity? YES-Update the PCM if it does not have the latest software, or substitute a known-good PCM, then recheck. If the symptom/indication goes away with a known-good PCM, replace the original PCM.
NO-Repair open in the wire between the PCM (A37) and DLC terminal No. 14.
35. Try to start the engine.
Does the engine start and idle smoothly? YES-Go to F-CAN circuit troubleshooting.
NO-Go to step 36.
36. Turn the ignition switch OFF.
37. Check the No. 2 IG MAIN (50 A) fuse in the under-hood fuse/relay box.
Is the fuse OK? YES-Repair open in the wire between the No.2 IG MAIN (50 A) fuse and the ignition switch. If the wire is OK, go to step 38.
NO-Repair short in the wire between the No.2 IG MAIN (50 A) fuse and the under-hood fuse/relay box. Also replace the No. 21G MAIN (50 A) fuse.
38. Inspect the No. 19 FI MAIN (15 A) fuse in the under-hood fuse/relay box.
Is the fuse OK? YES-Go to step 45.
NO-Go to step 39.
39. Remove the blown No. 19 FI MAIN (15 A) fuse from the under-hood fuse/relay box.
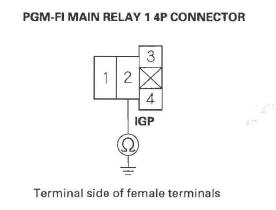
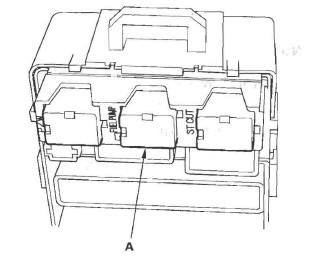
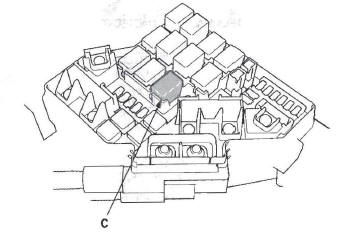
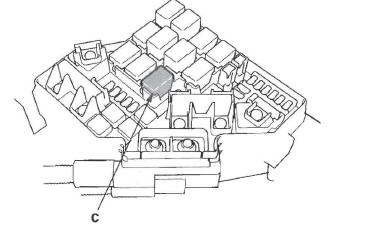
40. Remove PGM-FI main relay 1 (C) from the under-hood fuse/relay box.

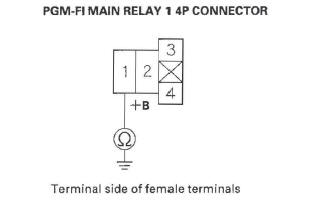
41. Check for continuity between body ground and PGM-FI main relay 1 4P connector terminals No.1 and No.3 individually.

Is there continuity? YES-Replace the under-hood fuse/relay box. Also replace the No. 19 FI MAIN (15 A) fuse.
NO-Go to step 42.
42. Disconnect each of the components or connectors from these components, one at a time, and check for continuity between PGM-FI main relay 1 4P connector terminal No. 2 and body ground.
- PGM-FI main relay 2 (FUEL PUMP)
- PCM connector A (44P)
- Each injector 2P connector
- Camshaft position (CMP) sensor B 3P connector
- Crankshaft position (CKP) sensor 3P connector
- Electronic throttle control system (ETCS) control relay
Does continuity go away when one of the above components is disconnected? YES-Replace the component that made the short to body ground go away when disconnected. If the item is the PCM, update the PCM if it does not have the latest software, or substitute a known-good PCM, then recheck. If the symptom/indication goes away with a known-good PCM, replace the original PCM. Also replace the No. 19 FI MAIN (15 A) fuse.
NO-Go to step 43.
43. Disconnect the connectors from these components:
- PGM-FI main relay 2 (FUEL PUMP)
- PCM connector A (44P)
- Injectors
- Camshaft position (CMP) sensor B
- Crankshaft position (CKP) sensor
- Electronic throttle control system (ETCS) control relay
44. Check for continuity between PGM-FI main relay 1 4P connector terminal No.2 and body ground.
Is there continuity? YES-Repair short in the wire between PGM-FI main relay 1 and each item. Also replace the No. 19 FI MAIN (15 A) fuse.
NO-Replace PGM-FI main relay 1. Also replace the No. 19 FI MAIN (15 A) fuse.
45. Inspect the No.2 FUEL PUMP (15 A) fuse in the under-dash fuse/relay box.
Is the fuse OK? YES-Go to step 58.
NO-Go to step 46.
46. Remove the blown No.2 FUEL PUMP (15 A) fuse in the under-dash fuse/relay box.
47. Jump the SCS line with the HDS.
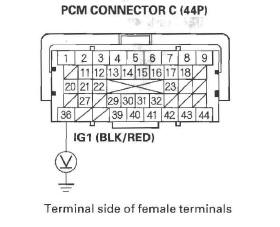
48. Disconnect PCM connector C (44P).
49. Check for continuity between PCM connector terminal C36 and body ground.

Is there continuity? YES-Go to step 50.
NO-Replace the No. 2 FUEL PUMP (15 A) fuse, and update the PCM if it does not have the latest software, or substitute a known-good PCM, then recheck. If the symptom/indication goes away with a known-good PCM, replace the original PCM.
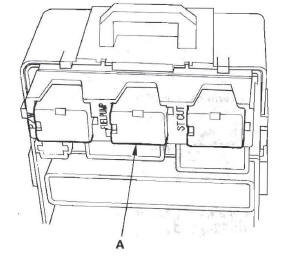
50. Remove PGM-FI main relay 2 (FUEL PUMP) (A) from the under-dash fuse/relay box.
51. Check for continuity between PCM connector terminal C36 and body ground.
Is there continuity? YES-Repair short in the wire between the No. 2 FUEL PUMP (15 A) fuse and the PCM (C36), between the No.2 FUEL PUMP (15 A) fuse and PGM-FI main relay 2 (FUEL PUMP), or between the No.2 FUEL PUMP (15 A) fuse and the immobilizer control unit. Also replace the No.2 FUEL PUMP (15 A) fuse.
NO-Go to step 52.
52. Fold the left side rear seat forward, and pull back the carpet to expose the access panel.
53. Remove the access panel from the floor.
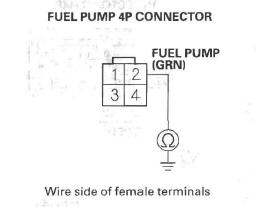
54. Disconnect the fuel pump 4P connector.
55. Check for continuity between fuel pump 4P connector terminal No.2 and body ground.
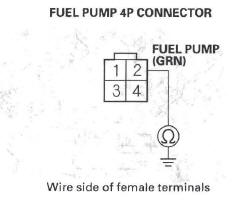
Is there continuity? YES-Repair short in the wire between the fuel pump and PGM-FI main relay 2 (FUEL PUMP). Also replace the No.2 FUEL PUMP (15 A) fuse.
NO-Go to step 56.
56. Reinstall PGM-FI main relay 2 (FUEL PUMP) (A).
57. Check for continuity between fuel pump 4P connector terminal No.2 and body ground.
Is there continuity? YES-Replace PGM-FI main relay 2 (FUEL PUMP).
Also replace the No.2 FUEL PUMP (15 A) fuse.
NO-Check the fuel pump, and replace it if necessary. Also replace the No.2 FUEL PUMP (15 A) fuse.
58. Jump the SCS line with the HDS.
59. Disconnect PCM connectors A (44P) and C (44P).
60. Turn the ignition switch ON (II).
61. Measure voltage between PCM connector terminal C36 and body ground.
Is there battery voltage? YES-Go to step 62.
NO-Repair open in the wire between the No.2 FUEL PUMP (15 Al fuse and the PCM (C36).
62. Measure voltage between PCM connector terminal A6 and body ground.
Is there battery voltage? YES-Go to step 67.
NO-Go to step 63.
63. Turn the ignition switch OFF.
64. Remove PGM-FI main relay 1 (C) from the under-hood fuse/relay box.
65. Measure voltage between PGM-FI main relay 1 4P connector terminal No.3 and body ground.
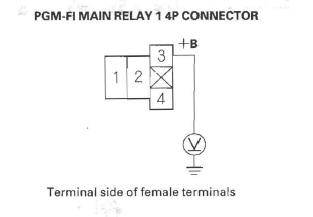
Is there battery voltage? YES-Go to step 66.
NO-Replace the under-hood fuse/relay box.
66. Check for continuity between PGM-FI main relay 1 4P connector terminal No.4 and PCM connector terminal A6.
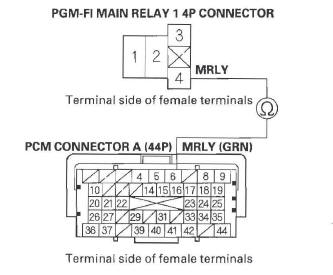
Is there continuity? YES-Test PGM-FI main relay 1. If the relay is OK, update the PCM if it does not have the latest software, or substitute a known-good PCM, then recheck. If the symptom/indication goes away with a known-good PCM, replace the original PCM.
NO-Repair open in the wire between the PCM (A6) and PGM-FI main relay 1.
67. Turn the ignition switch OFF.
68. Remove PGM-FI main relay 1 (C) from the under-hood fuse/relay box.
69. Measure voltage between PGM-FI main relay 1 4P connector terminal No.1 and body ground.
Is there battery voltage? YES-Go to step 70.
NO-Replace the under-hood fuse/relay box.
70. Check for continuity between PGM-FI main relay 1 4P connector terminal No.2 and PCM connector terminal A8.
Is there continuity? YES-Go to step 71.
NO-Repair open in the wire between the PCM (A8) and PGM-FI main relay 1.
71. Test PGM-FI main relay 1.
Is PGM-FI main relay 1 OK? YES-Go to step 72.
NO-Replace PGM-FI main relay 1.
72. Disconnect PCM connector B (44P).
73. Check for continuity between body ground and PCM connector terminals B1, B36, C2, C40, and C44 individually.
Is there continuity? YES-Go to step 74.
NO-Repair open in the wire between the PCM (B1, B36, C2, C40, C44) and G101.
74. Check for continuity between PCM connector terminal C13 and body ground.
Is there continuity? YES-Go to step 75.
NO-Go to step 76.
75. Continue to check for continuity between PCM connector terminal C13 and body ground, while disconnecting these parts, one at a time:
- MAP sensor 3P connector
- Output shaft (countershaft) speed sensor 3P connector.
Does continuity go away when one of the above components is disconnected? YES-Repair the part that caused an open when it was disconnected.
NO-Repair short in the between the PCM (C13) and the MAP sensor or the output shaft (countershaft) speed sensor.
76. Check for continuity between PCM connector terminal B18 and body ground.
Is there continuity? YES-Go to step 77.
NO-Go to step 78.
77. Continue to check for continuity between PCM connector terminal B18 and body ground, while disconnecting these parts, one at a time:
- EGR valve 6P connector
- Input shaft (mainshaft) speed sensor 3P connector
Does continuity go away when one of the above components is disconnected? YES-Repair the part that caused an open when it was disconnected.
NO-Repair short in the between the PCM (B18) and the EGR valve or the input shaft (mainshaft) speed sensor.
78. Check for continuity between PCM connector terminal C12 and body ground.
Is there continuity? YES-Go to step 79.
NO-Go to step 80.
79. Continue to check for continuity between PCM connector terminal C12 and body ground, while disconnecting the throttle body 6P connector.
Is there continuity? YES-Repair short in the wire between the PCM (C12) and the throttle body.
NO-Replace the throttle body.
80. Check for continuity between PCM connector terminal A25 and body ground.
Is there continuity? YES-Go to step 81.
NO-Go to step 82.
81. Continue to check for continuity between PCM connector terminal A25 and body ground, while disconnecting the APP sensor 6P connector.
Is there continuity? YES-Repair short in the wire between the PCM (A25) and APP sensor A.
NO-Replace the accelerator pedal module.
82. Check for continuity between PCM connector terminal A24 and body ground.
Is there continuity? YES-Go to step 83.
NO-Go to step 84.
83. Continue to check for continuity between PCM connector terminal A24 and body ground, while disconnecting the APP sensor 6P connector.
Is there continuity? YES-Repair short in the wire between the PCM (A24) and APP sensor B.
NO-Replace the accelerator pedal module.
84. Check for continuity between PCM connector terminal A19 and body ground.

Is there continuity? YES-Go to step 85.
NO-Update the PCM if it does not have the latest software, or substitute a known-good PCM, then recheck. If the symptom/indication goes away with a known-good PCM, replace the original PCM.
85. Continue to check for continuity between PCM connector terminal A19 and body ground, while disconnecting these parts, one at a time:
- A/C pressure sensor 3P connector
- FTP sensor 3P connector
Does continuity go away when one of the above components is disconnected? YES-Replace the part that caused an open when it was disconnected.
NO-Repair short in the wire between the PCM (A 19) and the A/C pressure sensor or the FTP sensor.
READ NEXT:
 Injector Replacement
1. Relieve fuel pressure.
2. Remove the engine cover.
3. Disconnect the connectors (A) from the injectors.
4. Remove the ground cable bolt (G101) (B).
5. Disconnect the quick-connect fitting (C).
PCM Replacement
NOTE:
Make sure the HDS is loaded with the latest software
version.
If you are replacing the PCM after substituting a
known-good PCM, reinstall the original PCM, then do
this procedure.
During
Electronic Throttle Control System
Component Location Index
ELECTRONIC THROTTLE
CONTROL SYSTEM (ETCS)
CONTROL RELAY
(RELAY SOCKET F)
POWERTRAIN CONTROL
MODULE (PCM)
General Troubleshooting
Information
Replacemen
SEE MORE:
Advice for Pregnant Women
If you are pregnant, the best way to
protect yourself and your unborn
child when driving or riding in a
vehicle is to always wear a seat belt,
and keep the lap part of the belt as
low as possible across the hips.
When driving, remember to sit
upright and adjust the seat as far
bac
Sound Quality Diagnosis
Special Tools Required
Diagnostics CD 07AAZ-SDBA100
Use the following tests to check sound quality.
NOTE: Before beginning the following tests, write down
the customer's bass, treble, fader and balance settings,
and then set them to their center positions for testing.
Left/Right Channel 10
Do this
