Honda CR-V: PCM Replacement
NOTE:
- Make sure the HDS is loaded with the latest software version.
- If you are replacing the PCM after substituting a known-good PCM, reinstall the original PCM, then do this procedure.
- During the procedure, is any READ DATA, WRITE DATA, or other data checks fail, note the failure, then continue.
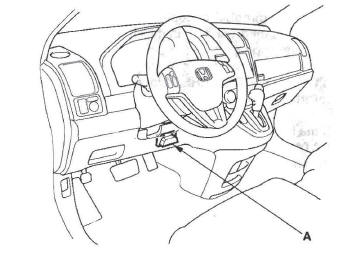
1. Connect the HDS to the data link connector (DLC) (A) located under the driver's side of the dashboard.
2. Turn the ignition switch ON (II).
3. Make sure the HDS communicates with the PCM. If it doesn't, go to the DLC circuit troubleshooting. If you are returning from DLC circuit troubleshooting, skip steps 4 through 9, 19 through 25, and 28 through 30, and do the this after replacing the PCM;
- Replace the engine oil and the engine oil filter.
- Replace the ATF.
- Clean the throttle body.
4. Select the PGM-FI system with the HDS.
5. Select the INSPECTION MENU with the HDS.
6. Select the ETCS TEST, then select the TP POSITION CHECK, and follow the screen prompts.
NOTE: If the TP POSITION CHECK indicates FAILED, continue with this procedure.
7. Select the REPLACE PCM MENU, then select READ DATA and follow the screen prompts.
NOTE:
- Doing this step copies (READS) the engine oil life data from the original PCM so you can later download (WRITES) it into the new PCM.
- If READ DATA indicates FAILED, continue with this procedure.
8. Select the A/T system with the HDS.
9. Select the REPLACE TCM/PCM MENU, then select READ DATA and follow the screen prompts.
NOTE:
- Doing this step copies (READS) the ATF life data from the original PCM so you can later download (WRITES) it into the new PCM.
- If READ DATA indicates FAILED, continue with this procedure.
10. Turn the ignition switch OFF.
11. Remove the under-hood fuse/relay box (A).
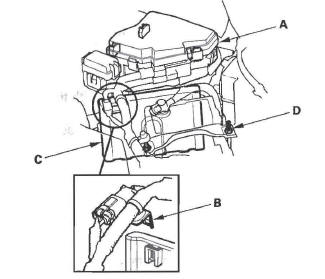
12. Remove the harness bracket (B).
13. Loosen the battery hold down belt (D) and re-position the battery away from the PCM.
14. Remove the PCM cover (C).
15. Remove the bolts (D), then remove the PCM (E).
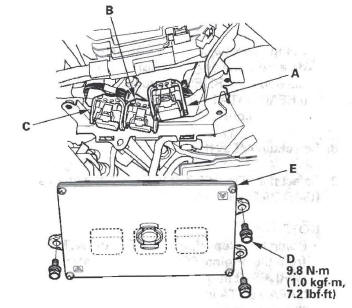
16. Disconnect the PCM connectors A, B, and C.
NOTE: The PCM connectors A, B, and C have
symbols (A= , B=
, B= ,
C=
,
C= ) embossed on them for
identification.
) embossed on them for
identification.
17. Install the parts in the reverse order of removal.
18. Turn the ignition switch ON (II).
19. Manually input the VIN to the PCM with the HDS.
NOTE: DTC P0630 "VIN Not Programmed or Mismatch" may be stored because the VIN has not been programmed into the PCM; ignore it, and continue this procedure.
20. If the READ DATA (engine oil life) failed in step 8, go to step 23. Otherwise, go to step 21.
21. Select the PGM-FI system with the HDS.
22. Select the REPLACE PCM MENU, then WRITE DATA and follow the screen prompts.
NOTE: If the WRITE DATA indicates FAILED, continue with this procedure.
23. If the READ DATA (ATF life) failed in step 10, go to step 25. Otherwise go to step 24.
24. Select the A/T SYSTEM with the HDS.
25. Select the REPLACE TCM/PCM MENU, then WRITE DATA and follow the screen prompts.
NOTE: If the WRITE DATA indicates FAILED, continue with this procedure.
26. Select IMMOBI system with the HDS.
27. Enter the immobilizer code with the PCM replacement procedure in the HDS; it allows you to start the engine.
28. If the TP POSITION CHECK failed in step 6 clean the throttle body, then go to step 29.
29. If the READ DATA failed in step 7 or the WRITE DATA failed in step 22, replace the engine oil and engine oil filter, then go to step 30.
30. If the READ DATA failed in step 10 or the WRITE DATA failed in step 25, replace the ATF, then go to step 31.
31. Select PGM-FI system and reset the PCM with the HDS.
32. Update the PCM if it does not have the latest software.
33. Do the PCM idle learn procedure.
34. Do the CKP pattern learn procedure.
READ NEXT:
 Electronic Throttle Control System
Component Location Index
ELECTRONIC THROTTLE
CONTROL SYSTEM (ETCS)
CONTROL RELAY
(RELAY SOCKET F)
POWERTRAIN CONTROL
MODULE (PCM)
General Troubleshooting
Information
Replacemen
DTC P0122: TP Sensor A Circuit Low Voltage
NOTE: Before you troubleshoot, record all freeze data and any on-board
snapshot, and review the general troubleshooting information.
1. Turn the ignition switch ON (II).
2. Clear the DTC with the HD
SEE MORE:
Mode Control
Use the mode control buttons to
select the vents air flows from. Some
air will flow from the dashboard
corner vents in all modes.
Air flows from the center
and corner vents in the dashboard.
Airflow is divided between
the vents in the dashboard and the
floor vents.
Air flo
Cargo Hooks
The four hooks on the floor can be
used to install a net for securing
items.
If equipped
Your vehicle also has cargo hooks on
the side panel in the cargo area.
They are designed to hold light
items. Heavy objects may damage
the hook. Make sure any items put
on each hook weigh less
