Honda CR-V: Differential Reassembly
Exploded View
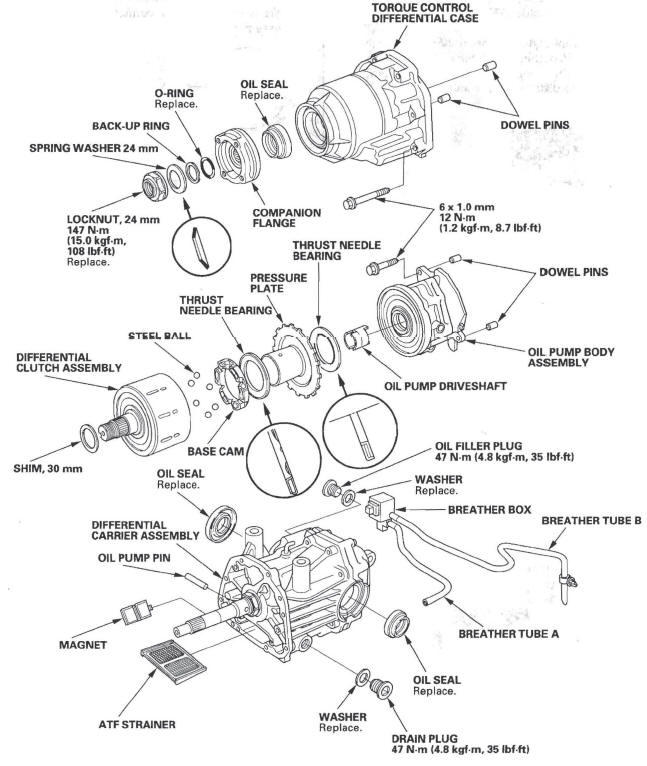
Special Tools Required
- Holder handle 07JAB-001020A
- Companion flange holder 07RAB-TB4010B
1. Apply differential fluid to the rubber pinion of the ATF strainer (A), then install the ATF strainer, the magnet (B), the dowel pins (C), and the oil pump pin (D), in the differential carrier assembly.
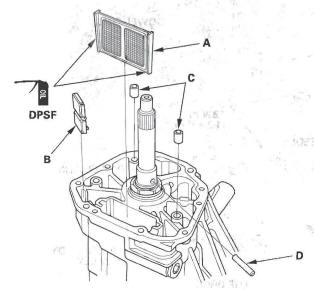
2. Align the grooves (A) of the rear oil pump with the oil pump pin (B), then install the oil pump body assembly (C) on the differential carrier assembly.

3. Install the oil pump driveshaft (A) by aligning the projection (B) of the oil pump driveshaft with the groove of the front oil pump in the oil pump body assembly.
4. Install the thrust needle bearing (C).
5. Install the six steel balls (A), base cam (B), thrust needle bearing (C), and the pressure plate (D) on the clutch assembly (E).
NOTE: Align the tabs (F) of the pressure plate with the grooves (G) of the clutch assembly.
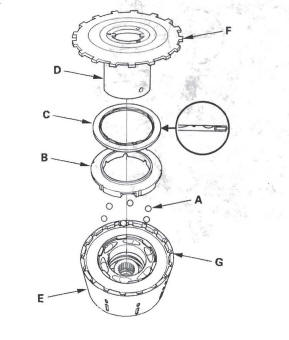
6. Make a mark (A) on the outside of the clutch assembly (B) that corresponds to the position of the tab (C) of the pressure plate (D) as shown. Make a mark (E) on the outside of the oil pump assembly (F) that corresponds to the position of the groove (G) in the oil pump driveshaft (H) as shown.
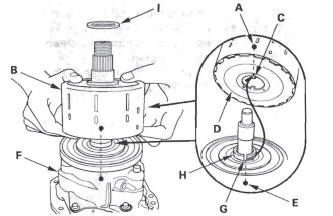
7. Support the pressure plate and clutch assembly by hand so that they do not misalign. With the marks aligned, install the clutch assembly to the oil pump assembly. Install the 30 mm shim (I).
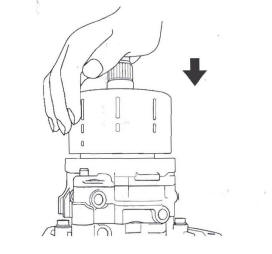
8. Make sure that the clutch assembly and pressure plate are correctly installed. If the clutch assembly can be pushed down as in the figure, proceed to step 9. If not, return to step 5.
NOTE: If incorrectly installed, the clutch assembly may be damaged when excessive force is applied.
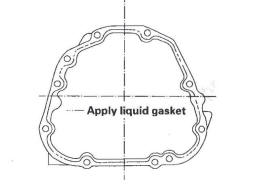
9. Remove the dirt and oil from the sealing surfaces.
Apply liquid gasket (P/N 08718-0001) to the sealing surface. Make sure you seal the entire circumference of the bolt holes to prevent fluid leakage.
NOTE:
- You must assemble the housings within 5 minutes after applying the liquid gasket. If you do not, the sealing surface must be cleaned, and the liquid gasket reapplied.
- Allow it to cure at least 30 minutes after assembly before filling the differential with fluid.
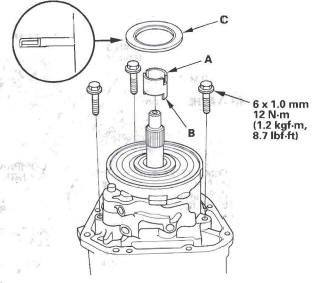
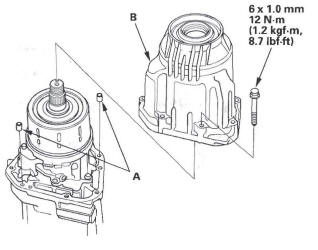
10. Install the 6 x 1.0 mm dowel pins (A) and the torque control differential case (B). Torque the eight mounting bolts in a crisscross pattern in several steps.
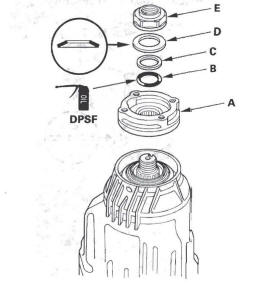
11. Install the companion flange (A), the O-ring (B), the back-up ring (C), the disc spring washer (D), and the locknut (E).
NOTE: Apply differential fluid to the O-ring.
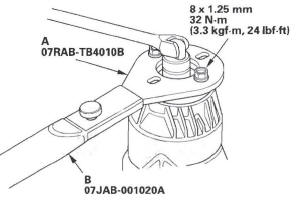
12. Install the companion flange holder (A) and holder handle (B) to the companion flange, then tighten the new locknut to the specified torque.
Torque: 147 N*m (15.0 kgf*m, 108 Ibf*ft)
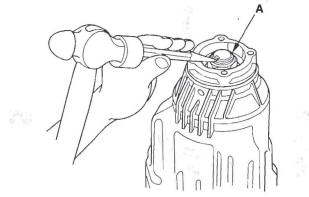
13. Stake the locknut tab (A) into the groove in the clutch guide.
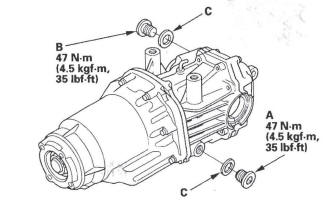
14. Install the drain plug (A) and the oil filler plug (B) with new washers (C).
READ NEXT:
 Differential Mount Replacement
Exploded View
Differential Installation
1. Install rear differential mount assembly A to the
rear differential assembly (B).
2. Jack up the rear differential.
3. Install the new set rings (A) onto t
Driveline/Axle
Special Tools
Oil Seal Driver
Attachment, 52 x 55 mm
Half Shaft Base
Threaded Adapter, 24 x 1.5 mm
Threaded Adapter, 26 x 1.5 mm
Attachment, 35 mm I.D.
Driver
Inner Handle, 30 mm
Oil Seal
Driveshaft Inspection
1. Check the inboard boot (A) and the outboard boot
(B) on the driveshaft (C) for cracks, damage, leaking
grease, and loose boot bands (D). If any damage is
found, replace the boot and boot bands.
2.
SEE MORE:
Reclining the Front Seats
You can recline the seat-backs on the
front seats so they are level with the
rear seat cushions, making a large
cushioned area. To do this:
EX-L and Canadian EX models
Only the passenger’s side can be
level as follows.
1. Adjust the rear seats as far back
as possible.
2. Remove t
DTC P2101: Electronic Throttle Control
System (ETCS) Malfunction
CAUTION
Do not insert your fingers into the installed throttle
body when you turn the ignition switch ON (II) or
while the ignition switch is ON (II). If you do, you
will seriously injure your fingers if the throttle valve
is activated.
NOTE: Before you troubleshoot, record all freeze data and any o
