Honda CR-V: Driveshaft Inspection
1. Check the inboard boot (A) and the outboard boot (B) on the driveshaft (C) for cracks, damage, leaking grease, and loose boot bands (D). If any damage is found, replace the boot and boot bands.

2. Turn the driveshaft by hand, and make sure the splines (E) and joint are not excessively loose.
3. Make sure the driveshaft is not twisted or cracked; if it is, replace it.
Front Driveshaft Removal
1. Raise the vehicle on a lift, and remove the front wheels.
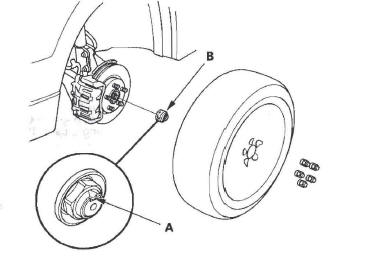
2. Lift up the locking tab (A) on the spindle nut (B), then remove the nut.
3. If you need to remove the left driveshaft, drain the transmission fluid. It is not necessary to drain the transmission fluid when the right driveshaft is removed.
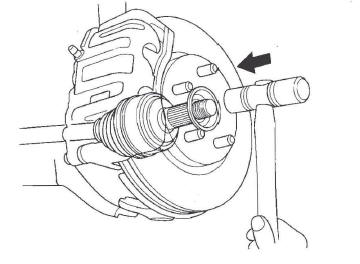
4. Disconnect the driveshaft outboard joint from the front wheel hub using a plastic hammer.
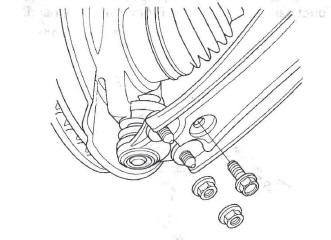
5. Remove the nuts and bolt, then separate the lower arm with a prybar.
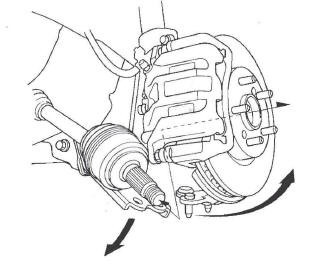
6. Pull the knuckle outward, and remove the driveshaft outboard joint from the front wheel hub.
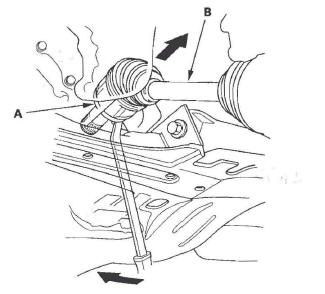
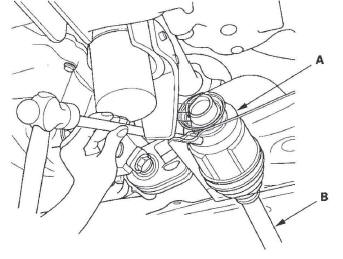
7. Left driveshaft: Pry the inboard joint (A) from the differential case with a prybar. Pull the driveshaft straight out to avoid damaging the oil seal.
Right drives haft: Drive the inboard joint (A) off of the intermediate shaft with a drift and hammer.
Remove the driveshaft as an assembly. Do not pull on the driveshaft (B), because the inboard joint may come apart.
Left driveshaft
Right driveshaft
Boot Band Removal
NOTE: When removing the boot bands, be careful not to damage the boot.
Welded Type
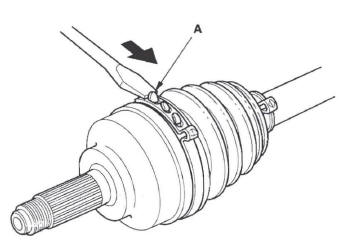
1. Cut the boot band (A), then remove the boot band.
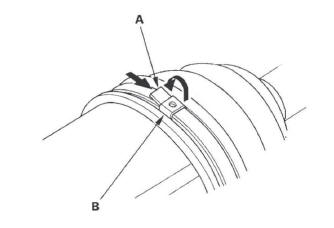
Dpuble Loop Type
1. Lift up the band end (A), then push it into the clip (B), then remove the boot band.
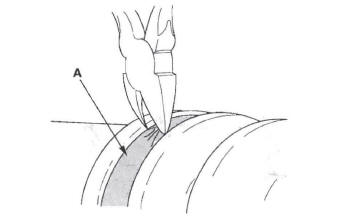
Low Profile Type
1. Pinch the boot band using commercially available boot band pliers (A), then remove the boot band.

Ear Clamp Type
1. Lift up the three tabs (A) with a screwdriver, then remove the boot band.
READ NEXT:
 Front Driveshaft Disassembly
Special Tools Required
Threaded adapter, 26 x 1.5 mm 07XAC-001030A
Slide hammer, 5/8"-18 UNF, commercially available
Inboard Joint Side
1. Remove the set ring (A) from the inboard joint.
2. Remov
Boot Band Installation
Special Tools Required
Boot band tool, KD-3191 or equivalent, commercially
available
Boot band pliers, Kent-Moore J-35910 or equivalent,
commercially available
Double Loop Type
1. Fit the boot ends on
Front Driveshaft Reassembly
Exploded View
NOTE: Refer to the Exploded View as needed during
this procedure.
Inboard Joint Side
1. Wrap the splines with vinyl tape (A) to prevent
damaging to the inboard boot.
2. Install the inb
SEE MORE:
Sleep and Wake-up Mode Test
1. Shift to the sleep mode:
Turn the ignition switch OFF, and remove the key. If the MICU receives no
signals from the inputs listed below, it
will go into sleep mode in less than 40 seconds.
Driver's door lock switch (LOCK or UNLOCK)
Driver's door key cylinder switch (LOCK or UNLOCK)
Front pas
Mirrors
Keep the inside and outside mirrors
clean and adjusted for best visibility.
Be sure to adjust the mirrors before
you start driving.
The inside mirror has day and night
positions. The night position reduces
glare from headlights behind you.
Flip the tab on the bottom edge of
the mirr
