Honda CR-V: Boot Band Installation
Special Tools Required
Boot band tool, KD-3191 or equivalent, commercially available
Boot band pliers, Kent-Moore J-35910 or equivalent, commercially available
Double Loop Type
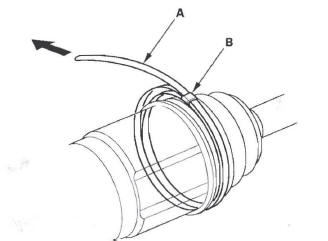
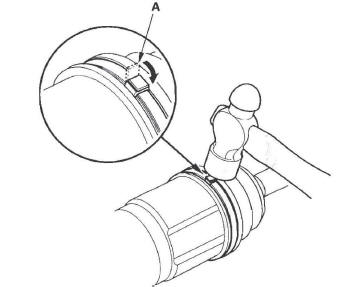
1. Fit the boot ends onto the driveshaft and the inboard joint, then install the new double loop band (A) onto the boot.
NOTE: Pass the end of the new double loop band through the clip (B) twice in the direction toward the front of the vehicle.
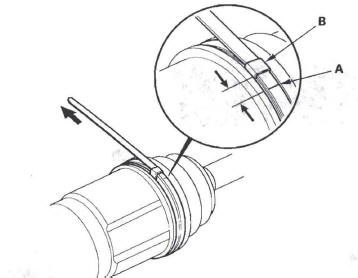
2. Pull up the slack in the band by hand.
3. Mark a position (A) on the band 10-14 mm (0.4-0.6 in.) from the clip (B).
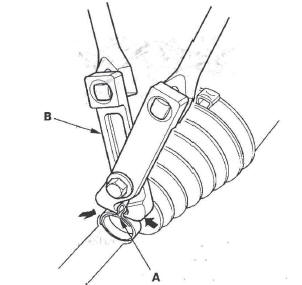
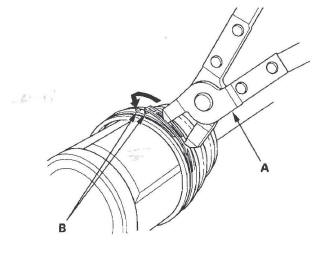
4. Thread the free end of the band through the nose section of the commercially available boot band tool KD-3191 or equivalent (A), and into the slot on the winding mandrel (B).
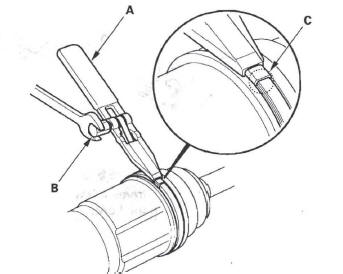
5. Place a wrench on the winding mandrel of the boot band tool, and tighten the band until the marked spot (C) on the band meets the edge of the clip.
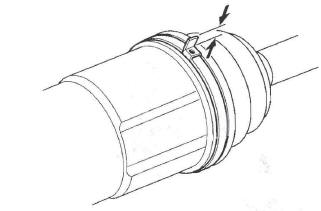
6. Lift up the boot band tool to bend the free end of the band 90 degrees to the clip. Center-punch the clip, then fold over the remaining tail onto the clip.

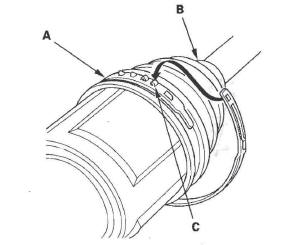
7. Unwind the boot band tool, and cut off the excess free end of the band to leave a 5-10 mm (0.2-0.4 in.) tail protruding from the clip.
8. Bend the band end (A) by tapping it down with a hammer.
NOTE:
- Make sure the band and clip do not interfere with anything on the vehicle and the band does not move.
- Clean any grease remaining on the surrounding surfaces.
Ear Clamp Type
1. Close the ear portion (A) of the band with commercially available boot band pliers Kent-Moore J-35910 or equivalent (B).
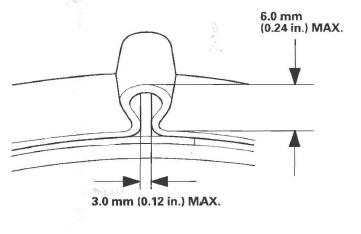
2. Check the clearance between the closed ear portion of the band. If the clearance is not within the standard, close the ear portion of the band farther.
Low Profile Type
1. Install the new low profile band (A) onto the boot (B), then hook the tab (C) of the band.
2. Close the hook portion of the band with commercially available boot band pliers (A), then hook the tabs (B) of the band.
READ NEXT:
 Front Driveshaft Reassembly
Exploded View
NOTE: Refer to the Exploded View as needed during
this procedure.
Inboard Joint Side
1. Wrap the splines with vinyl tape (A) to prevent
damaging to the inboard boot.
2. Install the inb
Front Driveshaft Installation
1. Apply grease to the contact area (A) of the outboard
joint and front wheel bearing.
NOTE: Failure to apply grease may cause excessive
noise and vibration.
2. Install a new set ring (A) onto the s
Intermediate Shaft
Intermediate Shaft Removal
1. Drain the automatic transmission fluid. Reinstall the drain plug with a
new washer.
2. Remove the right driveshaft.
3. Remove the flange bolt (A) and two dowel bolts (
SEE MORE:
To Change or Select Tracks/Files
You can use the SEEK button while
a disc is playing to change tracks
(files in MP3/WMA mode).
In MP3/WMA mode, use the
or
button to select
folders in the disc, and use the SEEK
button to change files.
SEEK/SKIP - Each time you
press and release the
side, the
player skips forwa
DTC P0705: Short in Transmission Range
Switch Circuit (Multiple Shift-Position Input)
NOTE:
Before you troubleshoot, record all freeze data and any on-board
snapshot, and review General Troubleshooting Information.
This code is caused by an electrical circuit problem
and cannot be caused by a mechanical problem in the
transmission.
1. Clear the DTC with the HDS.
2. Start the
