Honda CR-V: Damper/Spring
Damper/Spring Removal and Installation
Removal
1. Raise the rear of the vehicle, and support it with safety stands in the proper locations.
2. Remove the rear wheel.
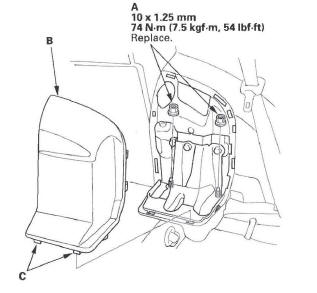
3. Remove the lid (A) on the cargo area side trim panel by releasing the hooks (B).
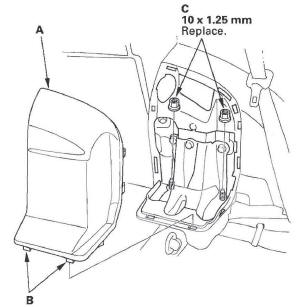
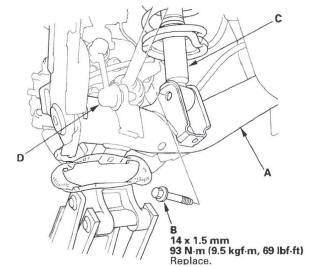
4. Remove the flange nuts (C) from the top of damper.
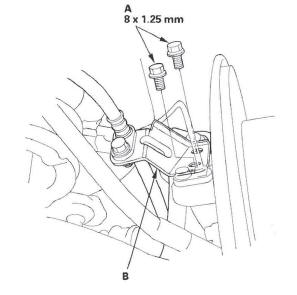
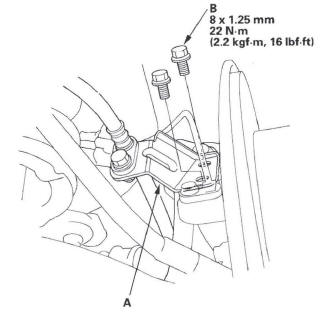
5. Remove the flange bolts (A), then remove the brake hose bracket (B).
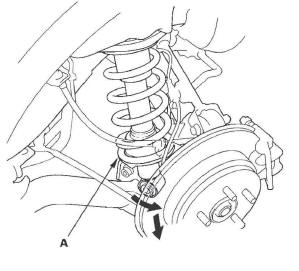
6. Position a floor jack under the trailing arm (A).
Raise the floor jack until the suspension begins to compress.
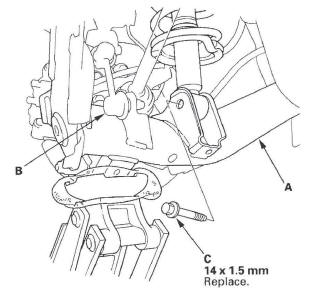
7. Disconnect the stabilizer link (B) from the trailing arm.
8. Remove the flange bolt (C) from the bottom of the damper.
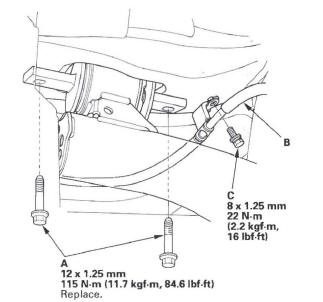
9. Remove the flange bolt (A), then remove the parking brake cable (B).
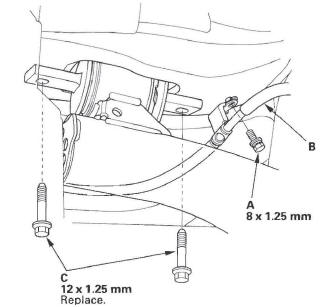
10. Remove the trailing arm mounting bolts (C).
11. Lower the rear suspension, then remove the damper assembly (A) from the vehicle.
Installation
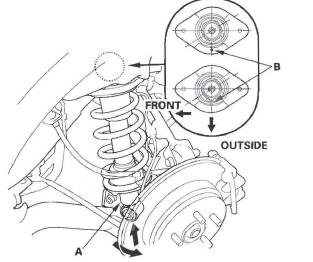
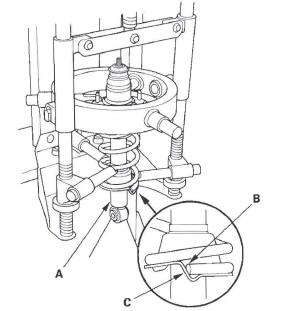
1. Position the damper assembly (A) between the body and the trailing arm. Note the direction of the damper mounting base so that the hook or the paint mark (B) on it is toward the outside of the vehicle.
2. Loosely install new flange nuts (A) to the top of the damper.
NOTE: Install the lid (B) by pushing the hooks (C) into place securely after tightening the flange nuts to the specified torque value.
3. Loosely install new trailing arm mounting bolts (A).
4. Install the parking brake cable (B), then install the flange bolt (C).
5. Position a floor jack under the trailing arm (A).
Raise the floor jack until the hole in the trailing arm aligns with the hole in the damper.
6. Loosely install a new flange bolt (B) on the bottom of the damper (C).
7. Connect the stabilizer link (D) to the trailing arm.
8. Raise the rear suspension with a floor jack to load the suspension with the vehicle's weight.
9. Tighten the flange nuts and the flange bolts to the specified torque values.
10. Install the brake hose bracket (A), then install the flange bolts (B).
11. Install the lid.
12. Clean the mating surface of the brake disc/drum and the inside of the wheel, then install the rear wheel.
13. Check the wheel alignment. and adjust it if necessary.
Damper/Spring Disassembly, Inspection, and Reassembly
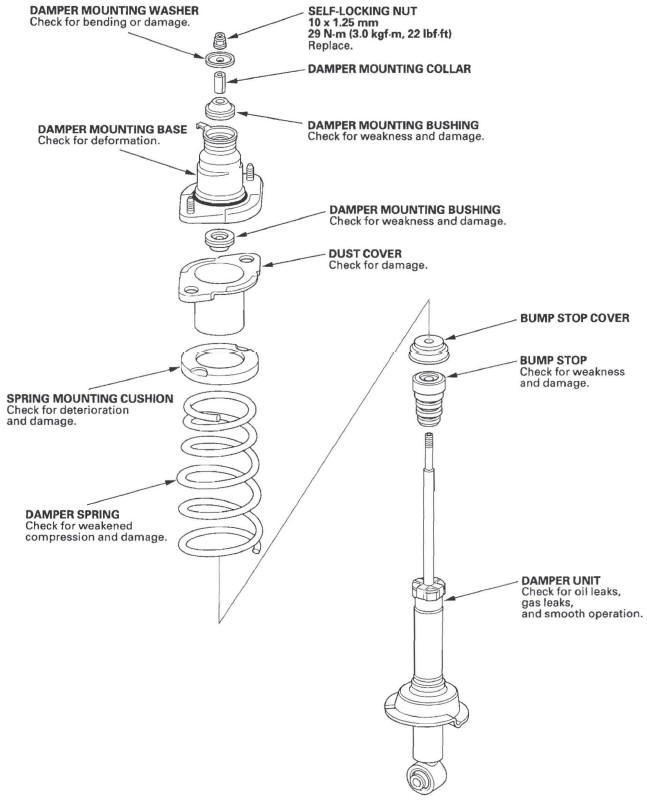
Exploded View
Disassembly
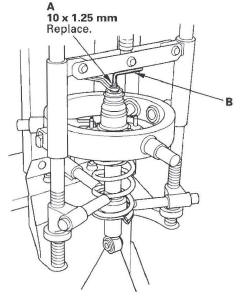
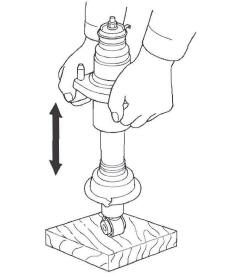
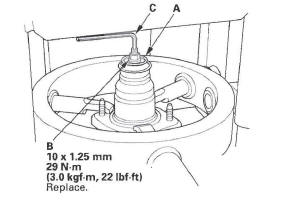
1. Compress the damper spring, then remove the 10 mm nut (A) while holding the damper shaft with a hex wrench (B). Do not compress the damper spring more than necessary to remove the nut.
2. Release the pressure from the strut spring compressor, then disassemble the damper as shown in the Exploded View.
Inspection
1. Reassemble all the parts, except the upper spring mounting cushion, the bump stop, and the damper spring.
2. Compress the damper assembly by hand, and check for smooth operation through a full stroke, both compression and extension. The damper should extend smoothly and constantly when compression is released. If it does not, the gas is leaking and the damper should be replaced.
3. Check for oil leaks, abnormal noises, and binding during these tests.
Reassembly
NOTE: Assemble each of the disassembled parts by referring to the Exploded View.
1. Compress the damper spring with the spring compressor.
2. Install all the parts except the damper mounting washer and self-locking nut onto the damper unit (A) by referring to the Exploded View.
3. Align the bottom of the damper spring (B) with the stepped part (C) of the lower spring seat.
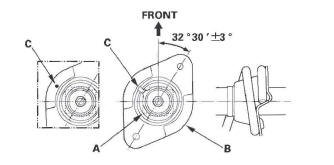
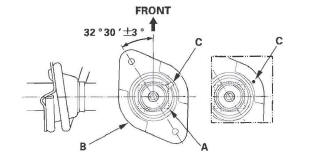
4. Align the bottom (A) of the damper and the damper mounting base (B) as shown so that the hook or the paint mark (C) on it is toward the outside of the vehicle.
Left side:
Right side:
5. Install the damper mounting washer (A) and a new self-locking nut (B).
6. Hold the damper shaft using a hex wrench (C), and tighten new self-locking nut to the specified torque value.
READ NEXT:
 TPMS (Tire Pressure Monitoring System)
Component Location Index
TPMS CONTROL UNIT
(Behind the dashboard center lower cover)
Replacement
TIRE PRESSURE SENSOR
Replacement
TIRE PRESSURE SENSOR
Replacement
UNDER-DASH F
General Troubleshooting Information
System Indicator locations
The system has two indicators.
The low pressure indicator (A)
The TPMS indicator (B)
How TPMS Works
The TPMS (tire pressure monitoring system) has a low
pressure indica
Memorizing the Tire Pressure Sensor ID
Special Tools Required
TPMS sensor initializer tool AKS0620006
Available through the American Honda Tool and
Equipment program, 888-424-6857.
All four tire pressure sensor IDs must be memorized to
th
SEE MORE:
DTC P2122: APP Sensor A (Throttle Position
Sensor D) Circuit Low Voltage
NOTE: Before you troubleshoot, record all freeze data
and any on-board snapshot, and review the general
troubleshooting information.
1. Turn the ignition switch ON (Ill.
2. Check APP SENSOR A in the DATA LIST with the
HDS.
Is there about 0.2 V or less?
YES-Go to step 3.
NO-Intermittent failure, t
Crossing a Stream
Avoid driving through deep water. If
you encounter water in your route (a
small stream or large puddle, for
example), evaluate it carefully before
going ahead. Make sure it is shallow,
flowing slowly, and has firm ground
underneath. If you are not sure of
the depth or the ground, turn
