Honda CR-V: Crankshaft Installation
Special Tools Required
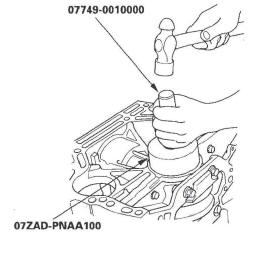
- Driver 077 49-00 10000
- Oil seal driver attachment, 96 mm 07ZAD-PNAA.100
1. Check the connecting rod bearing clearance with plastigage.
2. Check the main bearing clearance with plastigage.
3. Install the bearing halves in the engine block and connecting rods.
4. Apply a coat of new engine oil to the main bearings and rod bearings.
5. Hold the crankshaft so that rod journal No.2 and rod journal No.3 are straight up, and lower the crankshaft into the block.
6. Apply new engine oil to the thrust washer surfaces.
Install the thrust washers (A) in the NO.4 journal of the engine block.
7. Inspect the connecting rod bolts.
8. Apply engine oil to the threads of the connecting rod bolts.
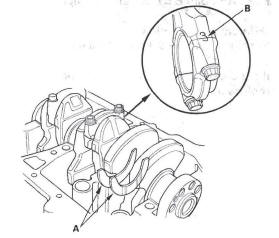
9. Seat the rod journals into connecting rod No.1 and connecting rod No.4. Line up the mark (B) on the connecting rod and cap, then install the caps and bolts finger-tight.
10. Rotate the crankshaft clockwise, and seat the journals into connecting rod No.2 and connecting rod No. 3. Line up the mark on the connecting rod and cap, then install the caps and bolts finger-tight.
11. Tighten the connecting rod bolts to 20 N*m (2.0 kgf*m, 14Ibf*ft).
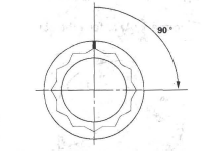
12. Tighten the connecting rod bolts an additional 90 º.
NOTE: Remove the connecting rod bolt if you tightened it beyond the specified angle, and go back to step 8 of the procedure. Do not loosen it back to the specified angle.
13. Remove all of the old liquid gasket from the lower block mating surfaces, bolts, and bolt holes.
14. Clean and dry the lower block mating surfaces.
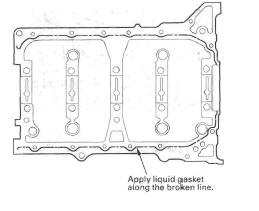
15. Apply liquid gasket, P/N 08717-0004, 08718-0001, 08718-0003, or 08718-0009, evenly to the engine block mating surface of the lower block and to the inner threads of the bolt holes. Install the component within 5 minutes of applying the liquid gasket.
NOTE:
- If you apply liquid gasket P/N 08718-0012, the component must be installed within 4 minutes.
- If too much time has passed after applying the liquid gasket, remove the old liquid gasket and residue, then reapply new liquid gasket.
16. Put the lower block on the engine block.
17. Apply new engine oil to the threads of the bearing cap bolts.
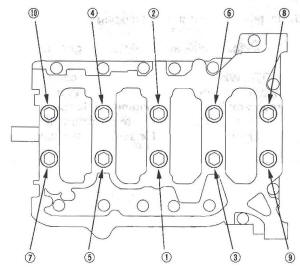
18. Tighten the bearing cap bolts, in sequence, to 29 N*m (3.0 kgf*m, 22 Ibf*ft).
19. Tighten the bearing cap bolts an additional 56 º.

20. Tighten the 8 mm bolts, in sequence, to 22 N*m (2.2 kgf*m, 16Ibf*ft).
21. Use the driver and attachment to drive a new oil seal squarely into the block to the specified installed height.
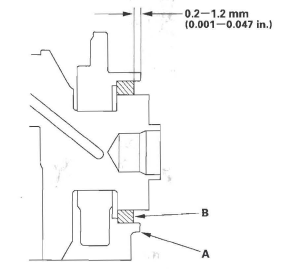
22. Measure the distance between the engine block (A) and oil seal (B).
Oil Seal Installed Height: 0.2-1.2 mm (0.001-0.047 in.)
23. Install the baffle plates.
24. Install the oil pump.
25. Install the oil pan.
26. Install the cylinder head.
27. Install the drive plate.
28. Install the transmission.
29. Install the engine assembly.
NOTE: Whenever any crankshaft or connecting rod bearing is replaced, it is necessary after reassembly to run the engine, at idle speed until it reaches normal operating temperature, then continue to running it for about 15 minutes.
READ NEXT:
 Oil Pan Installation
1. Remove all of the old liquid gasket from the oil pan
mating surfaces, bolts, and bolt holes.
2. Clean and dry the oil pan mating surfaces.
3. Apply liquid gasket, P/N 08717-0004,08718-0001,
08718
Engine Lubrication
Special Tools
Oil Filter Wrench
Component Location Index
OIL PAN
WASHER
DRAIN BOLT
OIL PUMP
OIL PUMP CHAIN
GUIDE
OIL PUMP CHAIN
TENSIONER
OIL CONTROL ORIFICE
OIL FIL
Low Oil Pressure Indicator Circuit
Troubleshooting (Open)
1. Connect the Honda Diagnostic System (HDS) to the
data link connector (DLC) (see step 2).
2. Turn the ignition switch ON (II).
3. Make sure the HDS communicates with the vehicle
and the powertrain
SEE MORE:
Cam Chain Inspection
1. Remove the front wheels.
2. Remove the splash shield (see step 21).
3. Remove the drive belt.
4. Remove the cylinder head cover.
5. Set the No.1 piston at top dead center (TDC). The
punch mark on the variable valve timing control
(VTC) actuator and the punch mark on the exhaust
camshaft sproc
Charging System Indicator
Circuit Troubleshooting
1. Turn the ignition switch ON (II).
Does the charging system indicator come on?
YES-Go to step 2.
NO-Go to step 14.
2. Start the engine. Hold the engine speed at
2,000 rpm for 1 minute.
Does the charging system indicator go off? YES-Charging system indicator circuit
is OK. Go to the alternator
