Honda CR-V: Oil Pan Installation
1. Remove all of the old liquid gasket from the oil pan mating surfaces, bolts, and bolt holes.
2. Clean and dry the oil pan mating surfaces.
3. Apply liquid gasket, P/N 08717-0004,08718-0001, 08718-0003, or 08718-0009, evenly to the engine block mating surface of the oil pan and to the inner threads of the bolt holes. Install the component within 5 minutes of applying the liquid gasket.
NOTE:
- If you apply liquid gasket P/N 08718-0012, the component must be installed within 4 minutes.
- If too much time has passed after applying the liquid gasket, remove the old liquid gasket and residue, then reapply new liquid gasket.
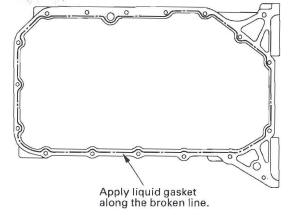
4. Install the oil pan.
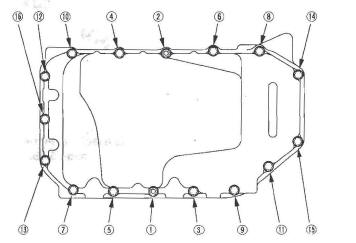
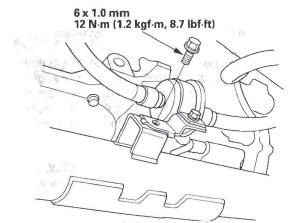
5. Tighten the bolts in two or three steps. In the final step, tighten all bolts, in sequence, to 12 N*m (1.2 kgf*m, 8.7 Ibf*ft). Wipe off the excess liquid gasket on the each side of crankshaft pulley and drive plate.
NOTE:
- Wait at least 30 minutes before filling the engine with oil.
- Do not run the engine for at least 3 hours after installing the oil pan.
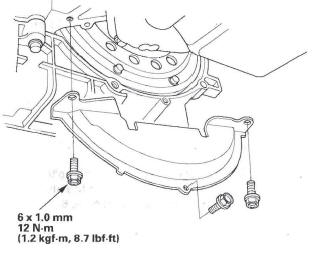
6. Install the torque converter cover.
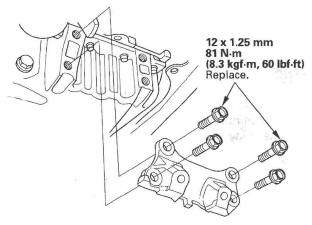
7. Install the lower torque rod bracket.
8. If the engine is still in the vehicle, do steps 9 through 30.
9.. Using the subframe adapter and a jack, raise the subframe up to body (see step 15).
10. Loosely install the new 14 x 1.5 mm bolts (see step 16).
11. Align all reference marks on the front subframe with the body, then tighten the bolts on the front subframe to the specified torque (see step 17).
12. Tighten the new subframe mounting bolts on both side (see step 18).
13. Lower the vehicle on the lift.
14. Loosen the upper torque rod mounting bolt (see step 6).
15. Raise the vehicle on the lift to full height.
16. Install the lower torque rod, then tighten the new lower torque rod mounting bolts in the numbered sequence shown (see step 19).
17. Lower the vehicle on the lift.
18. Tighten the upper torque rod mounting bolt (see step 20).
19. Install the automatic transmission fluid (ATF) filter.
20. Install the bolts securing the left steering gearbox mounting bracket (see step 25).
21. Install the bolts securing the right steering gearbox mounting bracket (see step 26).
22. Install the power steering (P/S) fluid line bracket, and secure the hose with the hose clamps.
23. Install the propeller shaft.
24. Install a new set ring on the end of each driveshaft, then install the driveshafts. Make sure each ring "Clicks" into place in the differential and intermediate shaft.
25. Connect the lower arms to the knuckles.
26. Install the shift cable.
27. Install the three way catalytic converter (TWC). Use new gaskets and new self-locking nuts. Connect the air fuel ratio (A/F) sensor connector and secondary heated oxygen sensor (secondary HO2S) connector (see step 32).
28. Install the splash shield (see step 34).
29. Install the front wheels.
30. Check the wheel alignment.
Transmission End Crankshaft Oil Seal Installation - In Car
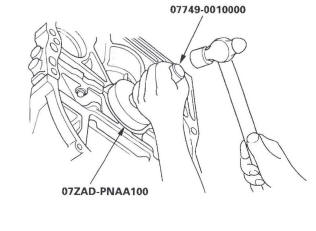
Special Tools Required
- Driver 07749-0010000
- Oil seal driver attachment 96 mm 07ZAD-PNAA100
1. Remove the transmission.
2. Remove the drive plate.
3. Clean and dry the crankshaft oil seal housing.
4. Use the driver and attachment to drive a new oil seal squarely into the block to the specified installed height.
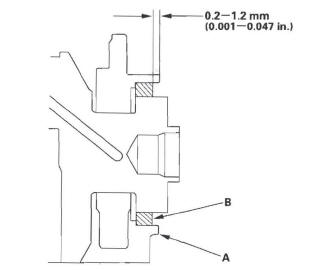
5. Measure the distance between the engine block (A) and oil seal (B).
Oil Seal Installed Height: 0.2-1.2 mm (0.001-0.047 in.)
6. Install the drive plate.
7. Install the transmission.
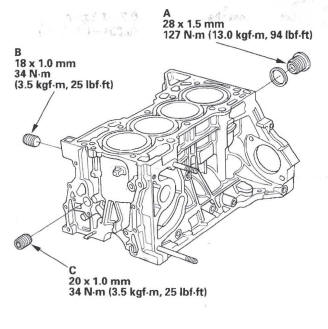
Sealing Bolt Installation
NOTE: When installing the sealing bolt (A), always use a new washer (except the bolts (B) and (C) ).
READ NEXT:
 Engine Lubrication
Special Tools
Oil Filter Wrench
Component Location Index
OIL PAN
WASHER
DRAIN BOLT
OIL PUMP
OIL PUMP CHAIN
GUIDE
OIL PUMP CHAIN
TENSIONER
OIL CONTROL ORIFICE
OIL FIL
Low Oil Pressure Indicator Circuit
Troubleshooting (Open)
1. Connect the Honda Diagnostic System (HDS) to the
data link connector (DLC) (see step 2).
2. Turn the ignition switch ON (II).
3. Make sure the HDS communicates with the vehicle
and the powertrain
Oil Pump Overhaul
Exploded View
Oil Pump Removal
1. Turn the crankshaft pulley so its top dead center
(TDC) mark (A) lines up with the pointer (B).
2. Remove the oil pan.
3. Remove and discard the oil pump chain ten
SEE MORE:
Horns
Component Location Index
HORN
HORN SWITCH
HORN RELAY CIRCUIT
(Built into the MICU)
CABLE REEL
UNDER-DASH FUSE/RELAY BOX
Circuit Diagram
Horn Switch Test
1. Remove the steering column covers.
2. Disconnect the dashboard wire harness 20P
connector (A) from the cable reel (B).
3. Usin
DTC P0451: FTP Sensor Range/Performance
Problem
NOTE:
Before you troubleshoot, record all freeze data and any on-board
snapshot, and review the general troubleshooting information.
If DTC P2422 is stored at the same time as DTC P0451,
troubleshoot DTC P2422 first, then recheck for DTC
P0451.
1. Turn the ignition switch ON (II).
2. Clear
