Honda CR-V: Camshaft Inspection
NOTE: Do not rotate the camshaft during inspection.
1. Remove the rocker arm assembly.
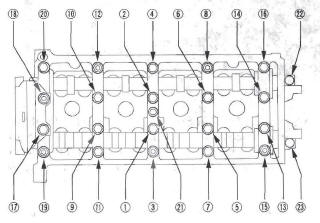
2. Put the rocker shaft holders, camshaft, and camshaft holders on the cylinder head, then tighten the bolts, in sequence, to the specified torque.
NOTE: If the engine does not have bolt 21, skip it and continue the torque sequence.
Specified Torque
8 x 1.25 mm
22 N*m (2.2 kgf*m, 16 Ibf*ft)
6x 1.0mm
12 N*m (1.2 kgf*m, 8.7 Ibf*ft)
6 x 1.0 mm Bolts: 21, 22, 23
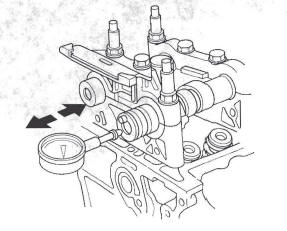
3. Seat the camshaft by pushing it away from the camshaft pulley end of the cylinder head.
4. Zero the dial indicator against the end of the camshaft, then push the camshaft back and forth, and read the end play. If the end play is beyond the service limit, replace the cylinder head and recheck.
If it is still beyond the service limit, replace the camshaft.
Camshaft End Play
Standard (New): 0.05-0.20 mm (0.002-0.008 in.)
Service Limit: 0.4 mm (0.02 in.)
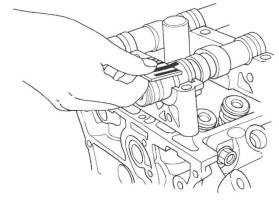
5. Unscrew the camshaft holder bolts two turns at a time, in a crisscross pattern. Then remove the camshaft holders from the cylinder head.
6. Lift the camshafts out of the cylinder head, wipe them clean, then inspect the lift ramps. Replace the camshaft if any lobes are pitted, scored, or excessively worn.
7. Clean the camshaft journal surfaces in the cylinder head, then set the camshafts back in place. Place a plastigage strip across each journal.
8. Install the camshaft holders, then tighten the bolts to the specified torque as shown in step 2.
9. Remove the camshaft holders. Measure the widest portion of plastigage on each journal.
- If the camshaft-to-holder clearance is within limits, go to step 11.
- If the camshaft-to-holder clearance is beyond the service limit, and the camshaft has been replaced, replace the cylinder head.
- If the camshaft-to-holder clearance is beyond the service limit, and the camshaft has not been replaced, go to step 10.
Camshaft-to-Holder Oil Clearance
Standard (New):
No.1 Journal: 0.030-0.069 mm
(0.001-0.003 in.)
No.2, 3, 4, 5 Journals: 0.060-0.099 mm
(0.002-0.004 in.)
Service limit: 0.15 mm (0.006 in.)
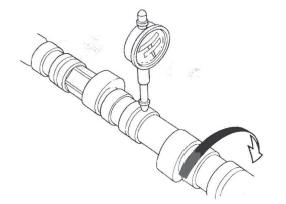
10. Check the total runout with the camshaft supported on V-blocks.
- If the total runout of the camshaft is within the service limit, replace the cylinder head.
- If the total runout is beyond the service limit, replace the camshaft, and recheck the camshaft-to-holder oil clearance. If the oil clearance is still beyond the service limit, replace the cylinder head.
Camshaft Total Runout
Standard (New): 0.03 mm (0.001 in.) max.
Service limit: 0.04 mm (0.002 in.)
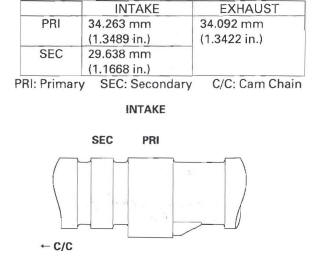
11. Measure cam lobe height.
Cam Lobe Height Standard (New):
READ NEXT:
 Valve, Spring, and Valve Seal Removal
Special Tools Required
Valve spring compressor attachment 07757-PJ1010A
Identify the valves and valve springs as they are
removed so that each item can be reinstalled in its
original position.
1. Rem
Valve, Spring, and Valve Seal Installation
Special Tools Required
Stem seal driver 07PAD-001 0000
Valve spring compressor attachment 07757-PJ1010A
1. Coat the valve stems with engine oil. Install the
valves in the valve guides.
2. Check t
Cylinder Head Installation
1. Install a new coolant separator in the engine block
whenever the engine block is replaced.
2. Clean the cylinder head and block surface.
3. Install the new cylinder head gasket (A) and dowel
pins
SEE MORE:
Warranty Coverages
U.S. Owners
Your new vehicle is covered by these
warranties:
New Vehicle Limited Warranty - covers your new vehicle, except for
the battery, emissions control
systems, and accessories against
defects in materials and
workmanship.
Emissions Control Systems Defects
Warranty and Emission
TripMeter
This meter shows the number of
miles (U.S.) or kilometers (Canada)
driven since you last reset it.
There are two trip meters: Trip A
and Trip B. Switch between these
displays by pressing the select/reset
knob repeatedly.
Each trip meter works independently,
so you can keep track of two
