Honda CR-V: Valve, Spring, and Valve Seal Removal
Special Tools Required
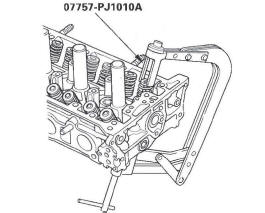
Valve spring compressor attachment 07757-PJ1010A Identify the valves and valve springs as they are removed so that each item can be reinstalled in its original position.
1. Remove the cylinder head.
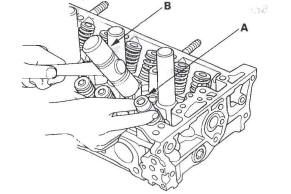
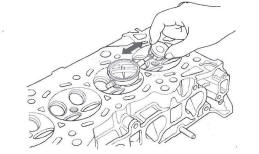
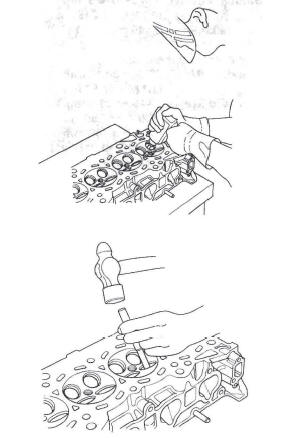
2. Using an appropriate-sized socket (A) and plastic mallet (B), lightly tap the valve retainer to loosen the valve cotters.
3. Install the valve spring compressor. Compress the spring, and remove the valve cotters.
4. Remove the special tool, then remove the valve retainer and valve spring.
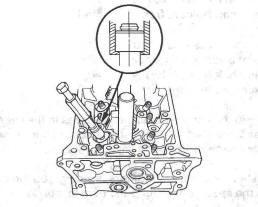
5. Install the valve guide seal remover.
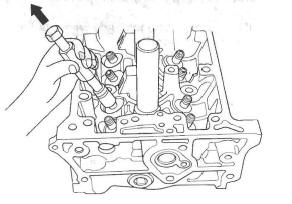
6. Remove the valve seal.
Valve Inspection
1. Remove the valves.
2. Measure the valve in these areas.
Intake Valve Dimensions
A Standard (New): 34.85-35.15 mm
(1.372-1.384 in.)
B Standard (New); 108.7-109.5 mm
(4.280-4.311 in.)
C Standard (New): 5.475-5.485 mm
(0.2156-0.2159 in.)
C Service Limit: 5.445 mm (0.214 in.)
Exhaust Valve Dimensions
A Standard (New): 29.85-30.15 mm
(1.175-1.187 in.)
B Standard (New); 108.3-109.1 mm
(4.264-4.295 in.)
C Standard (New): 5.450-5.460 mm
(0.2146-0.2150 in.)
C Service limit: 5.42 mm (0.213 in.)
Valve Stem-to-Guide Clearance Inspection
1. Remove the valves.
2. Slide the valve out of its guide about 10 mm (0.39 in.), then measure the guide-to-stem clearance with a dial indicator while rocking the stem in the direction of normal thrust (wobble method).
- If the measurement exceeds the service limit, recheck it using a new valve.
- If the measurement is now within the service limit, reassemble using a new valve.
- If the measurement with a new valve still exceeds the service limit, go to step 3.
Intake Valve Stem-to-Guide Clearance
Standard (New); 0.06-0.11 mm
(0.002-0.004 in.)
Service Limit: 0.16 mm (0.006 in.)
Exhaust Valve Stem-to-Guide Clearance
Standard (New): 0.11-0.16 mm
(0.004-0.006 in.)
Service Limit: 0.22 mm (0.009 in.)
3. Subtract the O.D. of the valve stem, measured with a micrometer, from the I.D. of the valve guide, measured with an inside micrometer or ball gauge.
Take the measurements in three places along the valve stem and three places inside the valve guide.
The difference between the largest guide measurement and the smallest stem measurement should not exceed the service limit.
Intake Valve Stem-to-Guide Clearance
Standard (New): 0.030-0.055 mm
(0.0012-0.0022 in.)
Service limit: 0.08 mm (0.003 in.)
Exhaust Valve Stem-to-Guide Clearance
Standard (New): 0.055-0.080 mm
(0.0022-0.0031 in.)
Service Limit: 0.11 mm (0.004 in.)
Valve Guide Replacement
Special Tools Required
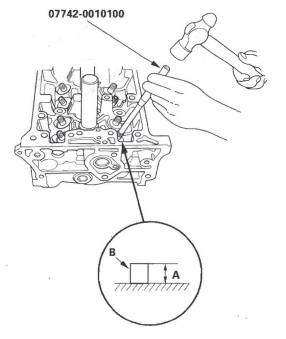
- Valve guide driver, 5.5 mm 07742-0010100
- Valve guide reamer, 5.5 mm 07HAH-PJ7 A 100
1. Inspect the valve stem-to-guide clearance.
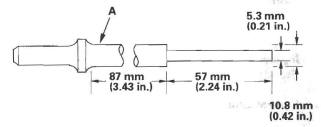
2. As illustrated, use a commercially available air-impact valve guide driver (A) modified to fit the diameter of the valve guides. In most cases, the same procedure can be done using the special tool and a conventional hammer.
3. Select the proper replacement guides, and chill them in the freezer section of a refrigerator for about an hour.
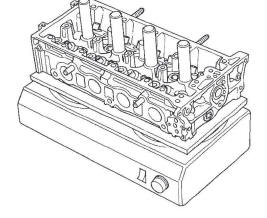
4. Use a hot plate or oven to evenly heat the cylinder head to 300 ºF (150 ºC). Monitor the temperature with a cooking thermometer. Do not get the head hotter than 300 ºF (150 ºC); excessive heat may loosen the valve seats.
5. Working from the camshaft side, use the driver and an air hammer to drive the guide about 2 mm (0.1 in.) towards the combustion chamber. This will knock off some of the carbon and make removal easier. Hold the air hammer directly in line with the valve guide to prevent damaging the driver.
6. Turn the head over, and drive the guide out toward the camshaft side of the head.
7. If a valve guide won't move, drill it out with a 8 mm (5/16 in.) bit, then try again. Drill guides only in extreme cases; you could damage the cylinder head if the guide breaks.
8. Take out the new guide(s) from the freezer, one at a time, as you need them.
9. Apply a thin coat of clean engine oil to the outside of the new valve guide. Install the guide from the camshaft side of the head; use the 5.5 valve guide driver to drive the guide in to the specified installed height (A) of the guide (B). If you have all 16 guides to do, you may have to reheat the head.
Valve Guide Installed Height
Intake: 15.2-16.2 mm (0.598-0.638 in.)
Exhaust: 15.5-16.5 mm (0.610-0.650 in.)
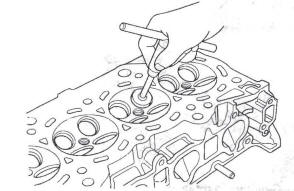
10. Coat both reamer and the valve guide with cutting oil.
11. Rotate the reamer clockwise to the full length of the valve guide bore.
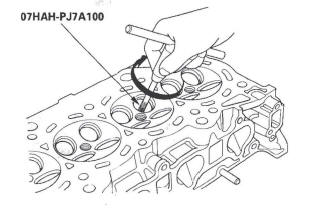
12. Continue to rotate the reamer clockwise while removing it from the bore.
13. Thoroughly wash the guide in detergent and water to remove any cutting residue.
14. Check the clearances with a valve.
Verify that a valve slides into the intake and exhaust valve guides without getting stuck.
Valve Seat Reconditioning
1. Inspect the valve stem-to-guide clearance. If the valve guides are worn, replace them before cutting the valve seats.
2. Renew the valve seats in the cylinder head using a valve seat cutter.
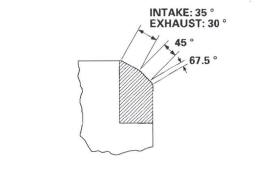
3. Carefully cut a 45 º seat, removing only enough material to ensure a smooth and concentric seat.
4. Bevel the upper and lower edges at the angles shown in the illustration.
Check the width of the seat and adjust accordingly.
5. Make one more very light pass with the 45 º cutter to remove any possible burrs caused by the other cutters.
Valve Seat Width
Standard (New): 1.25-1.55 mm (0.049-0.061 in.)
Service Limit: 2.00 mm (0.079 in.)
6. After resurfacing the seat, inspect for even valve seating. Apply Prussian Blue compound (A) to the valve face. Insert the valve in its original location in the head, then lift it and snap it closed against the seat several times.
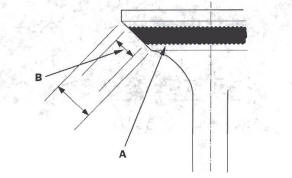
7. The actual valve seating surface (B), as shown by the blue compound, should be centered on the seat.
- If it is too high (closer to the valve stem), you must make a second cut with the 67.5 º cutter to move it down, then one more cut with the 45 º cutter to restore seat width.
- If it is too low (close to the valve edge), you must make a second cut with the 35 º cutter (intake side) or the 30 º cutter (exhaust side) to move it up, then make one more cut with the 45 º cutter to restore seat width.
NOTE: The final cut should always be made with the 45 º cutter.
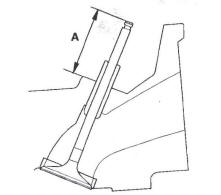
8. Insert the intake and exhaust valves in the head, and measure valve stem installed height (A).
Intake Valve Stem Installed Height
Standard (New): 44.0-44.5 mm (1.73-1.75 in.)
Service limit: 44.7 mm (1.76 in.)
Exhaust Valve Stem Installed Height
Standard (New): 44.1-44.6 mm (1.74-1.76 in.)
Service Limit: 44.8 mm (1.76 in.).
9. If valve stem installed height is beyond the service limit, replace the valve and recheck. If it is still beyond the service limit, replace the cylinder head; the valve seat in the head is too deep.
READ NEXT:
 Valve, Spring, and Valve Seal Installation
Special Tools Required
Stem seal driver 07PAD-001 0000
Valve spring compressor attachment 07757-PJ1010A
1. Coat the valve stems with engine oil. Install the
valves in the valve guides.
2. Check t
Cylinder Head Installation
1. Install a new coolant separator in the engine block
whenever the engine block is replaced.
2. Clean the cylinder head and block surface.
3. Install the new cylinder head gasket (A) and dowel
pins
Engine Block
Special Tools
Oil Seal Driver Attachment, 96 mm
Driver
Component Location Index
BAFFLE PLATE
LOVER BLOCK
DOWEL PINS
CRANKSHAFT OIL SEAL,
TRANSMISSION END
THRUST WASHERS
SEE MORE:
Self-diagnostic Function
Without Navigation
The audio system has a self-diagnostic function. To run the self-diagnostic
function, do the following:
How to check for audio system condition
NOTE: The audio unit must be in the code enter screen before doing the
self-diagnostic function.
1. Turn the ignition switch to the AC
Rear Window Replacement
NOTE:
Put on gloves to protect your hands.
Wear eye protection when removing the glass with
piano wire.
Use seat covers to avoid damaging any surfaces.
Do not damage the rear window defogger grid lines
and terminals.
1. Remove these items:
Tailgate lower trim panel
High mount brake light
