Honda CR-V: Valve, Spring, and Valve Seal Installation
Special Tools Required
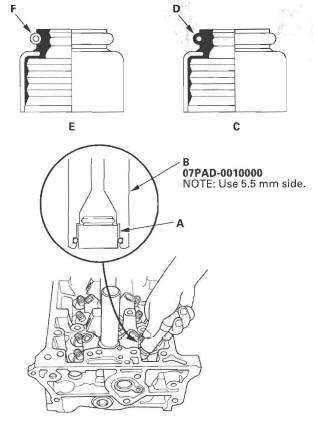
- Stem seal driver 07PAD-001 0000
- Valve spring compressor attachment 07757-PJ1010A
1. Coat the valve stems with engine oil. Install the valves in the valve guides.
2. Check that the valves move up and down smoothly.
3. Install the spring seats on the cylinder head.
4. Install the new valve seals (A) using the valve guide seal installer (B).
NOTE: The exhaust valve seal (C) has a black spring (D), and the intake valve seal (E) has a white spring (F). They are not interchangeable.
5. Install the valve spring and valve retainer. Place the end of the valve spring with the closely wound coils toward the cylinder head.
6. Install the valve spring compressor. Compress the spring, and install the valve cotters.
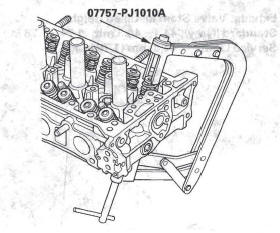
7. Remove the valve spring compressor.
8. Lightly tap the end of each valve stem two or three times with a plastic mallet (A) to ensure proper seating of the valve and valve keepers. Tap the valve stem only along its axis so you do not bend the stem.

Rocker Arm Assembly Installation
1. Reassemble the rocker arm assembly.
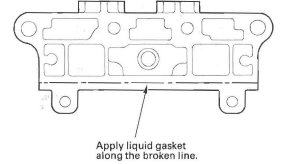
2. Clean and dry the No.5 rocker shaft holder mating surface.
3. Apply liquid gasket, P/N 08717-0004,08718-0001, 08718-0003, or 08718-0009, evenly to the cylinder head mating surface of the No. 5 rocker shaft holder. Install the component within 5 minutes of applying the liquid gasket.
NOTE:
- If you apply liquid gasket P/N 08718-0012, the component must be installed within 4 minutes.
- If too much time has passed after applying the liquid gasket, remove the old liquid gasket and residue, then reapply new liquid gasket.
4. Insert the bolts (A) into the rocker shaft holder, then install the rocker arm assembly (B) on the cylinder head.
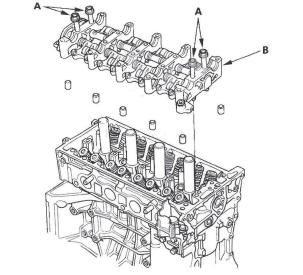
5. Remove the bolts from the rocker shaft holder.
6. Make sure the punch marks on the variable valve timing control (VTC) actuator and exhaust camshaft sprocket are facing up, then set the camshafts (A) in the holder.
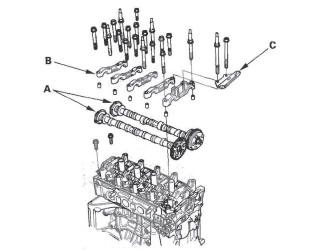
7. Set the camshaft holders (B) and cam chain guide B (C) in place.
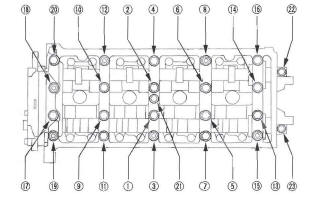
8. Tighten the bolts to the specified torque.
NOTE: If the engine does not have bolt 21, skip it and continue the torque sequence.
Specified Torque
8 x 1.25 mm
22 N*m (2.2 kgf*m, 16 Ibf*ft)
6x 1.0mm
12 N*m (1.2 kgf*m, 8.7 Ibf*ft)
6 x 1.0 mm Bolts: 21, 22, 23
9. Install the cam chain, and adjust the valve clearance.
READ NEXT:
 Cylinder Head Installation
1. Install a new coolant separator in the engine block
whenever the engine block is replaced.
2. Clean the cylinder head and block surface.
3. Install the new cylinder head gasket (A) and dowel
pins
Engine Block
Special Tools
Oil Seal Driver Attachment, 96 mm
Driver
Component Location Index
BAFFLE PLATE
LOVER BLOCK
DOWEL PINS
CRANKSHAFT OIL SEAL,
TRANSMISSION END
THRUST WASHERS
Connecting Rod and Crankshaft End Play
Inspection
1. Remove the oil pump.
2. Remove the baffle plates (see step 7).
3. Measure the connecting rod end play with a feeler
gauge between the connecting rod and crankshaft.
Connecting Rod End Play
Standa
SEE MORE:
Cowl Cover Replacement
Special Tools Required
KTC trim tool set SOJATP2014 *
* Available through the American Honda Tool and
Equipment Program; call 888-424-6857
NOTE:
Put on gloves to protect your hands.
Take care not to scratch the cowl cover and body.
Use the appropriate tool from the KTC trim tool set to
avoid da
Wiper Blades
Check the condition of the wiper
blades at least every six months.
Replace them if you find signs of
cracking in the rubber, areas that are
getting hard, or if they leave streaks
and unwiped areas when used.
To replace a front wiper blade:
1. Raise each wiper arm off the
windshield, l
