Honda CR-V: Dual Temperature Control
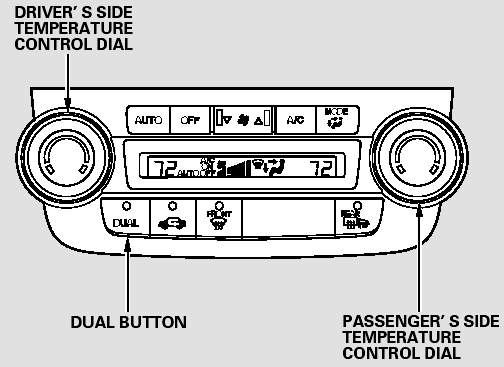
EX-L model only
The temperatures of the driver’s side and the front passenger’s side can be controlled independently when the indicator in the DUAL button is on.
To adjust the driver’s side, turn the driver’s side temperature control dial on the climate control panel. To adjust the passenger’s side, turn the passenger’s side temperature control dial.
Temperature Control
Push AUTO or
 . The selected
temperatures appear in the display.
. The selected
temperatures appear in the display.
When the indicator in the DUAL button is off, you can adjust both sides to the same temperature by adjusting the driver’s temperature control dial.
To set the driver’s side temperature to a different value than the passenger’s side, press the DUAL button, then turn the temperature control dial on the control panel. To set the passenger’s side to a different value than the driver’s side, turn the passenger’s side temperature control dial. You can adjust the passenger’s side without pressing the DUAL button first.
When you set the temperature to its lower limit or its upper limit, it will be displayed as ‘‘Lo’’ or ‘‘Hi’’.
READ NEXT:
 Climate Control Sensors
Sunlight and Temperature Sensors
The climate control systemhas two
sensors: a sunlight sensor on top of
the dashboard, and a temperature
and humidity sensor next to the
steering column. D
Audio System
An audio system is standard on all
models. Read the appropriate pages
(as shown below) to use your
vehicle’s audio system.
Audio System
Playing the AM/FM Radio (LX model)
Playing the AM/FM Radio (LX model)
SEE MORE:
Upper Arm Replacement
1. Raise the rear of the vehicle, and support it with safety stands in the
proper locations.
2. Remove the rear wheel.
3. Place a floor jack under the trailing arm, and
support the suspension.
4. Remove the wheel sensor harness bracket (A) from
the upper arm (B).
5. Remove the flange bolts (A),
Airbags
Your vehicle has a supplemental
restraint system (SRS) with front
airbags to help protect the heads and
chests of the driver and a front seat
passenger during a moderate to
severe frontal collision.
Your vehicle also has side airbags to
help protect the upper torso of the
driv
