Honda CR-V: Cylinder Head Installation
1. Install a new coolant separator in the engine block whenever the engine block is replaced.

2. Clean the cylinder head and block surface.
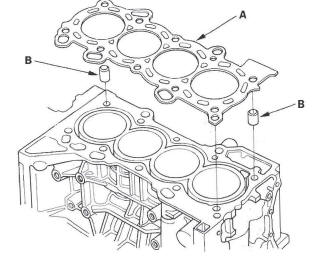
3. Install the new cylinder head gasket (A) and dowel pins (B) on the engine block. Always use a new cylinder head gasket.
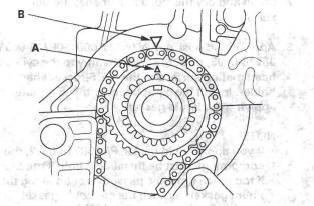
Set the crankshaft to top dead center (TDC). Align the TDC mark (A) on the crankshaft sprocket with the pointer (B) on the engine block.
5. Install the cylinder head on the block.
6. Measure the diameter of each cylinder head bolt at point A and point B.
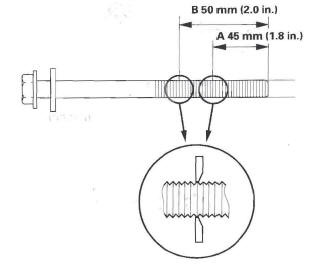
7. If either diameter is less than 10.6 mm (0.42 in.), replace the cylinder head bolt.
8. Apply engine oil to the threads and under the bolt heads of all cylinder head bolts.
9. Use a beam-type torque wrench. When using a preset-type torque wrench, be sure to tighten slowly and do not overtighten. If a bolt makes any noise while you are torquing it, loosen the bolt and retighten it from the first step.
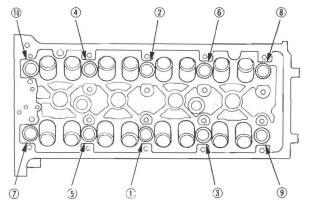
10. After torquing, tighten all cylinder head bolts in two steps (90 º per step). If you are using a new cylinder head bolt, tighten the bolt an extra 90 º.
NOTE: Remove the cylinder head bolt if you tightened it beyond the specified angle, and go back to step 6 of the procedure. Do not loosen it back to the specified angle.
11. Install the rocker arm assembly.
12. Install the cam chain.
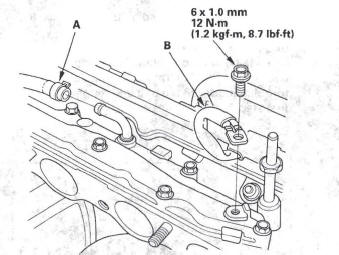
13. Connect the engine wire harness connectors, and install the wire harness clamps to the cylinder head.
- Four fuel injector connectors
- Engine coolant temperature (ECT) sensor 1 connector
- Camshaft position (CMP) sensor A (Intake) connector
- Camshaft position (CMP) sensor B (Exhaust) connector
- Rocker arm oil control solenoid connector
- Rocker arm oil pressure switch connector
- EVAP canister purge valve connector
- Exhaust gas recirculation (EGR) valve connector
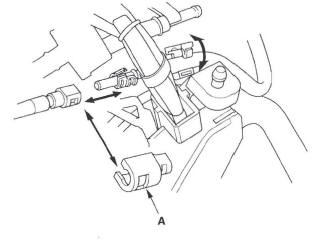
14. Install the bolt (A) securing the connecting pipe.
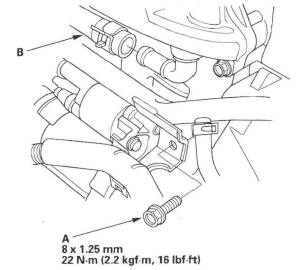
15. Install the water bypass hose (B).
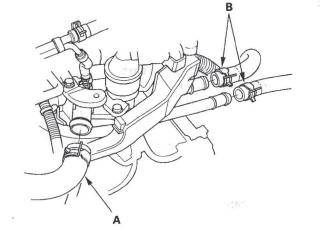
16. Install the upper radiator hose (A) and heater hoses (B).
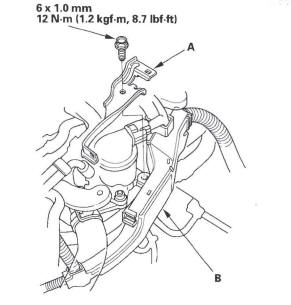
17. Install the harness holder bracket (A), then install the harness holder (B).
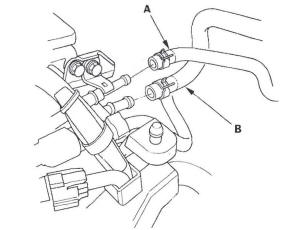
18. Install the positive crankcase ventilation (PCV) hose (A) and ground cable (B).
19. Connect the fuel feed hose, then install the quick-connect fitting cover (A).
20. Install the evaporative emission (EVAP) canister hose (A) and brake booster vacuum hose (B).
21. Install the exhaust manifold.
22. Install the intake manifold.
23. Install the drive belt.
24. Install the air cleaner housing.
25. After installation, check that all tubes, hoses and connectors are installed correctly.
26. Inspect for fuel leaks. Turn the ignition switch ON (II) (do not operate the starter) so the fuel pump runs for about 2 seconds and pressurizes the fuel line. Repeat this operation two or three times, then check for fuel leakage at any point in the fuel line.
27. Refill the radiator with engine coolant, and bleed the air from the cooling system with the heater valve open (see step 6).
28. Inspect the idle speed.
29. Inspect the ignition timing.
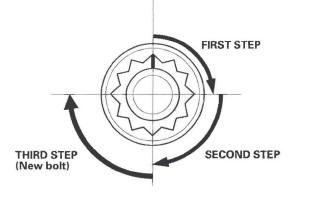
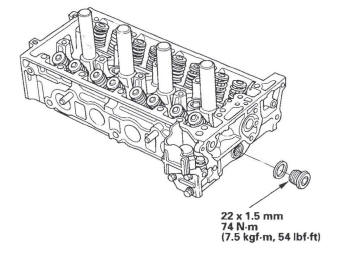
Sealing Bolt Installation
NOTE: When installing the sealing bolt, always use a new washer.
READ NEXT:
 Engine Block
Special Tools
Oil Seal Driver Attachment, 96 mm
Driver
Component Location Index
BAFFLE PLATE
LOVER BLOCK
DOWEL PINS
CRANKSHAFT OIL SEAL,
TRANSMISSION END
THRUST WASHERS
Connecting Rod and Crankshaft End Play
Inspection
1. Remove the oil pump.
2. Remove the baffle plates (see step 7).
3. Measure the connecting rod end play with a feeler
gauge between the connecting rod and crankshaft.
Connecting Rod End Play
Standa
Connecting Rod Bearing Replacement
Rod Bearing Clearance Inspection
1. Remove the oil pump.
2. Remove the baffle plates (see step 7).
3. Remove the connecting rod cap and bearing half.
4. Clean the crankshaft rod journal and bearing
SEE MORE:
Text Data Display Function
Each time you press the TITLE
button, the display shows you the
text, if the disc was recorded with
text data.
You can see the album, artist, and
track name in the display. If a disc is
recorded in MP3 or WMA, you can
see the folder and file name, and the
artist, album, and track tag.
If You Get Stuck
Avoid driving on soft sand, deep mud,
or other surfaces where you could
get stuck. If you do happen to get
stuck because of inclement weather
or other conditions, choose a safe
and appropriate course of action.
You should never use a jack to try
getting unstuck. A jack only works
on f
