Honda CR-V: VTC Actuator, Exhaust Camshaft Sprocket Replacement
Removal
1. Remove the cam chain.
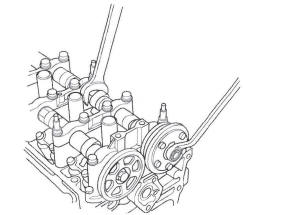
2. Hold the camshaft with an open-end wrench, then loosen the variable valve timing control (VTC) actuator mounting bolt and exhaust camshaft sprocket mounting bolt.
3. If the VTC actuator will be reused, do these steps.
- Remove the intake camshaft, and seal the advance holes and retard holes in the No.1 camshaft journal with tape (see step 6).
- Punch a hole in the tape over one of the advance holes (see step 7).
- Apply air to the advance hole to release the lock (see step 8).
- Remove the tape and adhesive residue from the camshaft journal.
4. Remove the VTC actuator and exhaust camshaft sprocket.
Installation
1. Install the VTC actuator and exhaust camshaft sprocket.
NOTE: Install the VTC actuator to unlock position.
2. Apply engine oil to the threads of the VTC actuator mounting bolt and exhaust camshaft mounting bolt, then install them.
3. Hold the camshaft with an open-end wrench, then tighten the bolts.
Specified Torque
VTC Actuator Mounting Bolt:
12 x 1.25 mm
113 N*m (11.5 kgf*m, 83 Ibf*ft)
Exhaust Camshaft Sprocket Mounting Bolt:
10 x 1.25 mm
72 N*m (7.3 kgf*m, 53Ibf*ft)
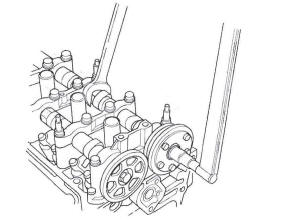
4. Hold the camshaft, and turn the VTC actuator clockwise until you hear it click. Make sure to lock the VTC actuator by turning it.
5. Install the cam chain.
Cylinder Head Inspection for Warpage
1. Remove the cylinder head.
2. Inspect the camshaft.
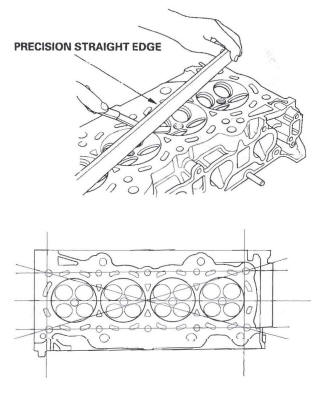
3. Check the cylinder head for warpage. Measure along the edges, and three ways across the center.
- If warpage is less than 0.05 mm (0.002 in.) cylinder head resurfacing is not required.
- If warpage is between 0.05 mm (0.002 in.) and 0.2 mm (0.008 in.), resurface the cylinder head.
- Maximum resurface limit is 0.2 mm (0.008 in.) based on a height of 104 mm (4.09 in.).
Cylinder Head Height
Standard (New): 103.95-104.05 mm (4.093-4.096 in.)
Rocker Arm Assembly Removal
1. Remove the cam chain.
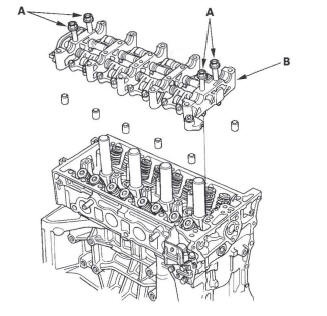
2. Loosen the rocker arm adjusting screws (A).
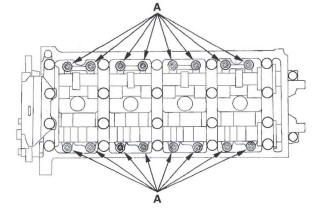
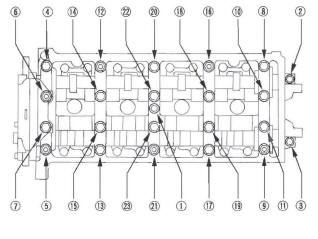
3. Remove the camshaft holder bolts. To prevent damaging the camshafts, unscrew the bolts, in sequence, two turns at a time.
NOTE: Bolt CD is not on all engines.
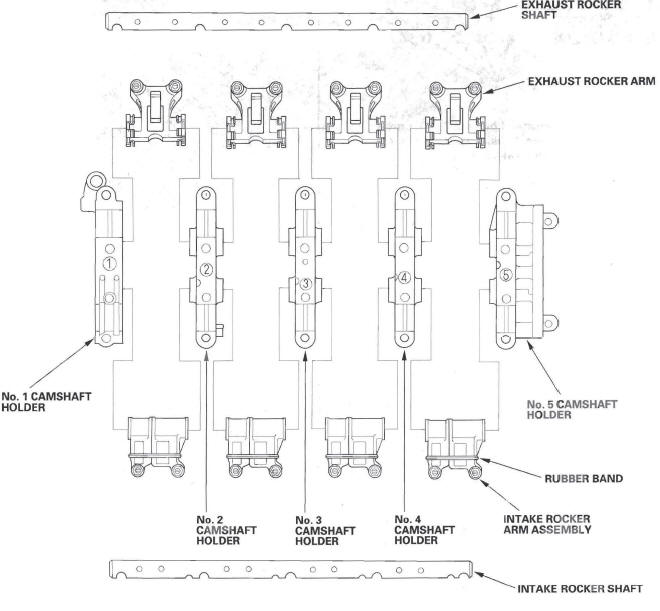
4. Remove cam chain guide B, camshaft holders, and camshafts.
5. Insert the bolts (A) into the rocker shaft holder, then remove the rocker arm assembly (B).
Rocker Arm and Shaft Disassembly/Reassembly
NOTE:
- Identify each part as it is removed so that each item can be reinstalled.
- Inspect the rocker arm shaft and rocker arms.
- If reused, the rocker arms must be installed in the same positions.
- When removing, or installing the rocker arm assembly, do not remove the camshaft holder bolts. The bolts will keep the holders and rocker arms on the shaft.
- Prior to reassembling, clean all the parts in solvent, dry them, and apply lubricant to any contact points.
- Bundle the intake rocker arms with rubber bands to keep them together as a set.
- When replacing the intake rocker arm assembly, remove the fastening hardware from the new intake rocker arm assembly.
Rocker Arm and Shaft Inspection
1. Remove the rocker arm assembly.
2. Disassemble the rocker arm assembly.
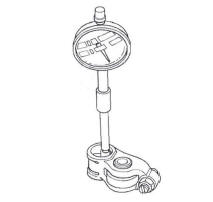
3. Measure the diameter of the shaft at the first rocker location.
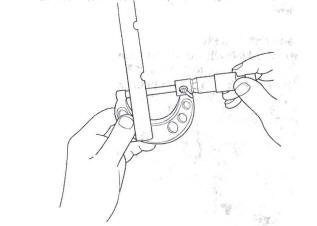
4. Zero the gauge (A) to the shaft diameter.
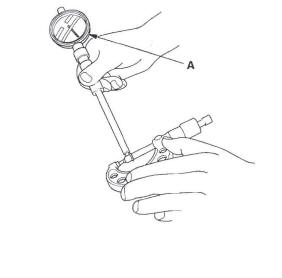
5. Measure the inside diameter of the rocker arm, and check it for an out-of-round condition.
Rocker Arm-to-Shaft Clearance
Standard (New):
Intake: 0.025-0.052 mm
(0.0010-0.0020 in.)
Exhaust: 0.018-0.056 mm
(0.0007-0.0022 in.)
Service limit: 0.08 mm (0.003 in.)
6. Repeat for all rocker arms and both shafts. If the clearance is beyond the service limit, replace the rocker shaft and all out of service limit rocker arms.
If any VTEC rocker arm needs replacement, replace the rocker arms (primary and secondary), as a set.
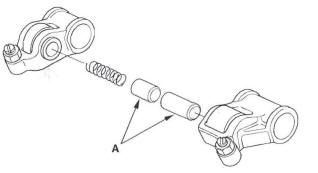
7. Inspect the rocker arm pistons (A). Push on each piston manually. If it does not move smoothly, replace the rocker arm set.
NOTE: Apply oil to the pistons when reassembling.
8. Install the rocker arm assembly.
READ NEXT:
 Camshaft Inspection
NOTE: Do not rotate the camshaft during inspection.
1. Remove the rocker arm assembly.
2. Put the rocker shaft holders, camshaft, and
camshaft holders on the cylinder head, then tighten
the bolts, i
Valve, Spring, and Valve Seal Removal
Special Tools Required
Valve spring compressor attachment 07757-PJ1010A
Identify the valves and valve springs as they are
removed so that each item can be reinstalled in its
original position.
1. Rem
Valve, Spring, and Valve Seal Installation
Special Tools Required
Stem seal driver 07PAD-001 0000
Valve spring compressor attachment 07757-PJ1010A
1. Coat the valve stems with engine oil. Install the
valves in the valve guides.
2. Check t
SEE MORE:
A FewWordsAbout Safety
Your safety, and the safety of others,
is very important. And operating this
vehicle safely is an important
responsibility.
To help you make informed
decisions about safety, we have
provided operating procedures and
other information on labels and in
this manual. This information aler
Unlocking the Tailgate
If the power door lock system cannot
unlock the tailgate, unlock it
manually.
Place a cloth on the top side of the
cover to prevent scratches, then use
a small flat-tip screwdriver to remove
the cover on the back of the tailgate.
Push the release lever to the lower
right as sho
