Honda CR-V: Transmission Mount Replacement
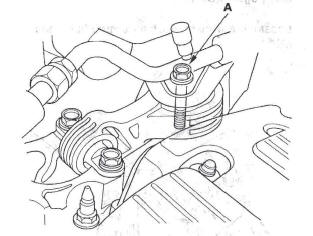
1. Loosen the upper torque rod mounting bolt (A).
2. Remove the air cleaner housing assembly.
3. Remove the powertrain control module (PCM) cover, then remove the three bolts securing the PCM.
4. Remove the PCM bracket.
5. Support the transmission with a jack and wood block under the transmission.
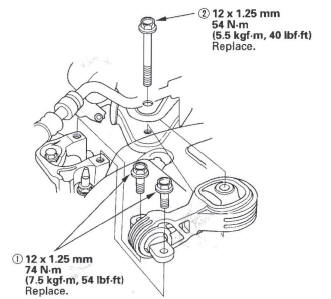
6. Remove the transmission mount stiffener (A) and transmission mount (B).
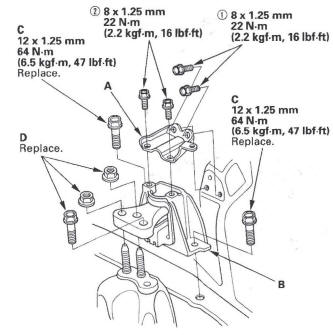
7. Install the transmission mount with the new mounting bolts (C), then install the transmission mount stiffener, and tighten the mounting bolts in the numbered sequence shown.
8. Loosely tighten the new bolt and nuts (D).
9. Raise the lift to full height.
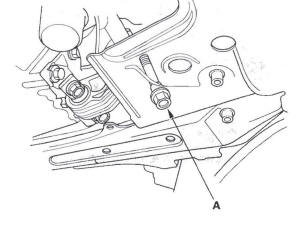
10. Loosen the lower torque rod mounting bolt (A).
11. Lower the vehicle on the lift.
12. Tighten the transmission mounting bolt and nuts.
13. Raise the lift to full height.
14. Tighten the lower torque rod mounting bolt.
15. Lower the vehicle on the lift.
16. Tighten the upper torque rod mounting bolt.
17. Install the PCM bracket.
18. Install the PCM, then install the PCM cover.
19. Install the air cleaner housing assembly.
Lower Torque Rod Replacement
1. Loosen the upper torque rod mounting bolt (A).
2. Raise the lift to full height.
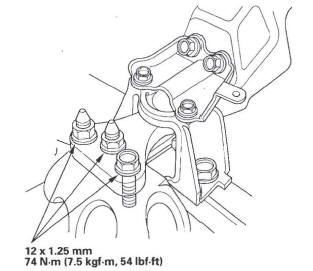
3. Remove the lower torque rod.

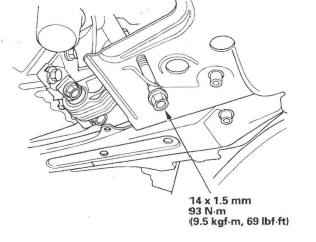
4. Install the lower torque rod, then tighten the new lower torque rod mounting bolts in the numbered sequence shown.
5. Lower the vehicle on the lift.
6. Tighten the upper torque rod mounting bolt.
Upper Torque Rod Replacement
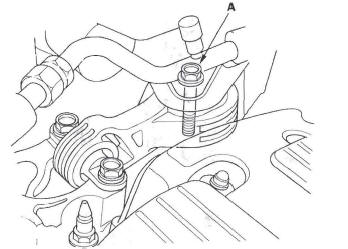
1. Remove the upper torque rod (A).
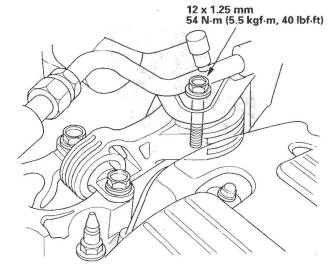
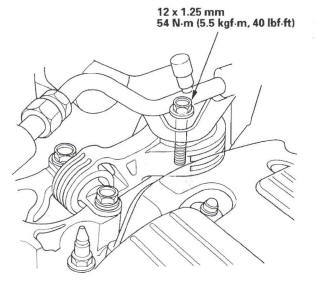
2. Install the upper torque rod, then tighten the new bolts in the numbered sequence shown.
READ NEXT:
 Side Engine Mount Bracket Replacement
1. Support the engine with a jack and wood block
under the oil pan.
2. Remove the upper torque rod.
3. Remove the ground cable (A), then remove the side
engine mount bracket (B).
4. Install the sid
Cylinder Head
Special Tools
Air Pressure Regulator
Valve Guide Reamer, 5.5 mm
Socket, 19 mm
Holder Handle
Adjuster
Locknut Wrench
Stem Seal Driver
VTEC Air Adapter
VTEC Air Stopper
Air Joint Adapter
C
Engine Compression Inspection
NOTE: After this inspection, you must reset the
powertrain control module (PCM), otherwise the PCM
will continue to stop the injectors from functioning.
Select PCM reset using the Honda Diagnostic Sy
SEE MORE:
Replacing Tires andWheels
Replace your tires with radial tires of
the same size, load range, speed
rating, and maximum cold tire
pressure rating (as shown on the
tire’s sidewall).
Mixing radial and bias-ply tires on
your vehicle can reduce braking
ability, traction, and steering
accuracy. Using tires of a di
Reporting Safety Defects (U.S. Vehicles)
If you believe that your vehicle has a
defect which could cause a crash or
could cause injury or death, you
should immediately inform the
National Highway Traffic Safety
Administration (NHTSA) in addition
to notifying American Honda Motor
Co., Inc.
If NHTSA receives similar complaints
