Honda CR-V: Stabilizer
Stabilizer Link Removal/Installation
1. Raise the front of the vehicle, and support it with safety stands in the proper locations.
2. Remove the front wheel.
3. Remove the flange nuts while holding the respective joint pin (A) with a hex wrench (B), then remove the stabilizer link (C).
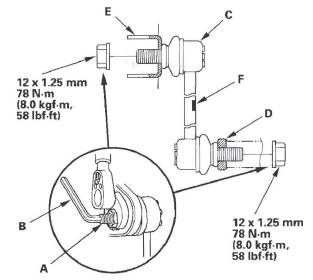
4. Install the stabilizer link on the stabilizer bar (D) and the damper (E) with the joint pins set at the center of their range of movement.
NOTE: The stabilizer link has a paint mark (F). Align the paint mark on the stabilizer link facing inward.
5. Install the flange nuts, and lightly tighten them.
6. Place a jack under the lower arm, and raise the suspension to load it with the vehicle's weight.
7. Tighten the flange nuts to the specified torque value while holding the respective joint pin with a hex wrench.
8. Clean the mating surface of the brake disc and the inside of the wheel, then install the rear wheel.
Stabilizer Bar Replacement
Special Tools Required
- Universal eyelet 07AAK-SNAA120
- Front subframe adapter VSB02C000016 *
- Engine support hanger, A and Reds AAR-T-12566 *
* Available through the American Honda Tool and Equipment program 888-424-6857
1. Raise the front of the vehicle, and support it with safety stands in the proper locations.
2. Remove the front wheels.
3. Disconnect both stabilizer links from the stabilizer bar.
4. Remove the under-cowl cover.
5. Attach the universal eyelet to the cylinder head.
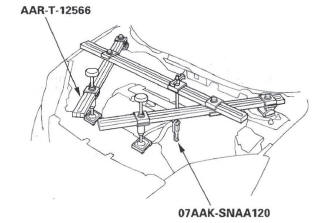
6. Install the engine support hanger (AAR-T-12566) to the vehicle, and attach the hook to the universal eyelet.
7. Attach the front subframe adapter (A) to the front subframe (B) by hanging the hook of the special tool over the front of the subframe, then tighten the special tool screw.
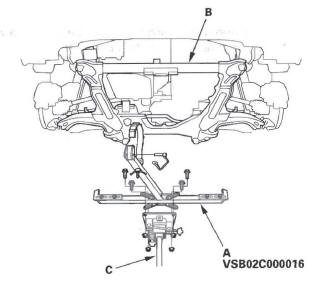
8. Raise the jack (C) and line up the slots in the arms with the bolt holes on the corner of the jack base, then attach them with bolts securely.
9. Loosen the front subframe front mounting bolt (A) on the right and left of the vehicle so they are about 30 mm (1 3/16 in.) from the mounting surface.
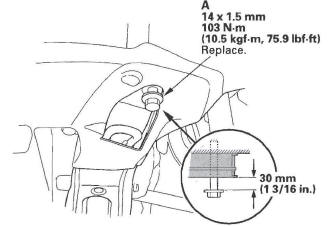
10. Support the front subframe securely by raising the special tool, then loosen the 14 mm special bolts (A) so they are about 30 mm (1 3/16 in.) from the mounting surface.
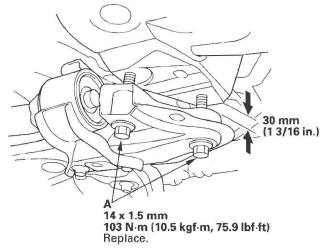
11. Lower the jack supporting the front subframe with the special tool slowly until the front subframe has dropped about 30 mm (1 3/16 in.).
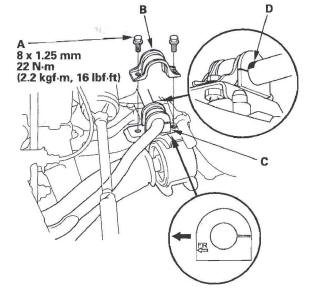
12. Remove the flange bolts (A) and bushing holders (B), then remove the bushings (C).
NOTE: During installation align the paint marks (D) on the stabilizer bar with the sides of the bushings.
13. Install the stabilizer bar in the reverse order of removal, and note these items:
- Note the right and left direction of the stabilizer bar.
- Align the paint marks on the stabilizer bar with the sides of the bushings.
- Note the fore/aft direction of the bushing holders.
- Raise the front subframe up with the jack and special tool until it contacts the body frame, then tighten the mounting bolts to the specified torque.
- Refer to Stabilizer Link Removal/Installation to connect the stabilizer bar to the links.
- Check the front wheel alignment. and adjust it if necessary.
READ NEXT:
 Damper/Spring
Damper/Spring Removal and Installation
Removal
1. Turn the ignition switch ON (II), then turn on the
windshield wipers. Turn the ignition switch off
when the wipers are near the A-pillars.
2. Raise
Knuckle/Hub Bearing Unit Replacement
Exploded View
Hub Bearing Unit Replacement
1. Raise the rear of the vehicle, and support it with safety stands in the
proper locations.
2. Remove the wheel nuts (A) and the rear wheel.
3. Remove t
SEE MORE:
DTC P2122: Accelerator Pedal Position (APP)
Sensor A (Throttle Position Sensor D) Circuit
Low Voltage Input
NOTE: Before you troubleshoot, record all freeze data and any on-board
snapshot, and review General Troubleshooting Information.
1. Clear the DTC with the HDS.
2. Turn the ignition switch ON.
3. Check whether DTC P2122 is indicated in the DTCs/
Freeze Data in PGM-FI Mode Menu with the HDS.
Is D
Steering Gearbox Overhaul
Exploded View
Special Tools Required
Cylinder end seal remover attachment
070AF-S7S0100
Valve seal ring sizing tool 07NAG-SR3090A
Sleeve seal ring guide 07YAG-S2X0100
Sleeve seal ring sizing tool, 36 mm 07ZAG-S5A0100
Attachment, 28 x 30 mm 07946-1870100
Driver 07749-0010000
Piston seal ri
