Honda CR-V: Replacing Rear Bulbs

1. Open the tailgate. Place a cloth on the edge of the cover to prevent scratches. Remove the covers by carefully prying on the edge with a small flat-tip screwdriver.
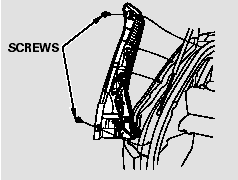
2. Use a Phillips-head screwdriver to remove the taillight assembly mounting screw under each cover.
3. Pull the taillight assembly out of the rear pillar.
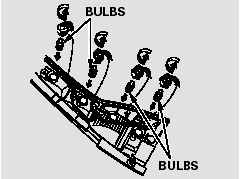
4. Determine which of the four bulbs is burned out: stop/taillight, backup light, turn signal, or side marker.
5. Remove the socket by turning it one-quarter turn counterclockwise.
6. Pull the bulb straight out of its socket. Push the new bulb straight into the socket until it bottoms.
7. Reinstall the socket into the light assembly by turning it clockwise until it locks.
8. Turn on the lights to make sure the new bulb is working.
9. Align the clips on the taillight assembly with the holes in the body, then push the taillight assembly into place. Tighten the two mounting screws securely and reinstall the covers.
READ NEXT:
 Replacing a High-mount Brake Light Bulb
1. Open the tailgate.
Unlatch the top of the cover by
pulling back on it with your hands.
2. Place a cloth on the side edge of
the cover to prevent scratches.
Remove the cover by carefully
Cleaning the Seat Belts
Dirt build-up in the loops of the seat
belt anchors can cause the belts to
retract slowly. Wipe the insides of
the loops with a clean cloth
dampened in mild soap and warm
water or isopropy
Floor Mats
The floor mats that came with your
vehicle hook over the floor mat
anchors. This keeps the floor mats
from sliding forward, possibly
interfering with the pedals, or
backwards, making the f
SEE MORE:
Crankshaft Installation
Special Tools Required
Driver 077 49-00 10000
Oil seal driver attachment, 96 mm 07ZAD-PNAA.100
1. Check the connecting rod bearing clearance with
plastigage.
2. Check the main bearing clearance with plastigage.
3. Install the bearing halves in the engine block and
connecting rods.
4. Apply a
To Remove Exterior Frost or Ice Fromthe Windows
1. Select
. The system
automatically switches to fresh air
mode and turns on the A/C.
The A/C indicator does not come
on if it was off to start with.
2. Select
.
3. Set the fan and temperature
controls to maximum level.
To clear the windows faster, you can
close the dashboard corner
