Honda CR-V: Replacing a Parking Light/Front Side Marker Light Bulb
Honda CR-V (2006–2011) Owner's Manual / Maintenance / Lights / Replacing a Parking Light/Front Side Marker Light Bulb
1. Open the hood.
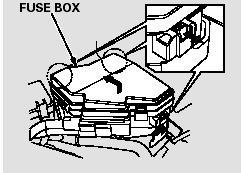
To change the parking light/front side marker on the driver’s side, remove the fuse box fromits stay by pulling out.
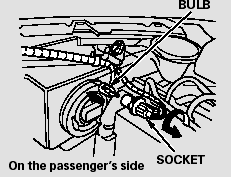
2. Remove the socket from the headlight assembly by turning it one-quarter turn counterclockwise.
3. Pull the bulb straight out of its socket. Push the new bulb straight into the socket until it bottoms.
4. Insert the socket back into the headlight assembly. Turn it clockwise to lock it in place.
5. Turn on the lights to make sure the new bulb is working.
6. (Driver’s side)
Reinstall the fuse box in place
securely.
READ NEXT:
 Replacing Rear Bulbs
1. Open the tailgate. Place a cloth on
the edge of the cover to prevent
scratches. Remove the covers by
carefully prying on the edge with a
small flat-tip screwdriver.
2. Use a Phillips-h
Replacing a High-mount Brake Light Bulb
1. Open the tailgate.
Unlatch the top of the cover by
pulling back on it with your hands.
2. Place a cloth on the side edge of
the cover to prevent scratches.
Remove the cover by carefully
Cleaning the Seat Belts
Dirt build-up in the loops of the seat
belt anchors can cause the belts to
retract slowly. Wipe the insides of
the loops with a clean cloth
dampened in mild soap and warm
water or isopropy
SEE MORE:
Owner’s Maintenance Checks
You should check the following
items at the specified intervals. If
you are unsure of how to perform
any check, turn to the appropriate
page listed.
Engine oil level - Check every
time you fill the fuel tank.
Engine coolant level - Check the
radiator reserve tank every time
you fill
Alternator and Regulator
Circuit Troubleshooting
1. Make sure the battery connections are good and
the battery is sufficiently charged.
2. Connect a VAT-40 (or equivalent tester), and turn
the selector switch to position 1 (starting).
3. Start the engine. Hold the engine speed at
3,000 rpm with no load until the radiator fan comes
on, then let i
© 2016-2026 Copyright www.hcrv.net
