Honda CR-V: Rear Seat
Rear Seat Armrest Removal/Installation
NOTE: Take care not to tear the seams or damage the seat covers.
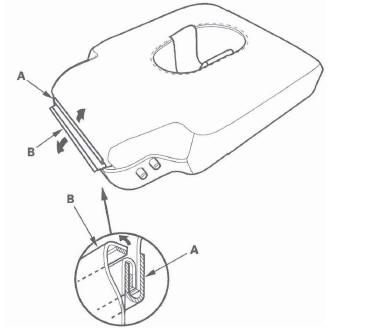
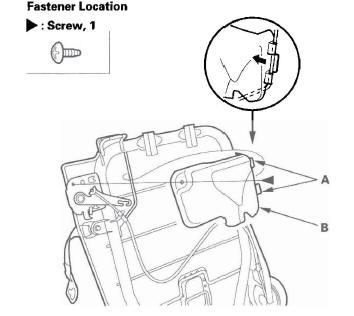
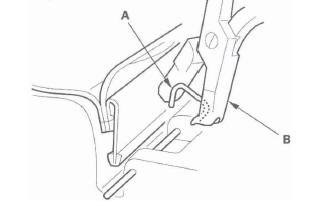
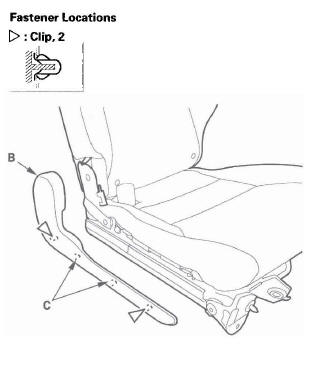
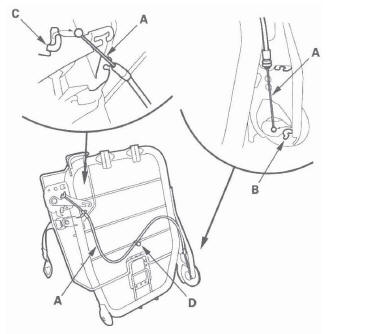
1. Remove the E-ring (A) from the right side portion on the armrest pivot.
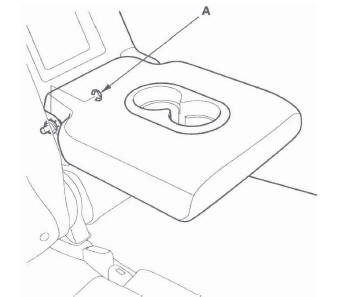
2. Slide the armrest (A) toward the right side, then release the left pivot shaft (B) from the bushing (C).
3. Release the right pivot shaft (A) from the bushing (B) by pulling the armrest back, and remove the armrest (C).
4. If necessary, remove the bushings from the frame both sides.
5. Install the armrest in the reverse order of removal.
Rear Seat Armrest Cover Replacement
Special Tools Required
KTC trim tool set SOJATP2014 *
* Available through the American Honda Tool and Equipment Program; call 888-424-6857
NOTE:
- Use the appropriate tool from the KTC trim tool set to avoid damage when prying components.
- Take care not to tear the seams or damage the seat covers.
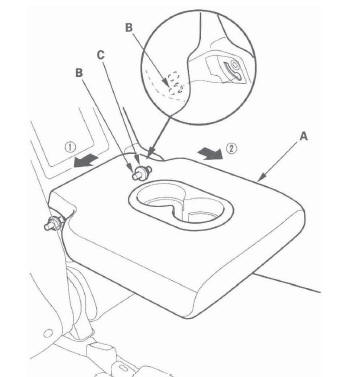
1. Remove the armrest.
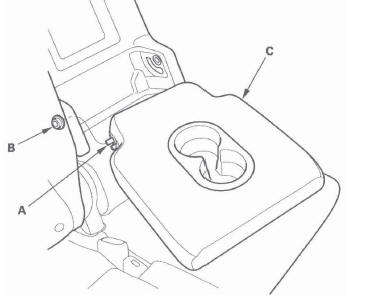
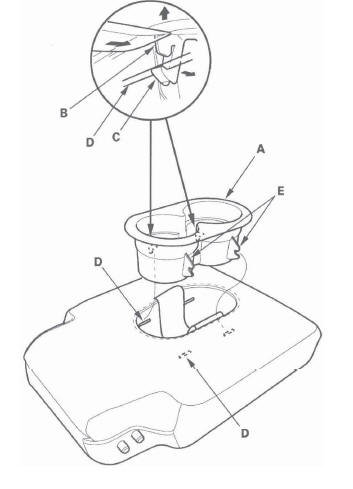
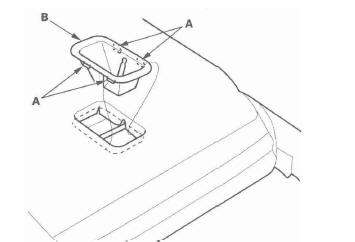
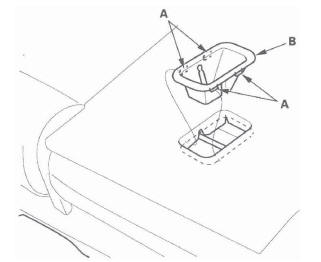
2. Remove the beverage holder (A).
- Using a trim tool, push on the bottom ribs (B) of the left side hooks (C) to pull up the holder, then release the hooks from the wire (D).
- Release the right side hooks (E) from the wire, then remove the holder.
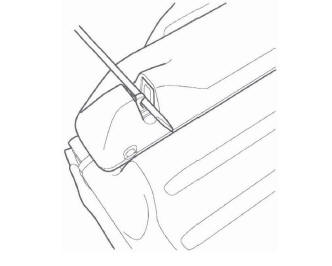
3. Release the hook (A), and pull back the edge of the armrest cover (B) all the way around, and remove it.
4. Install the cover in the reverse order of removal, and note these items:
- To prevent wrinkles, make sure the material is stretched evenly over the armrest before securing the hooks.
- Make sure the right side hooks are installed securely to the wire, then push down on the beverage holder and install the left side hooks into the wire securely.
Rear Seat Removal/Installation
NOTE:
- Put on gloves to protect your hands.
Take care not to tear the seams or damage the seat covers.
- Have an assistant help you when removing and installing the rear seat.
- Right rear seat is shown, and left rear seat is similar.
1. Remove the head restraints.
2. Fold the seat-back forward, and slide the rear seat backward fully.
3. Remove the front seat track end covers (A) from the front of both seat tracks.
4. Unlock the rear seat and tip it up, then remove the rear seat track end covers (A) from the back of both seat tracks.
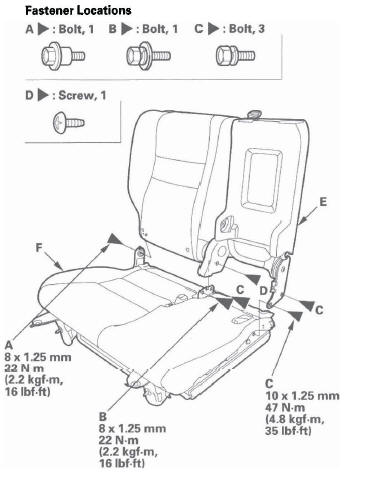
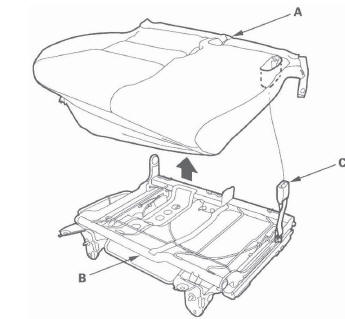
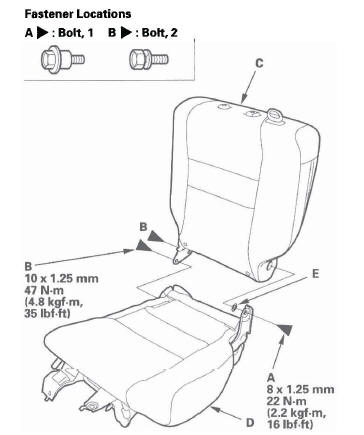
5. While holding the rear seat (A) up, remove the mounting bolts.
6. With the help of an assistant, remove the rear seat through the door opening.
7. Install the rear seat in the reverse order of removal.
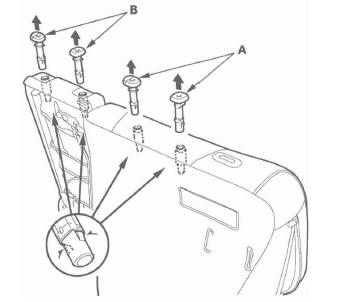
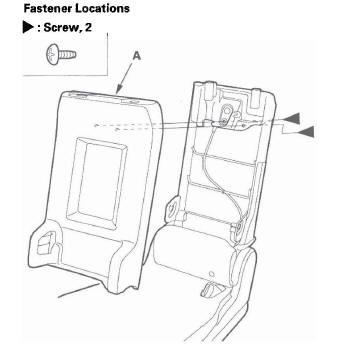
Right Rear Seat Cover Replacement
NOTE:
- Take care not to tear the seams or damage the seat covers.
- Put on gloves to protect your hands.
Seat-back Cover
1. Remove the right rear seat.
2. Remove the rear seat armrest.
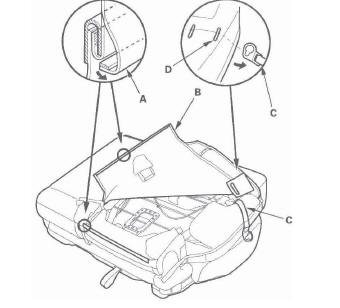
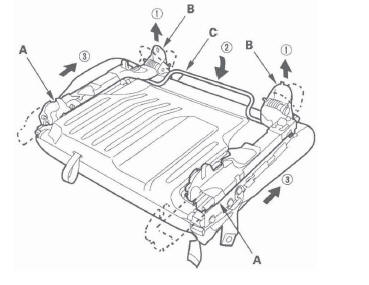
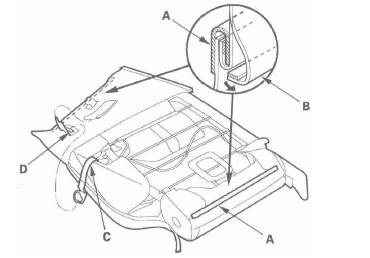
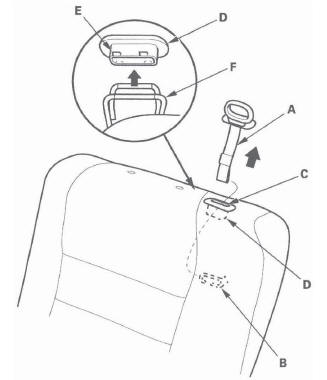
3. Release the hooks (A), then remove the tether anchor cover (B).
4. Release the bottom hook (A), unzip the seat-back cover (B), then fold back the cover. Pull the strap (C) secured on the seat-back frame inside the seat-back cover through the slot (D).
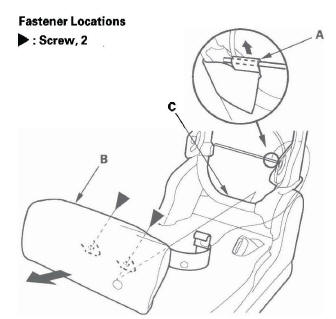
5. Pull back the edge of the rear center seat-back cover (A) all the way around, and release the hooks (B, C, D), then remove the back cover.
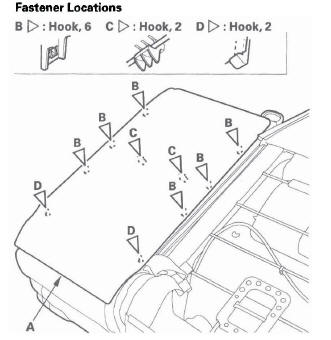
6. Release the hook strips (A), then pull the seat-back cover (B).
8. Pull out the right seat head restraint guides (A) and center seat head restraint guides (B) while pinching the end of the guides, and remove them.
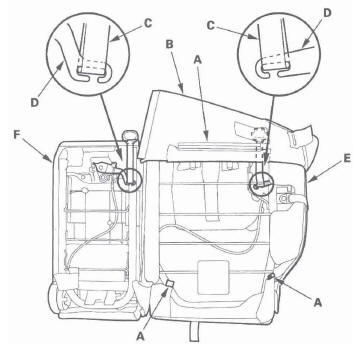
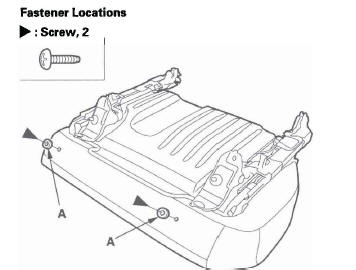
9. Remove the screws, and remove the center through trim (A) from the center seat-back frame.
10. Release the hook (A). Remove the screws, then remove the rear seat center lower (B) from the center seat-back frame (C).
11. Separate the rear seat-back and the rear seat cushion.
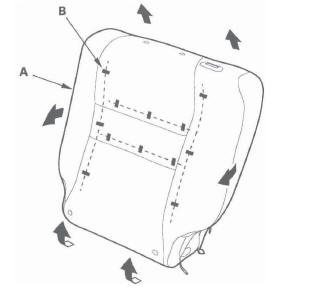
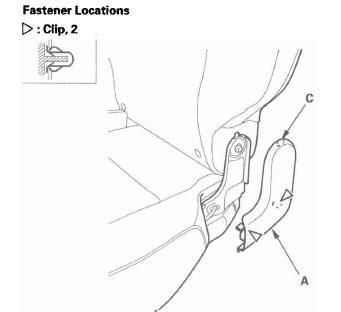
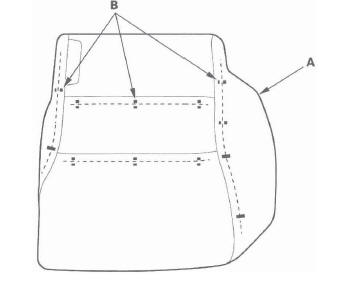
12. Pull back the edge of the seat-back cover (A) all the way around, and release the clips (B), then remove the seat-back cover.
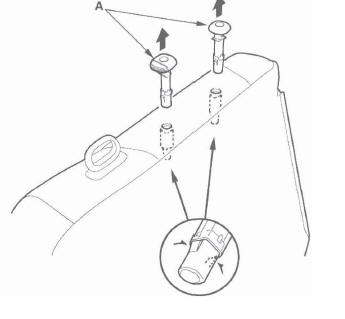
13. If necessary, remove the screw, then release the hooks (A), and remove the strap lever cover (B).
14. Install the cover in the reverse order of removal, and note these items:
- To prevent wrinkles when installing a seat-back cover, make sure the material is stretched evenly over the pad before securing the clips and hook strips.
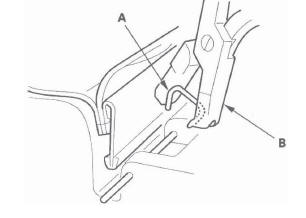
- Replace any clips (A) you removed with new ones. Install them with commercially available upholstery ring pliers (B).
Seat Cushion Cover
1. Remove the right rear seat.
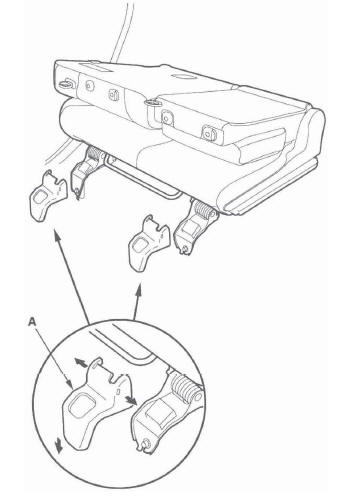
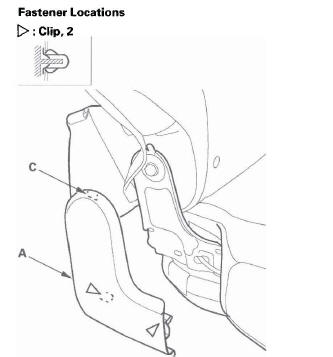
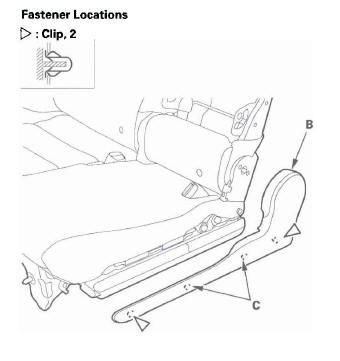
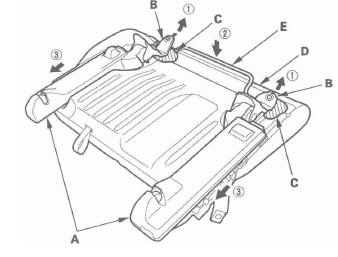
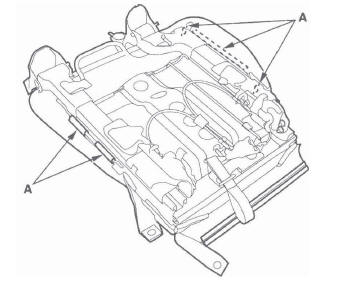
2. Gently pull out the right outer cover (A) and left outer cover (B) to detach the clips, and release the hooks (C), then remove the covers.
3. Remove the bolts (A, B, C) and screw (D) securing the seat-back (E) and seat cushion (F), then separate them.
4. To allow the seat cushion to slide, use a screwdriver to close the latch.
5. Slide both seat tracks (A) back fully.
- Raise both mounting brackets (B), and place shop towels (C) between the brackets and the bottom cover (D).
- Push the slide lever (E) down.
- Slide both seat tracks back fully, taking care not to let the mounting brackets scratch the bottom cover.
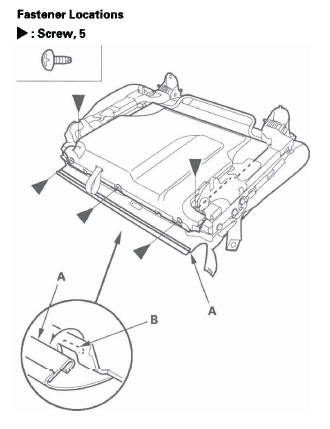
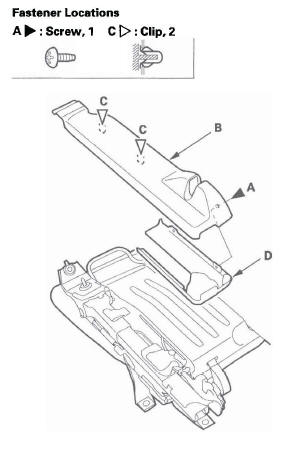
6. Remove the screw (A), then pull up the outer seat track cover (B) to detach the clips (C), and remove it.
Remove the outer seat track cover (D). The left seat track is shown, the right seat track is similar.

7. Remove the screws, then remove both dampers (A).
8. Slide both seat tracks (A) forward fully.
- Raise both mounting brackets (B), and hold them.
- Push the slide lever (C) down.
- While holding both mounting brackets, slide both seat tracks forward fully.
NOTE: While sliding both seat tracks, keep both mounting brackets raised securely so they do not spring back.
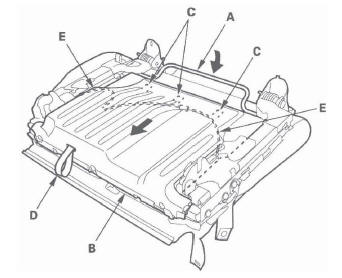
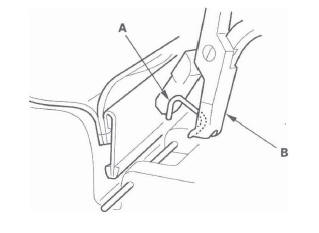
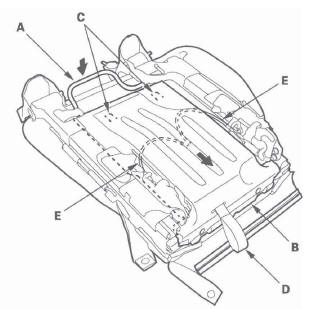
9. Pull back the rear edge of the seat cushion cover (A) to release it from the hooks (B), and remove the screws.
10. While pushing the slide lever (A) down, remove the undercover (B) by pulling it to release the hooks (C).
Pass the strap (D) through its slot, and pass both side cables (E) through the side slots in the cover.
Take care not to kink the cables.
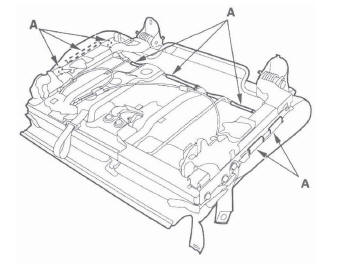
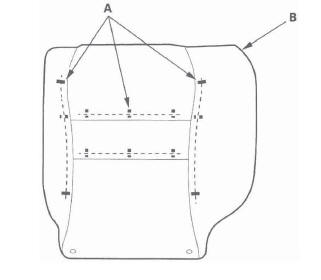
11. Release all of the hook strips (A).
12. Remove the rear seat belt buckle and center seat belt detachable anchor (see step 3).
13. Remove the seat cushion cover (A) with the seat cushion pad from the seat cushion frame (B). Pass the center seat belt buckle (C) through a hole in the seat cushion cover.
14. Pull back the edge of the seat cushion cover all the way around, and release the clips (A), then remove the seat cushion cover (B).

15. Install the cover in the reverse order of removal, and note these items:
- To prevent wrinkles when installing a seat-back cover, make sure the material is stretched evenly over the pad before securing the clips and hook strips.
- Replace any clips (A) you removed with new ones. Install them with commercially available upholstery ring pliers (B).

Left Rear Seat Cover Replacement
NOTE:
- Take care not to tear the seams or damage the seat covers.
- Put on gloves to protect your hands.
Seat-back Cover
1. Remove the left rear seat.
2. Separate the rear seat-back and the rear seat cushion (see step 3).
3. Release the hooks (A), then remove the tether anchor cover (B).
4. Release the bottom hook (A), unzip the seat-back cover (B), then fold back the cover. Pull the seatback strap (C) secured to the seat-back frame inside the seat-back cover through the slot (D).
5. Release the hook strips, then pull the seat-back cover.
6. Pull out the head restraint guides (A) while pinching the end of the guides, and remove them.
7. Release the strap (A) from the strap lever (B), then remove the strap out through the slot (C) in the strap guide (D). From the seat-back inside: Release the hooks (E) of the strap guide from the wire frame (F), then push out the strap guide.
8. Pull back the edge of the seat-back cover all the way around, and release the clips (A), then remove the seat-back cover (B).
9. Install the cover in the reverse order of removal, and note these items:
- To prevent wrinkles when installing a seat-back cover, make sure the material is stretched evenly over the pad before securing the clips and hook strips.
- Replace any clips (A) you removed with new ones. Install them with commercially available upholstery ring pliers (B).
Seat Cushion Cover
1. Remove the left rear seat.
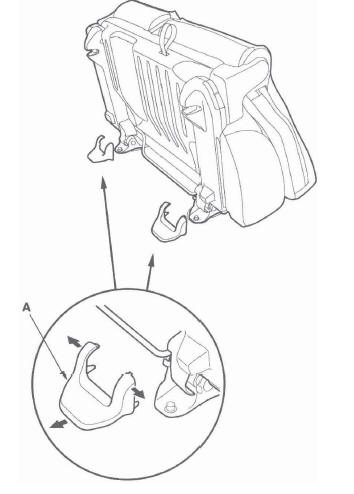
2. Gently pull out the left outer cover (A) and right outer cover (B), then detach the clips, and remove them by releasing the hooks (C).
3. Remove the bolts (A, B) securing the seat-back (C) and seat cushion (D), then separate them. If necessary, remove the bushing (E).
4. To allow the seat cushion to slide, use a screwdriver to close the latch.
5. Slide both seat tracks back fully (see step 5).
NOTE: While sliding the outer seat track, keep the outer mounting bracket raised securely so it does not spring back.
6. Remove the outer seat track cover (see step 6).
7. Remove the screw (A), then pull up the inner seat track cover (B) to detach the clips (C), and remove it.
Remove the inner seat track end cover (D).
8. Remove both dampers and both damper covers (see step 7).
9. Slide both seat tracks forward fully (see step 8).
NOTE: While sliding the outer seat track, keep the outer mounting bracket raised securely so it does not spring back.
10. Pull back the rear edge of the seat cushion cover (A) to release it from the hooks (B), and remove the screws.

11. While pushing the slide lever (A) down, remove the bottom cover (B) by pulling it to release the hooks (C). Pass the strap (D) through the slot, and pass both side cables (E) through the side slits in the cover. Take care not to kink the cables.
12. Release all of the hook strips (A).
13. Remove the seat cushion cover (A) with the seat cushion pad from the seat cushion frame (B). Pass the seat belt buckle (C) through the hole in the seat cushion cover.

14. Pull back the edge of the seat cushion cover (A) all the way around, and release the clips (B), then remove the cover.
15. Install the cover in the reverse order of removal, and note these items:
- To prevent wrinkles when installing a seat-back cover, make sure the material is stretched evenly over the pad before securing the clips and hook strips.
- Replace any clips (A) you removed with new ones. Install them with commercially available upholstery ring pliers (B).
Right Rear Seat-back Lock Control Cable Replacement
NOTE:
- Take care not to tear the seams or damage the seat covers.
- Put on gloves to protect your hands.
1. Remove the right rear seat.
2. Remove the right seat-back assembly from the seat cushion (see step 3).
3. Remove the tether anchor cover (see step 3).
4. Release the bottom hook, unzip the seat-back cover, then fold back the cover (see step 4).
5. Release the strap from the strap lever (see step 7).
6. Remove the head restraint guides (see step 8).
7. Remove the seat-back cover/pad from the frame (see step 12).
8. Remove the strap lever cover (see step 13).
9. Disconnect the seat-back control cable (A) from the inner recline adjuster (B) and the outer recline adjuster (C). Release the clamp (D), then remove the cable.
10. Install the cable in the reverse order of removal, and note these items:
- Replace the clamp you removed with a new one.
- To prevent wrinkles when installing a seat-back cover, make sure the material is stretched evenly over the pad before securing the hooks.
READ NEXT:
 Front Bumper
Front Bumper Removal/Installation
NOTE:
Have an assistant help you when removing and
installing the front bumper.
Take care not to scratch the front bumper and body.
Put on gloves to protect your
Rear Bumper
Rear Bumper Removal/Installation
NOTE:
Have an assistant help you when removing and
installing the rear bumper.
Take care not to scratch the rear bumper and body.
Put on gloves to protect your ha
SEE MORE:
DTC P1549: Charging System High Voltage
NOTE:
Before you troubleshoot, record all freeze data and any on-board
snapshot, and review the general troubleshooting information.
If a high voltage battery (24 V, etc.) is connected to
the vehicle, this DTC can be stored.
1. Turn the ignition switch ON (II).
2. Clear the DTC with the HDS.
DTC P0116: ECT Sensor 1 Range/Performance Problem
NOTE: Before you troubleshoot, record all freeze data
and any on-board snapshot, and review the general
troubleshooting information.
1. Turn the ignition switch ON (II).
2. Check ECT SENSOR 1 in the DATA LIST with the
HDS.
Is about 176 ºF (80 ºC) or more, or 0.78 V or less
indicated?
YES-Go to s
