Honda CR-V: Rear Bumper
Rear Bumper Removal/Installation
NOTE:
- Have an assistant help you when removing and installing the rear bumper.
- Take care not to scratch the rear bumper and body.
- Put on gloves to protect your hands.
1. Remove the rear splash guard.
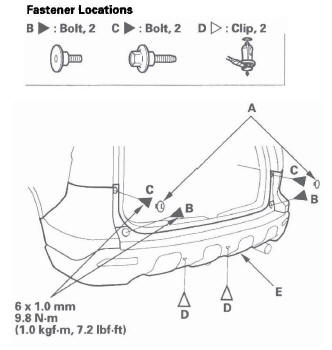
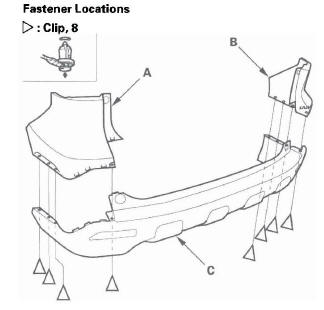
2. Remove the caps (A). Remove the bolts (B, C) and clips (D) securing the rear bumper (E).
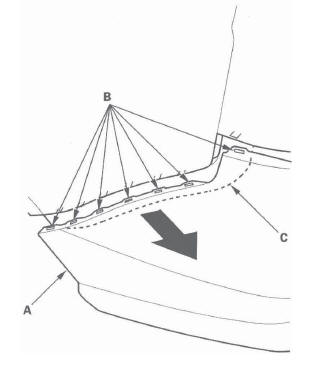
3. Pullan the rear bumper (A) at the wheel arch areas to release it from the hooks (B) on the side spacers (C).
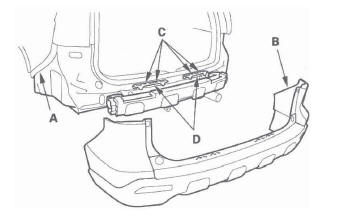
4. With the help of an assistant, while pulling the wheel arch portion away from the side spacer (A), pull the rear bumper (B) to release the bumper from the hooks (C) on the upper bracket (D).
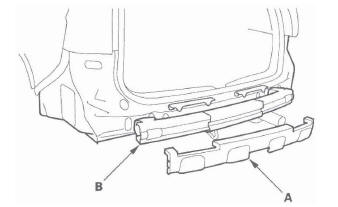
5. Remove the rear bumper absorber (A) from the rear bumper beam (B).
6. Install the bumper in the reverse order of removal, and note these items:
- Make sure the rear bumper engages the hooks (of both the side bracket and side spacers) on each side securely.
- Check if the clips are damaged or stress-whitened, and if necessary, replace them with new ones.
- Push the clips and hooks into place securely.
Rear Bumper Disassembly/Reassembly
NOTE: Take care not to scratch the bumper faces.
1. Remove the rear bumper.
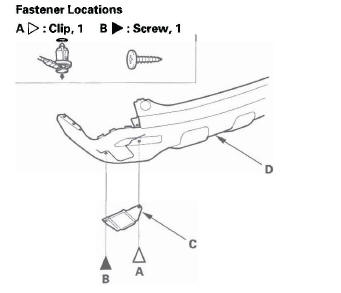
2. Remove the clips, then separate the left rear bumper face (A), right rear bumper face (B) and lower rear bumper face (C).
3. Remove the clip (A) and screw (B), then remove the rear bumper under trim (C) from the lower rear bumper face (D).
4. Reassemble the bumper faces in the reverse order of disassembly, and note these items:
- Check if the clips are damaged or stress-whitened, and if necessary, replace them with new ones.
- Push the clips and hooks into place securely.
Rear Bumper Reflector Replacement
NOTE:
- Take care not to scratch the rear bumper and body.
- Put on gloves to protect your hands.
1. Remove the rear bumper.
2. Release the hook (A), then remove the rear bumper reflector (B).

3. Reattach the hook to the rear bumper first, and push the clip into place securely.
READ NEXT:
 Hood
Hood
Hood Adjustment
1. Remove these items:
Front bulkhead cover
Front fender trim
Cowl cover
2. Slightly loosen each bolt (A).
3. Adjust the hood alignment in this sequence:
Adjust the hood right
Tailgate
Tailgate Adjustment
NOTE:
Have an assistant help you when adjusting the
tailgate.
Take care not to scratch the tailgate, body, and other
related parts.
Put on gloves to protect your hands.
1. R
Fuel Fill Door
Fuel Fill Door Adjustment
1. Remove the nut (A), then remove the open spring
(B).
2. Slightly loosen the hinge mounting bolts (A).
3. Adjust the fuel fill door (B) in or out until it's flush
with th
SEE MORE:
A FewWordsAbout Safety
Your safety, and the safety of others,
is very important. And operating this
vehicle safely is an important
responsibility.
To help you make informed
decisions about safety, we have
provided operating procedures and
other information on labels and in
this manual. This information aler
Brake System Indicator
The brake system indicator normally
comes on when you turn the ignition
switch to the ON (II) position, and as
a reminder to check the parking
brake. It will stay on if you do not
fully release the parking brake.
If the brake system indicator comes
on while driving, the brake fluid le
